.
QGIS GUI
When QGIS starts, you are presented with the GUI as shown in the figure (the numbers 1 through 5 in yellow circles are discussed below).
Figure QGIS GUI 1:
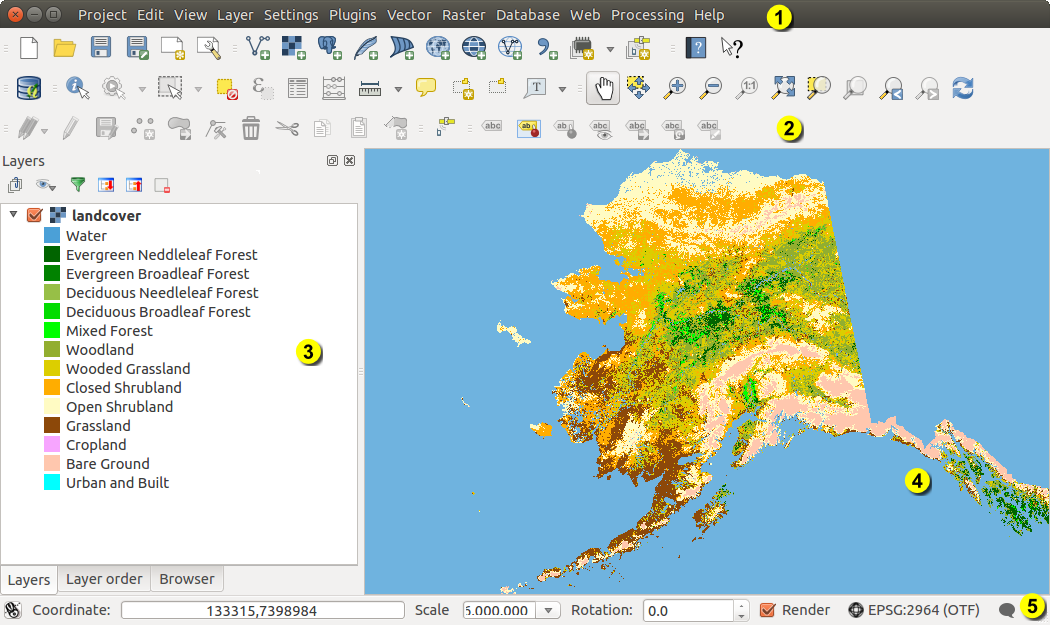
QGIS GUI with Alaska sample data 
Nota
L’aspetto delle finestre (barra del titolo, ecc.) potrà apparire diverso a seconda del sistema operativo e dell’ambiente desktop.
The QGIS GUI is divided into five areas:
Barra dei Menu
- Tool Bar
- Map Legend
Mappa
Barra di Stato
These five components of the QGIS interface are described in more detail in the following sections. Two more sections present keyboard shortcuts and context help.
Barra dei Menu
The menu bar provides access to various QGIS features using a standard hierarchical menu. The top-level menus and a summary of some of the menu options are listed below, together with the associated icons as they appear on the toolbar, and keyboard shortcuts. The shortcuts presented in this section are the defaults; however, keyboard shortcuts can also be configured manually using the Configure shortcuts dialog, opened from Settings ‣ Configure Shortcuts....
Anche se la maggior parte dei menu ha uno strumento corrispondente (e viceversa), i menu non sono organizzati come le barre degli strumenti. Gli strumenti contenuti in queste ultime infatti sono identificate con una casella di controllo nel menu corrispondente. Alcuni strumenti sono visibili solamente se il plugin corrispondente è attivo. Per maggiori informazioni sugli strumenti e sulle barre degli strumenti, vedi la sezione Barra degli Strumenti.
Progetto
Voce di Menu |
Scorciatoia |
Riferimento |
Barra degli Strumenti |
|---|---|---|---|
 New New |
Ctrl+N | vedi Progetti |
Progetto |
 Open Open |
Ctrl+O | vedi Progetti |
Progetto |
Nuovo da modello ‣ |
vedi Progetti |
Progetto |
|
| Open Recent ‣ | vedi Progetti |
||
 Save Save |
Ctrl+S | vedi Progetti |
Progetto |
 Save As... Save As... |
Ctrl+Shift+S | vedi Progetti |
Progetto |
 Save as Image... Save as Image... |
vedi Output |
||
| DXF Export ... | vedi Output |
||
 New Print Composer New Print Composer |
Ctrl+P | Progetto |
|
 Composer manager ... Composer manager ... |
Progetto |
||
Stampe ‣ |
|||
 Exit QGIS Exit QGIS |
Ctrl+Q |
Modifica
Voce di Menu |
Scorciatoia |
Riferimento |
Barra degli Strumenti |
|---|---|---|---|
 Undo Undo |
Ctrl+Z | Digitalizzazione avanzata |
|
 Redo Redo |
Ctrl+Shift+Z | Digitalizzazione avanzata |
|
 Cut Features Cut Features |
Ctrl+X | Digitalizzazione |
|
 Copy Features Copy Features |
Ctrl+C | Digitalizzazione |
|
 Paste Features Paste Features |
Ctrl+V | Digitalizzazione |
|
Incolla elementi come ‣ |
|||
 Add Feature Add Feature |
Ctrl+. | Digitalizzazione |
|
 Move Feature(s) Move Feature(s) |
Digitalizzazione |
||
 Delete Selected Delete Selected |
Digitalizzazione |
||
 Rotate Feature(s) Rotate Feature(s) |
Digitalizzazione avanzata |
||
 Simplify Feature Simplify Feature |
Digitalizzazione avanzata |
||
 Add Ring Add Ring |
Digitalizzazione avanzata |
||
 Add Part Add Part |
Digitalizzazione avanzata |
||
 Fill Ring Fill Ring |
Digitalizzazione avanzata |
||
 Delete Ring Delete Ring |
Digitalizzazione avanzata |
||
 Delete Part Delete Part |
Digitalizzazione avanzata |
||
 Reshape Features Reshape Features |
Digitalizzazione avanzata |
||
 Offset Curve Offset Curve |
Digitalizzazione avanzata |
||
 Split Features Split Features |
Digitalizzazione avanzata |
||
 Split Parts Split Parts |
Digitalizzazione avanzata |
||
 Merge Selected Features Merge Selected Features |
Digitalizzazione avanzata |
||
| Merge Attr. of Selected Features |
Digitalizzazione avanzata |
||
 Node Tool Node Tool |
Digitalizzazione |
||
| Rotate Point Symbols |
Digitalizzazione avanzata |
After activating  Toggle editing mode for a layer,
you will find the Add Feature icon in the Edit menu
depending on the layer type (point, line or polygon).
Toggle editing mode for a layer,
you will find the Add Feature icon in the Edit menu
depending on the layer type (point, line or polygon).
Modifica (extra)
Voce di Menu |
Scorciatoia |
Riferimento |
Barra degli Strumenti |
|---|---|---|---|
| Add Feature |
Digitalizzazione |
||
 Add Feature Add Feature |
Digitalizzazione |
||
 Add Feature Add Feature |
Digitalizzazione |
Mappa
Voce di Menu |
Scorciatoia |
Riferimento |
Barra degli Strumenti |
|---|---|---|---|
 Pan Map Pan Map |
Navigazione mappa |
||
 Pan Map to Selection Pan Map to Selection |
Navigazione mappa |
||
 Zoom In Zoom In |
Ctrl++ | Navigazione mappa |
|
 Zoom Out Zoom Out |
Ctrl+- | Navigazione mappa |
|
Seleziona ‣ |
Attributi |
||
 Identify Features Identify Features |
Ctrl+Shift+I | Attributi |
|
Misura ‣ |
vedi Misurazioni |
Attributi |
|
 Zoom Full Zoom Full |
Ctrl+Shift+F | Navigazione mappa |
|
 Zoom To Layer Zoom To Layer |
Navigazione mappa |
||
 Zoom To Selection Zoom To Selection |
Ctrl+J | Navigazione mappa |
|
 Zoom Last Zoom Last |
Navigazione mappa |
||
 Zoom Next Zoom Next |
Navigazione mappa |
||
 Zoom Actual Size Zoom Actual Size |
Navigazione mappa |
||
Proprietà ‣ |
vedi Decorazioni |
||
Modalità anteprima ‣ |
|||
 Map Tips Map Tips |
Attributi |
||
 New Bookmark New Bookmark |
Ctrl+B | Attributi |
|
 Show Bookmarks Show Bookmarks |
Ctrl+Shift+B | Attributi |
|
 Refresh Refresh |
F5 | Navigazione mappa |
Layer
Voce di Menu |
Scorciatoia |
Riferimento |
Barra degli Strumenti |
|---|---|---|---|
Crea Layer ‣ |
Gestione layer |
||
Aggiungi Layer ‣ |
Gestione layer |
||
| Embed Layers and Groups ... | vedi Progetti nidificati |
||
| Add from Layer Definition File ... | |||
| Copy style |
see Menu Stile | ||
| Paste style |
see Menu Stile | ||
 Open Attribute Table Open Attribute Table |
Attributi |
||
| Toggle Editing |
Digitalizzazione |
||
| Save Layer Edits |
Digitalizzazione |
||
 Current Edits ‣ Current Edits ‣ |
Digitalizzazione |
||
| Save as... | |||
| Save as layer definition file... | |||
 Remove Layer/Group Remove Layer/Group |
Ctrl+D | ||
 Duplicate Layers (s) Duplicate Layers (s) |
|||
Definisci Scala di Visibilità dei Layer |
|||
| Set CRS of Layer(s) | Ctrl+Shift+C | ||
| Set project CRS from Layer | |||
| Properties ... | |||
| Query... | |||
 Labeling Labeling |
|||
 Add to Overview Add to Overview |
Ctrl+Shift+O | Gestione layer |
|
 Add All To Overview Add All To Overview |
|||
 Remove All From Overview Remove All From Overview |
|||
 Show All Layers Show All Layers |
Ctrl+Shift+U | Gestione layer |
|
 Hide All Layers Hide All Layers |
Ctrl+Shift+H | Gestione layer |
|
| Show selected Layers |
|||
| Hide selected Layers |
Impostazioni
Voce di Menu |
Scorciatoia |
Riferimento |
Barra degli Strumenti |
|---|---|---|---|
Pannelli ‣ |
vedi Panels and Toolbars |
||
Barre degli strumenti ‣ |
vedi Panels and Toolbars |
||
| Toggle Full Screen Mode | F 11 | ||
 Project Properties ... Project Properties ... |
Ctrl+Shift+P | vedi Progetti |
|
 Custom CRS ... Custom CRS ... |
|||
Gestore di stili |
vedi Presentation |
||
 Configure shortcuts ... Configure shortcuts ... |
|||
| Customization ... |
vedi Personalizzazione |
||
| Options ... |
|||
| Snapping Options ... |
Plugins
Voce di Menu |
Scorciatoia |
Riferimento |
Barra degli Strumenti |
|---|---|---|---|
 Manage and Install Plugins ... Manage and Install Plugins ... |
|||
| Python Console | Ctrl+Alt+P |
When starting QGIS for the first time not all core plugins are loaded.
Vector
Voce di Menu |
Scorciatoia |
Riferimento |
Barra degli Strumenti |
|---|---|---|---|
| Open Street Map ‣ | |||
|
vedi Plugin fTools |
||
|
vedi Plugin fTools |
||
|
vedi Plugin fTools |
||
Strumenti di Geometria ‣ |
vedi Plugin fTools |
||
|
vedi Plugin fTools |


When starting QGIS for the first time not all core plugins are loaded.
Raster
Voce di Menu |
Scorciatoia |
Riferimento |
Barra degli Strumenti |
|---|---|---|---|
| Raster calculator ... | see Calcolatore raster |
When starting QGIS for the first time not all core plugins are loaded.
Database
Voce di Menu |
Scorciatoia |
Riferimento |
Barra degli Strumenti |
|---|---|---|---|
| Database ‣ | see Plugin DB Manager | Database |
When starting QGIS for the first time not all core plugins are loaded.
Web
Voce di Menu |
Scorciatoia |
Riferimento |
Barra degli Strumenti |
|---|---|---|---|
| Metasearch | see Client Catalogo MetaSearch | Web |
When starting QGIS for the first time not all core plugins are loaded.
Processing
Voce di Menu |
Scorciatoia |
Riferimento |
Barra degli Strumenti |
|---|---|---|---|
 Toolbox Toolbox |
vedi Strumenti |
||
 Graphical Modeler ... Graphical Modeler ... |
vedi Modellatore grafico |
||
 History and log ... History and log ... |
|||
 Options ... Options ... |
|||
 Results viewer ... Results viewer ... |
|||
 Commander Commander |
Ctrl+Alt+M | vedi La riga di comando |
When starting QGIS for the first time not all core plugins are loaded.
Guida
Voce di Menu |
Scorciatoia |
Riferimento |
Barra degli Strumenti |
|---|---|---|---|
 Help Contents Help Contents |
F1 | Guida |
|
 What’s This? What’s This? |
Shift+F1 | Guida |
|
| API Documentation | |||
| Need commercial support? | |||
 QGIS Home Page QGIS Home Page |
Ctrl+H | ||
 Check QGIS Version Check QGIS Version |
|||
 About About |
|||
 QGIS Sponsors QGIS Sponsors |
Please note that for Linux , the menu bar items listed above are the
default ones in the KDE window manager. In GNOME, the Settings menu
has different content and its items have to be found here:
| Custom CRS |
Edit |
| Style Manager | Edit |
| Configure Shortcuts |
Edit |
| Customization |
Edit |
| Options |
Edit |
| Snapping Options ... | Edit |
Barra degli Strumenti
Le barre degli strumenti forniscono accesso alla maggior parte delle funzioni presenti nei menu, oltre a funzioni aggiuntive volte ad interagire con la mappa. Ogni oggetto della barra degli strumenti ha un aiuto a comparsa (pop-up). Lasciando il cursore del mouse sopra l’icona, verrà visualizzata una breve descrizione della funzione di quello strumento.
Every menu bar can be moved around according to your needs. Additionally, every menu bar can be switched off using your right mouse button context menu, holding the mouse over the toolbars (read also Panels and Toolbars).
Suggerimento
Ripristinare le barre degli strumenti
If you have accidentally hidden all your toolbars, you can get them back by choosing menu option Settings ‣ Toolbars ‣. If a toolbar disappears under Windows, which seems to be a problem in QGIS from time to time, you have to remove key \HKEY_CURRENT_USER\Software\QGIS\qgis\UI\state in the registry. When you restart QGIS, the key is written again with the default state, and all toolbars are visible again.
Map Legend
The map legend area lists all the layers in the project. The checkbox in each legend entry can be used to show or hide the layer. The Legend toolbar in the map legend are list allow you to Add group, Manage Layer Visibility of all layers or manage preset layers combination, Filter Legend by Map Content, Expand All or Collapse All and Remove Layer or Group.
Figure Layer tools Bar:

Layer Tool Bar in Map Legend
The button  allows you to add Presets views in the legend. It means that you can choose to display some layer with specific categorization and add this view to the Presets list. To add a preset view just click on , choose Add Preset... from the drop down menu and give a name to the preset. After that you will see a list with all the presets that you can recall pressing on the button.
Tutte le viste predefinite aggiunte sono presenti anche nel compositore di stampe in modo di permetterti di creare stampe impostate sulle suddette viste (vedi: ref: composer_main_properties).
Puoi selezionare un layer e trascinarlo in modo da modificarne la visibilità (Z-ordering). Z-ordering significa che i layer in cima alla legenda coprono nella mappa quelli sottostanti.
Nota
This behaviour can be overridden by the ‘Layer order’ panel.
Layers in the legend window can be organised into groups. There are two ways to do this:
- Press the
 icon to add a new group. Type in a name for
the group and press Enter. Now click on an existing layer and
drag it onto the group.
icon to add a new group. Type in a name for
the group and press Enter. Now click on an existing layer and
drag it onto the group. Seleziona alcuni layer, clicca con il tasto destro e scegli Gruppo selezionato. I layer selezionati saranno automaticamente spostati nel nuovo gruppo.
Per rimuovere un layer da un gruppo puoi selezionare e trascinare il layer al di fuori dello stesso o in alternativa puoi cliccare con il tasto destro del mouse sul layer e selezionare Muovi fuori dal gruppo –>. I gruppi possono essere nidificati all’interno di altri gruppi.
Puoi usare la casella di controllo di un gruppo per mostrare/nascondere tutti i layer del gruppo con un singolo click.
The content of the right mouse button context menu depends on whether the
selected legend item is a raster or a vector layer. For GRASS vector layers,
Toggle editing is not available. See section
Digitalizzare e modificare layer vettoriali GRASS for information on editing GRASS vector layers.
Right mouse button menu for raster layers
- Zoom to Layer
- Show in overview
- Zoom to Best Scale (100%)
- Remove
- Duplicate
Imposta la scala di visibilità del layer
- Set Layer CRS
Imposta SR progetto dal layer
Stili ‣
- Save as ...
- Save As Layer Definition File ...
Proprietà
Rinomina ‣
Additionally, according to layer position and selection
:menuselection:` Muovi al livello più alto`
Gruppo selezionato
Right mouse button menu for vector layers
- Zoom to Layer
- Show in overview
- Remove
- Duplicate
Imposta la scala di visibilità del layer
- Set Layer CRS
Imposta SR progetto dal layer
Stili ‣
- Open Attribute Table
- Toggle Editing (not available for GRASS layers)
- Save As ...
- Save As Layer Definition Style
Filtro
- Show Feature Count
Proprietà
Rinomina ‣
Additionally, according to layer position and selection
:menuselection:` Muovi al livello più alto`
Gruppo selezionato
Right mouse button menu for layer groups
- Zoom to Group
- Remove
- Set Group CRS
Rinomina ‣
- Add Group
Puoi selezionare più di un layer o di un gruppo allo stesso tempo tenendo premuto il tasto Ctrl e cliccando il tasto sinistro del mouse sui vari layer. Potrai cosi spostare contemporaneamente tutti i layer selezionati in un nuovo gruppo.
You may also delete more than one layer or group at once by selecting several layers with the Ctrl key and pressing Ctrl+D afterwards. This way, all selected layers or groups will be removed from the layers list.
Lavorare con la legenda indipendentemente dall’ordine dei layer
There is a panel that allows you to define an independent drawing order for the map legend.
You can activate it in the menu Settings ‣ Panels ‣ Layer
order. This feature allows you to, for instance, order your layers in order of importance,
but still display them in the correct order (see figure_layer_order).
Checking the  Control rendering order box underneath the
list of layers will cause a revert to default behavior.
Control rendering order box underneath the
list of layers will cause a revert to default behavior.
Figure Layer Order:
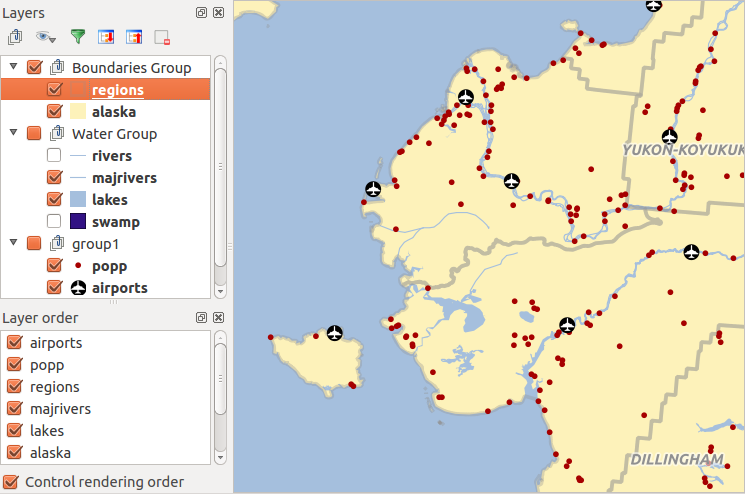
Define a legend independent layer order
Mappa
This is the “business end” of QGIS — maps are displayed in this area! The map displayed in this window will depend on the vector and raster layers you have chosen to load (see sections that follow for more information on how to load layers). The map view can be panned, shifting the focus of the map display to another region, and it can be zoomed in and out. Various other operations can be performed on the map as described in the toolbar description above. The map view and the legend are tightly bound to each other — the maps in view reflect changes you make in the legend area.
Suggerimento
ZOOM IN E ZOOM OUT CON LA ROTELLA DEL MOUSE
Per le operazioni di zoom puoi anche utilizzare la rotella del mouse. Posizionando il puntatore del mouse nell’area di visualizzazione delle mappe aumenterai lo zoom girando la rotella verso lo schermo, lo ridurrai girandola nel verso contrario. La posizione del puntatore costituisce il centro per l’ingrandimento. Puoi regolare il comportamento della funzione di zoom con la rotella del mouse nella scheda Strumenti mappa del menu Impostazioni ‣ Opzioni .
Suggerimento
MUOVERE LA MAPPA CON I TASTI FRECCIA E LA BARRA SPAZIATRICE
Puoi spostare la mappa anche con le frecce della tastiera. Posiziona il mouse sulla mappa e clicca la freccia destra per spostarti verso est, la freccia sinistra per spostarti verso ovest, la freccia in su per spostarti verso nord e la freccia in giù per spostarti verso sud. Puoi anche spostare la mappa con la barra spaziatrice oppure premendo la rotellina del mouse: nel primo caso tieni premuta la barra spaziatrice e muovi il mouse, mentre nel secondo caso tieni premuto il tasto della rotellina mentre muovi il mouse.
Barra di Stato
The status bar shows you your current position in map coordinates (e.g., meters or decimal degrees) as the mouse pointer is moved across the map view. To the left of the coordinate display in the status bar is a small button that will toggle between showing coordinate position or the view extents of the map view as you pan and zoom in and out.
Next to the coordinate display you will find the scale display. It shows the scale of the map view. If you zoom in or out, QGIS shows you the current scale. There is a scale selector, which allows you to choose between predefined scales from 1:500 to 1:1000000.
Alla destra della scala è possibile definire la rotazione in gradi (in senso orario) della mappa.
A progress bar in the status bar shows the progress of rendering as each layer is drawn to the map view. In some cases, such as the gathering of statistics in raster layers, the progress bar will be used to show the status of lengthy operations.
If a new plugin or a plugin update is available, you will see a message at the
far left of the status bar. On the right side of the status bar, there is a small
checkbox which can be used to temporarily prevent layers being rendered to the
map view (see section Visualizzazione below). The icon  immediately stops the current map rendering process.
To the right of the render functions, you find the EPSG code of the current project CRS and a projector icon. Clicking on this opens the projection properties for the current project.
Suggerimento
Calcolare la scala corretta della mappa
When you start QGIS, the default units are degrees, and this means that QGIS will interpret any
coordinate in your layer as specified in degrees. To get correct scale values, you can
either change this setting to meters manually in the General tab
under Settings ‣ Project Properties, or you can select a
project CRS clicking on the  Current CRS: icon in the
lower right-hand corner of the status bar. In the last case, the units are set to what the
project projection specifies (e.g., ‘+units=m’).
Current CRS: icon in the
lower right-hand corner of the status bar. In the last case, the units are set to what the
project projection specifies (e.g., ‘+units=m’).