.
QGIS Configuration
QGIS is highly configurable through the Settings menu. Choose between Panels, Toolbars, Project Properties, Options and Customization.
Nota
QGIS follows desktop guidelines for the location of options and project properties item. Consequently related to the OS you are using, location of some of items described above could be located in the View menu (Panels and Toolbars) or in Project for Options.
Panels and Toolbars
In the Panels‣ menu, you can switch on and off QGIS widgets. The Toolbars‣ menu provides the possibility to switch on and off icon groups in the QGIS toolbar (see figure_panels_toolbars).
Figure Panels and Toolbars:
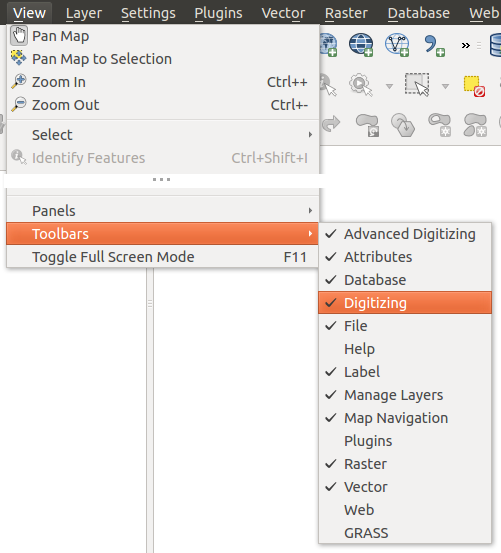
The Panels and Toolbars menu 
Suggerimento
Activating the QGIS Overview
In QGIS, you can use an overview panel that provides a full extent view of
layers added to it. It can be selected under the menu Settings ‣ Panels or
 View ‣ Panels. Within the view is a rectangle showing the
current map extent. This allows you to quickly determine which area of the
map you are currently viewing. Note that labels are not rendered to the map
overview even if the layers in the map overview have been set up for
labeling. If you click and drag the red rectangle in the overview that shows
your current extent, the main map view will update accordingly.
View ‣ Panels. Within the view is a rectangle showing the
current map extent. This allows you to quickly determine which area of the
map you are currently viewing. Note that labels are not rendered to the map
overview even if the layers in the map overview have been set up for
labeling. If you click and drag the red rectangle in the overview that shows
your current extent, the main map view will update accordingly.
Suggerimento
Show Log Messages
It’s possible to track the QGIS messages. You can activate
 Log Messages in the menu
Settings ‣ Panels or
View ‣ Panels and follow the messages
that appear in the different tabs during loading and operation.
Log Messages in the menu
Settings ‣ Panels or
View ‣ Panels and follow the messages
that appear in the different tabs during loading and operation.
Proprietà progetto
In the properties window for the project under
Settings ‣ Project Properties (kde) or
Project ‣ Project Properties (Gnome), you can set
project-specific options. These include:
- In the General menu, the project title, selection and background color, layer units, precision, and the option to save relative paths to layers can be defined. If the CRS transformation is on, you can choose an ellipsoid for distance calculations. You can define the canvas units (only used when CRS transformation is disabled) and the precision of decimal places to use. You can also define a project scale list, which overrides the global predefined scales.
La scheda SR permette di scegliere il sistema di riferimento e di abilitare la riproiezione al volo di raster e vettori quando questi hanno un SR diverso.
- With the third Identify layers menu, you set (or disable) which layers will respond to the identify tool (see the “Map tools” paragraph from the Opzioni dell’interfaccia grafica (GUI) section to enable identifying of multiple layers).
- The Default Styles menu lets you control how new layers will be drawn when they do not have an existing .qml style defined. You can also set the default transparency level for new layers and whether symbols should have random colours assigned to them. There is also an additional section where you can define specific colors for the running project. You can find the added colors in the drop down menu of the color dialog window present in each renderer.
- The tab OWS Server allows you to define information about the QGIS Server WMS and WFS capabilities, extent and CRS restrictions.
La scheda Macro serve per modificare le macro di Python per il progetto. Attualmente sono disponibili tre macro: openProject(), saveProject() e closeProject().
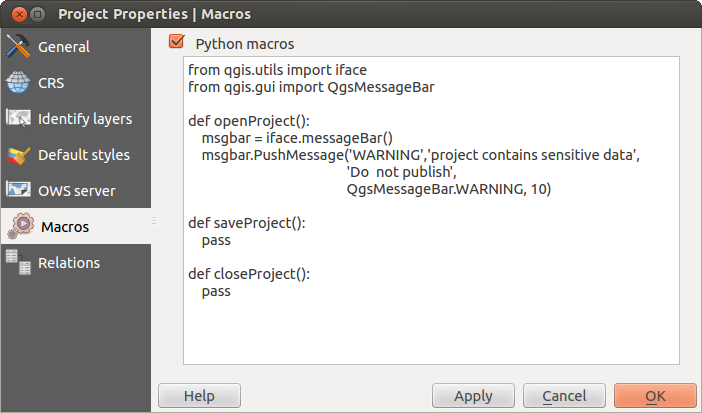
Macro settings in QGIS
La scheda Relazioni permette di impostare relazioni 1:n. Le relazioni sono definite nella finestra di dialogo delle proprietà del progetto. Una volta impostate le relazioni per un vettore, la vista modulo (cioè quando si interroga il vettore con lo strumento informazioni elemento) elencherà le relazioni in una finestra dedicata. Le relazioni 1:n sono uno strumento molto prezioso che può essere utilizzato, per esempio, per tenere traccia delle ispezioni storiche di un tratto stradale o di manutenzione delle tubature. Per maggiori informazioni sulle relazioni 1:n dai un’occhiata alla sezione Creating one to many relations.
Opzioni dell’interfaccia grafica (GUI)
 Some basic options for QGIS can be selected using the
Options dialog. Select the menu option Settings ‣
Options. The tabs where you can customize your
options are described below.
Some basic options for QGIS can be selected using the
Options dialog. Select the menu option Settings ‣
Options. The tabs where you can customize your
options are described below.
Menu Generale
Applicazione
- Select the Style (QGIS restart required)
 and choose
between ‘Oxygen’,’Windows’,’Motif’,’CDE’, ‘Plastique’ and ‘Cleanlooks’ ().
and choose
between ‘Oxygen’,’Windows’,’Motif’,’CDE’, ‘Plastique’ and ‘Cleanlooks’ (). - Define the Icon theme . Currently only ‘default’ is
possible.
- Define the Icon size .
- Define the Font. Choose between
 Qt default and a user-defined font.
 - Change the Timeout for timed messages or dialogs .
- Nascondi lo splash screen all’avvio
- Mostra suggerimenti all’avvio
- Titoli del gruppo box in grassetto
- Box gruppi secondo stile QGIS
- Use native color chooser dialogs
- Use live-updating color chooser dialogs
- Custom side bar style
- Experimental canvas rotation support (restart required)
File di progetto
- Open project on launch (choose between ‘New’,
‘Most recent’ and ‘Specific’). When choosing ‘Specific’ use the
 to define a project.
 - Crea un nuovo progetto dal progetto predefinito. Puoi scegliere Definisce il progetto attuale come predefinito oppure Ripristina il predefinito. Sfoglia fra i tuoi file e specifica la cartella in cui sono presenti i progetti da usare come modello. Se hai spuntato la casella di controllo Crea un nuovo progetto dal progetto predefinito e hai salvato un progetto nella cartella dei modelli, comparirà la nuova voce Progetto ‣ Nuovo da modello.
- Chiedi di salvare il progetto e cambia sorgente dati quando richiesto
- Prompt for confirmation when a layer is to be removed
- Avvisa quando viene aperto un file di progetto salvato con una vecchia versione di QGIS
- Enable macros . This option was created to handle
macros that are written to perform an action on project events. You can
choose between ‘Never’, ‘Ask’, ‘For this session only’ and
‘Always (not recommended)’.
Menu Sistema
Ambiente
Il gruppo Ambiente mostra le variabili di ambiente e permette anche di configurarle (vedi figure_environment_variables). Questa opzione è particolarmente utile per piattaforme stile Mac, dove le applicazioni GUI non ereditano necessariamente l’ambiente shell dell’utente. È utile anche per impostare/visualizzare le variabili di ambiente usate da strumenti esterni, gestiti da Processing come, SAGA e GRASS. Infine è utile anche per abilitare gli output del debug per specifiche sezione del codice sorgente.
- Usa variabili utente (necessario il riavvio - includere i separatori). Gestisci le variabili con i pulsanti [Aggiungi] e [Rimuovi]. Il Variabili di ambiente attuali ‣ mostra le variabili di ambiente già definite e puoi scegliere di filtrarle spuntando la casella di controllo Mostrare le sole variabili specifiche di QGIS.
Figure System Environment:
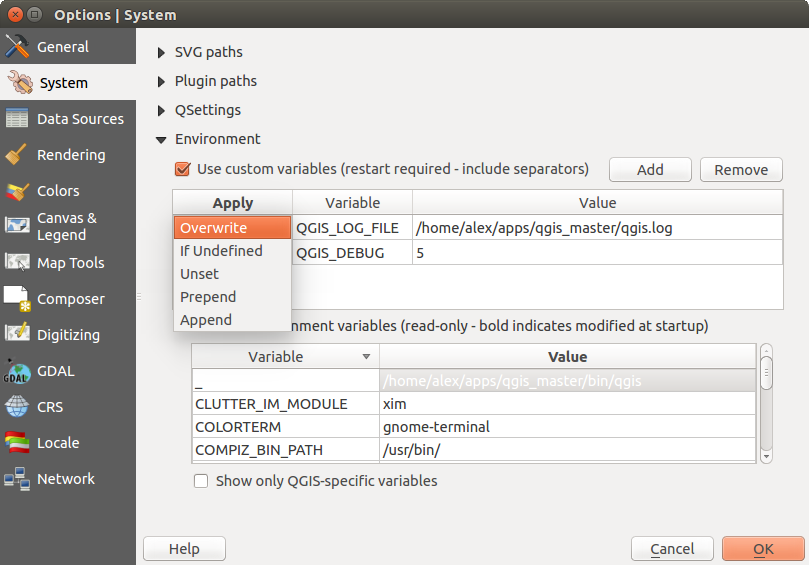
System environment variables in QGIS
Percorsi verso i plugin
[Aggiungi] o [Rimuovi] Percorsi per cercare ulteriori librerie plugin C++
Menu Sorgente dati
Attributi delle geometrie e tabelle
- Apri la tabella degli attributi in una finestra agganciata (richiede il riavvio di QGIS)
- Copy geometry in WKT representation from attribute
table. When using
 Copy selected rows to
clipboard from the Attribute table dialog, this has the
result that the coordinates of points or vertices are also copied to the
clipboard.
Copy selected rows to
clipboard from the Attribute table dialog, this has the
result that the coordinates of points or vertices are also copied to the
clipboard. - Attribute table behaviour . There are three
possibilities: ‘Show all features’, ‘Show selected features’ and ‘Show
features visible on map’.
- Attribute table row cache
 . This row cache makes
it possible to save the last loaded N attribute rows so that working with the
attribute table will be quicker. The cache will be deleted when closing the
attribute table.
. This row cache makes
it possible to save the last loaded N attribute rows so that working with the
attribute table will be quicker. The cache will be deleted when closing the
attribute table. Mostra i valori NULL come. Puoi definire un attributo con cui verranno visualizzati i valori NULL (nessun valore).
Trattamento delle sorgenti dati
- Scan for valid items in the browser dock . You can
choose between ‘Check extension’ and ‘Check file contents’.
- Scan for contents of compressed files (.zip) in browser dock
. ‘No’, ‘Basic scan’ and ‘Full scan’ are possible.
Richiedi i sublayer raster al caricamento. Alcuni raster supportano i sublayer, chiamati subdataset in GDAL. Un esempio sono i file netCDF: se sono presenti diverse variabili netCDF, GDAL riconosce ogni variabile come un subdataset. L’opzione permette di gestire i sublayer quando uno di questi viene aperto. Puoi scegliere fra:
‘Sempre’: chiede sempre (se sono presenti sublayer)
‘Se necessario’: chiede se il layer non ha bande, ma ha sublayer
‘Mai’: non chiede mai e non carica niente
‘Carica tutto’: non chiede, ma carica tutti i sublayer
- Ignore shapefile encoding declaration. If a shapefile
has encoding information, this will be ignored by QGIS.
- Add PostGIS layers with double click and select in
extended mode
- Aggiungi layer Oracle con un doppio click e seleziona modalità estesa
Menu Visualizzazione
Rendering behaviour
- Per impostazione predefinita i nuovi layer aggiunti alla mappa vengono visualizzati subito
- Usa il caching del disegno quando possibile per velocizzare la visualizzazione
- Visualizza i layyer in parallelo usando più processori della CPU
- Numero massimo di processori
Intervallo dio aggiornamento della mappa (predefinito a 250 ms)
- Enable feature simplication by default for newly added layers
Semplifica dal lato provider se possibile
- Semplifica dal lato provider se possibile
Scala massima alla quale il layer dovrebbe essere semplificato
Impostazioni di visualizzazione
- Rendi le linee meno irregolari a spese delle prestazioni
Raster
Con Selezione banda RGB puoi scegliere il numero di bande rosse, verdi e blu.
Miglioramento contrasto
- Single band gray . A single band gray can have
‘No stretch’, ‘Stretch to MinMax’, ‘Stretch and Clip to MinMax’ and also
‘Clip to MinMax’.
- Multi band color (byte/band) . Options are ‘No stretch’,
‘Stretch to MinMax’, ‘Stretch and Clip to MinMax’ and ‘Clip to MinMax’.
- Multi band color (>byte/band) . Options are ‘No stretch’,
‘Stretch to MinMax’, ‘Stretch and Clip to MinMax’ and ‘Clip to MinMax’.
- Limits (minimum/maximum) . Options are
‘Cumulative pixel count cut’, ‘Minimum/Maximum’, ‘Mean +/- standard deviation’.
Limiti di taglio del conteggio cumulativo pixel
Moltiplicatore deviazione standard
Debugging
- Aggiornamento della visualizzazione della mappa
Menu Mappa & Legenda
Aspetto della mappa (modificato dalle proprietà del progetto)
Scegli un Colore della selezione e un Colore di sfondo
Legenda dei layer
- Double click action in legend . You can either
‘Open layer properties’ or ‘Open attribute table’ with the double click.
Puoi scegliere diverse opzioni per gli Stili elementi legenda:
- Nomi dei layer in maiuscolo
- Nomi dei layer in grassetto
- Nomi gruppo in grassetto
- Visualizza nomi di classificazione degli attributi
- Crea le icone raster (potrebbe essere lento)
Menu Strumenti mappa
This menu offers some options regarding the behaviour of the Identify tool.
Raggio di ricerca per identificare e visualizzare le relative informazioni sulla mappa è un fattore di tolleranza espressa come percentuale della larghezza mappa. Ciò significa che lo strumento di informazione mostrerà i risultati se si fa clic all’interno di questa tolleranza.
Colore di evidenziaione di scegliere con quale colore saranno evidenziati gli elementi identificati.
- Buffer expressed as a percentage of the map width, determines a buffer distance to be rendered from the outline of the identify highlight.
- Minimum width expressed as a percentage of the map width, determines how thick should the outline of a highlighted object be.
Strumenti di misura
Colore elastico
Posizioni decimali
- Keep base unit
- Preferred measurements units (‘Meters’, ‘Feet’, ‘Nautical Miles’ or ‘Degrees’)`
- Preferred angle units (‘Degrees’, ‘Radians’ or ‘Gon’)
Spostamento e zoom
- Define Mouse wheel action (‘Zoom’, ‘Zoom and recenter’,
‘Zoom to mouse cursor’, ‘Nothing’)
Fattore di zoom
Scale preimpostate
Here, you find a list of predefined scales. With the [+] and [-] buttons you can add or remove your individual scales.
Menu Compositore
Opzioni predefinite del compositore
You can define the Default font here.
Reticolo
- Define the Grid style (‘Solid’, ‘Dots’, ‘Crosses’)
- Define the Grid color
Grid and guide defaults
- Define the Grid spacing
- Define the Grid offset for x and y
- Define the Snap tolerance
Menu Digitalizzazione
Creazione di geometrie
- Non aprire la finestra degli attributi dopo la creazione di ogni geometria
- Ripeti i valori degli attributi usati per ultimi
- Validate geometries. Editing complex lines and polygons with many nodes can result in very slow rendering. This is because the default validation procedures in QGIS can take a lot of time. To speed up rendering, it is possible to select GEOS geometry validation (starting from GEOS 3.3) or to switch it off. GEOS geometry validation is much faster, but the disadvantage is that only the first geometry problem will be reported.
Elastico
Definisci le proprietà dell’elastico, Spessore della linea e Colore della linea
Snapping
- Apri le opzioni di snap in una finestra agganciata (richiede il riavvio di QGIS)
- Define Default snap mode (‘To vertex’, ‘To segment’,
‘To vertex and segment’, ‘Off’)
Imposta la Tolleranza di snapping predefinita in unità di mappa o pixel
Imposta il Raggio di ricerca per le modifiche dei vertici in unità di mappa o in pixel
Indicatori di vertice
- Utilizza indicatori solo per le geometrie selezionate
- Define vertex Marker style (‘Cross’ (default), ‘Semi
transparent circle’ or ‘None’)
Specifica le Dimensioni indicatore
Strumento per la curva di offset
The next 3 options refer to the  Offset Curve tool
in Digitalizzazione avanzata. Through the various settings, it is possible to
influence the shape of the line offset. These options are possible starting from GEOS 3.3.
Offset Curve tool
in Digitalizzazione avanzata. Through the various settings, it is possible to
influence the shape of the line offset. These options are possible starting from GEOS 3.3.
Stile unione
Segmenti di quadrante
Limite di smusso
Menu SR
SR predefinito per nuovi progetti
 Don’t enable ‘on the fly’ reprojection
- Automatically enable ‘on the fly’ reprojection if
layers have different CRS
- Enable ‘on the fly’ reprojection by default
Seleziona un SR e Inizia un nuovo progetto sempre con questo SR
SR per i nuovi layer
Questa sezione permette di specificare il comportamento di QGIS quando viene creato un nuovo layer oppure quando viene caricato un layer privo di SR.
- Prompt for CRS
- Use project CRS
- Use default CRS
Trasformazioni datum predefinite
- Chiedi la trasformazione del datum quando non è definito un valore di riferimento
Se hai lavorato con la trasformazione del SR ‘al volo’ puoi vedere i risultati della trasformazione nella finestra di sotto. Questa finestra mostra infatti le informazioni del ‘SR sorgente’, ‘SR destinazione’, ‘Trasformazione datum sorgente’ e ‘Trasformazione datum destinazione’.
Menu Lingua
- Sovrascrivi lingua in uso
Informazioni sulla lingua correntemente impostata nel sistema
Menu Rete
Generale
Indirizzo di ricerca WMS (Quello predefinito è “http://geopole.org/wms/search?search=%1&type=rss”)
Imposta il Timeout per le richieste di rete (ms) - il valore predefinito è 60000
Imposta il Periodo di scadenza predefinito per piastrelle WMSC/WMTS (ore) - valore standard è 24
Specifica il Numero massimo di tentativi in caso di errore nella richiesta della mattonella
Definisci l’Utente-Agente
Figure Network Tab:
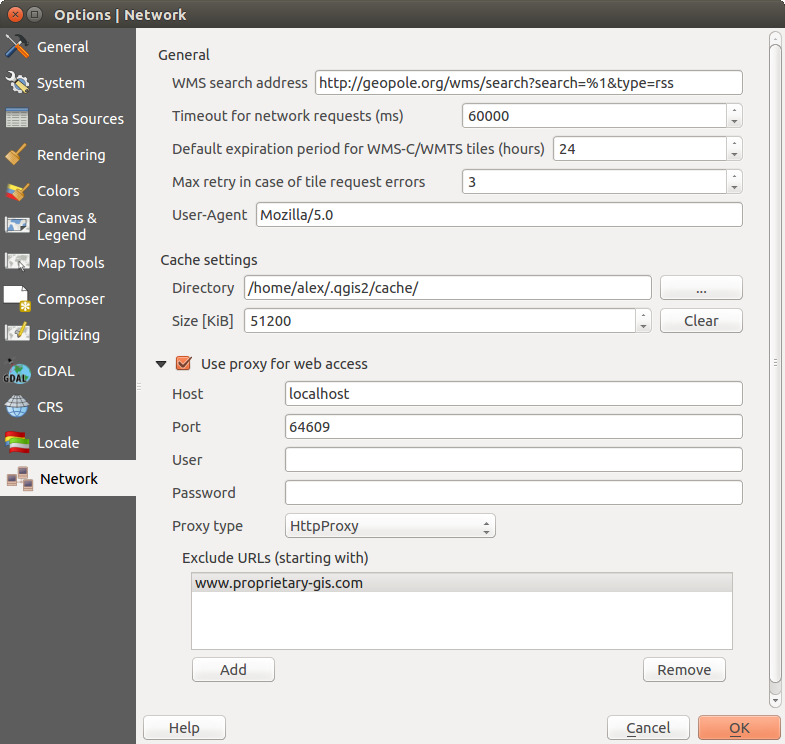
Proxy-settings in QGIS
Impostazioni della cache
Specifica la Cartella e la Dimensione per la cache.
- Utilizza un proxy per l’accesso web, definizione di host, porta, utente e password.
- Set the Proxy type according to your needs.
Default Proxy:Il proxy è determinato sulla base delle impostazioni in uso del proxy dell’applicazione
Socks5Proxy: Proxy generico per ogni tipo di connessione. Supporta TCP, UDP, associazione a una porta (connessione in entrata) e autenticazione.
HttpProxy: Realizzato usando il comando “CONNECT”, supporta solamente connessioni TCP in uscita; supporta l’autenticatione.
HttpCachingProxy: Realizzato usando normali comandi HTTP, è utile solamente nel contesto di richieste HTTP.
FtpCachingProxy: Realizzato usando un proxy FTP, è utile solamente nel contesto di richieste FTP.
È possibile escludere alcuni URL aggiungendo il testo nella sezione dedicata (vedi Figure_Network_Tab).
Per informazioni più dettagliate sulle diverse impostazioni del proxy, fai riferimento al manuale della documentazione delle librerie QT suhttp://doc.trolltech.com/4.5/qnetworkproxy.html#ProxyType-enum.
Suggerimento
UTILIZZO DEI PROXY
L’utilizzo dei proxy può risultare complicato. È utile testare i tipi di proxy elencati sopra e controllare il loro funzionamento nel tuo caso specifico.
You can modify the options according to your needs. Some of the changes may require a restart of QGIS before they will be effective.
- Impostazioni sono salvate in file testo $HOME/.config/QGIS/QGIS2.conf
 puoi trovare le impostazioni in: $HOME/Library/Preferences/org.qgis.qgis.plist
- le impostazioni sono salvate nel resistro: HKEY\CURRENT_USER\Software\QGIS\qgis
Personalizzazione
The customization tool lets you (de)activate almost every element in the QGIS user interface. This can be very useful if you have a lot of plugins installed that you never use and that are filling your screen.
Figure Customization 1:
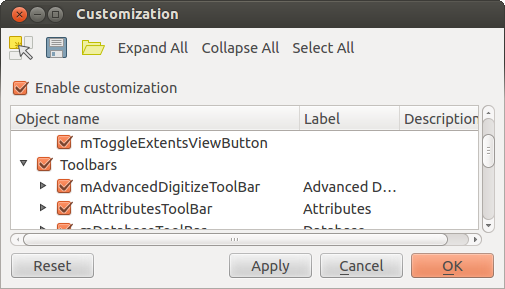
The Customization dialog
QGIS Customization is divided into five groups. In Menus,
you can hide entries in the Menu bar. In Panels, you
find the panel windows. Panel windows are applications that can be started and
used as a floating, top-level window or embedded to the QGIS main window as a
docked widget (see also Panels and Toolbars). In the
Status Bar, features like the coordinate information can be
deactivated. In Toolbars, you can (de)activate the
toolbar icons of QGIS, and in Widgets, you can (de)activate
dialogs as well as their buttons.
With  Switch to catching widgets in main application, you
can click on elements in QGIS that you want to be hidden and find the corresponding
entry in Customization (see figure_customization). You can also save your
various setups for different use cases as well. Before your changes
are applied, you need to restart QGIS.
Switch to catching widgets in main application, you
can click on elements in QGIS that you want to be hidden and find the corresponding
entry in Customization (see figure_customization). You can also save your
various setups for different use cases as well. Before your changes
are applied, you need to restart QGIS.