.
Lavorare con le proiezioni
QGIS allows users to define a global and project-wide CRS (coordinate reference system) for layers without a pre-defined CRS. It also allows the user to define custom coordinate reference systems and supports on-the-fly (OTF) projection of vector and raster layers. All of these features allow the user to display layers with different CRSs and have them overlay properly.
Panoramica sul supporto alle proiezioni
QGIS has support for approximately 2,700 known CRSs. Definitions for each CRS are stored in a SQLite database that is installed with QGIS. Normally, you do not need to manipulate the database directly. In fact, doing so may cause projection support to fail. Custom CRSs are stored in a user database. See section Sistemi di riferimento personalizzati for information on managing your custom coordinate reference systems.
The CRSs available in QGIS are based on those defined by the European Petroleum Search Group (EPSG) and the Institut Geographique National de France (IGNF) and are largely abstracted from the spatial reference tables used in GDAL. EPSG identifiers are present in the database and can be used to specify a CRS in QGIS.
In order to use OTF projection, either your data must contain information about its coordinate reference system or you will need to define a global, layer or project-wide CRS. For PostGIS layers, QGIS uses the spatial reference identifier that was specified when the layer was created. For data supported by OGR, QGIS relies on the presence of a recognized means of specifying the CRS. In the case of shapefiles, this means a file containing the well-known text (WKT) specification of the CRS. This projection file has the same base name as the shapefile and a .prj extension. For example, a shapefile named alaska.shp would have a corresponding projection file named alaska.prj.
Whenever you select a new CRS, the layer units will automatically be
changed in the General tab of the  Project Properties dialog under the Project (Gnome,
OS X) or Settings (KDE, Windows) menu.
Project Properties dialog under the Project (Gnome,
OS X) or Settings (KDE, Windows) menu.
Specifiche globali delle proiezioni
QGIS starts each new project using the global default projection. The global default CRS is EPSG:4326 - WGS 84 (proj=longlat +ellps=WGS84 +datum=WGS84 +no_defs), and it comes predefined in QGIS. This default can be changed via the [Select...] button in the first section, which is used to define the default coordinate reference system for new projects, as shown in figure_projection_1. This choice will be saved for use in subsequent QGIS sessions.
Figure Projection 1:
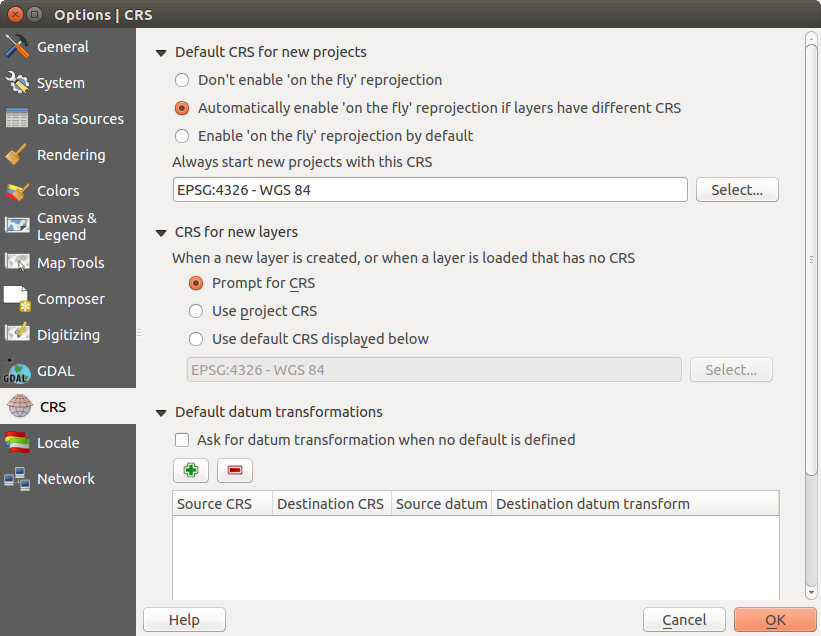
CRS tab in the QGIS Options Dialog 
When you use layers that do not have a CRS, you need to define how QGIS
responds to these layers. This can be done globally or project-wide in the
CRS tab under Settings ‣
Options.
Le opzioni mostrate in figura figure_projection_1 sono:
 Prompt for CRS
 Use project CRS
- Use default CRS displayed below
If you want to define the coordinate reference system for a certain layer without CRS information, you can also do that in the General tab of the raster and vector properties dialog (see Menu Generale for rasters and Menu Generale for vectors). If your layer already has a CRS defined, it will be displayed as shown in Vector Layer Properties Dialog .
Suggerimento
SR NELLA LEGENDA
Facendo click con il tasto destro su di un layer in legenda (sezione Map Legend) hai a disposizione due scorciatoie per l’impostazione del SR. Imposta il SR del layer apre direttamente la finestra per la scelta del sistema di riferimento (figura figure_projection_2), mentre Imposta il SR del progetto dal layer imposterà il SR del progetto sulla base di quello del layer
Definire la riproiezione al volo (OTF)
QGIS supports OTF reprojection for both raster and vector data. However, OTF is
not activated by default. To use OTF projection, you must activate the
 Enable on the fly CRS transformation checkbox in the
CRS tab of the
Enable on the fly CRS transformation checkbox in the
CRS tab of the  Project
Properties dialog.
Project
Properties dialog.
Hai tre modi diversi per farlo:
- Select Project Properties from the
Project (Gnome, OSX) or Settings (KDE,
Windows) menu.
Cliccare sull’icona
 Stato SR nell’angolo in basso a destra della barra di stato.
Abilita la riproiezione al volo in modalità predefinita spuntando la casella di controllo
Effettua sempre la riproiezione al volo nella scheda SR della finestra di dialogo Opzioni oppure spunta Abilita automaticamente la riproiezione al volo se i layer hanno SR differente.
Se hai già caricato un layer e vuoi abilitare la riproiezione al volo, la scelta migliore è: aprire la scheda Sistema di riferimento (SR) della finestra di dialogo Proprietà progetto, selezionare nell’elenco il SR attualmente impostato, quindi attivare la casella di controllo Abilita la riproiezione al volo. Ogni layer caricato successivamente sarà riproiettato al volo nel SR mostrato vicino all’icona Stato SR e quest’icona diventerà attiva a tutti gli effetti.
Figure Projection 2:
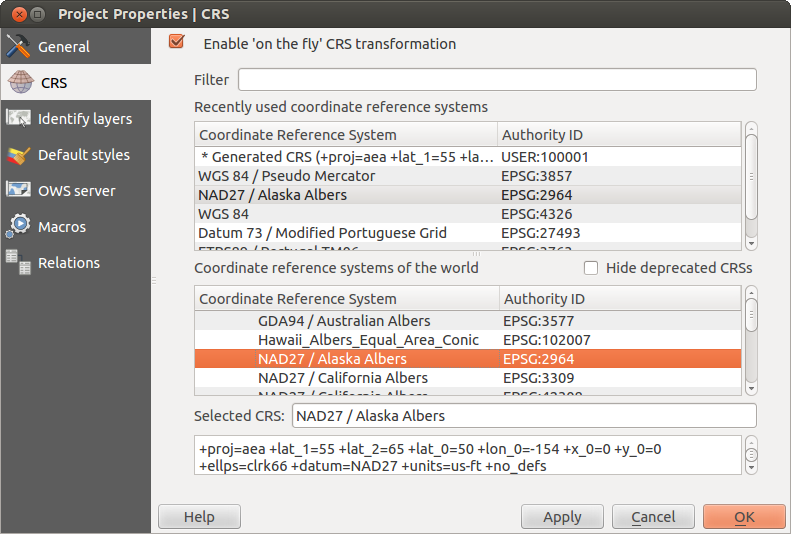
Project Properties Dialog
La scheda SR della finestra di dialogo Proprietà progetto contiene cinque importanti componenti, come puoi vedere nella figura Figure_projection_2:
Abilita la riproiezione al volo — puoi utilizzare questa casella di controllo per abilitare o disabilitare la riproiezione al volo. Quando è disabilitata, ogni layer verrà visualizzato in funzione del proprio sistema di riferimento e le componenti descritte sotto non saranno attive. Quando è abilitata, ogni layer verrà visualizzato nel sistema di riferimento specificato.
Filtro — se conosci il codice EPSG, l’identificatore o il nome del SR che vuoi impostare, puoi utilizzare questa area di ricerca per trovarlo nell’elenco. Inserisci il codice EPSG, l’identificatore o il nome.
Sistemi di riferimento usati di recente — se ci sono dei SR che usi frequentemente, questi verranno visualizzati in questa sezione della finestra di dialogo. Clicca su una voce per impostare il SR associato.
- Coordinate reference systems of the world — This is a list of all CRSs supported by QGIS, including Geographic, Projected and Custom coordinate reference systems. To define a CRS, select it from the list by expanding the appropriate node and selecting the CRS. The active CRS is preselected.
Testo PROJ.4 - è la stringa SR usata dal motore di proiezione Proj4. È un testo di sola lettura, a solo scopo informativo.
Suggerimento
Finestra di dialogo Proprietà del progetto
Se apri la finestra di dialogo Proprietà progetto dal menu Progetto, per poter visualizzare le impostazioni del SR devi cliccare sulla scheda SR.
Se clicchi sull’icona Stato SR si aprirà automaticamente la scheda SR.
Sistemi di riferimento personalizzati
If QGIS does not provide the coordinate reference system you need, you can
define a custom CRS. To define a CRS, select  Custom CRS... from the Settings menu. Custom CRSs
are stored in your QGIS user database. In addition to your custom CRSs, this
database also contains your spatial bookmarks and other custom data.
Custom CRS... from the Settings menu. Custom CRSs
are stored in your QGIS user database. In addition to your custom CRSs, this
database also contains your spatial bookmarks and other custom data.
Figure Projection 3:
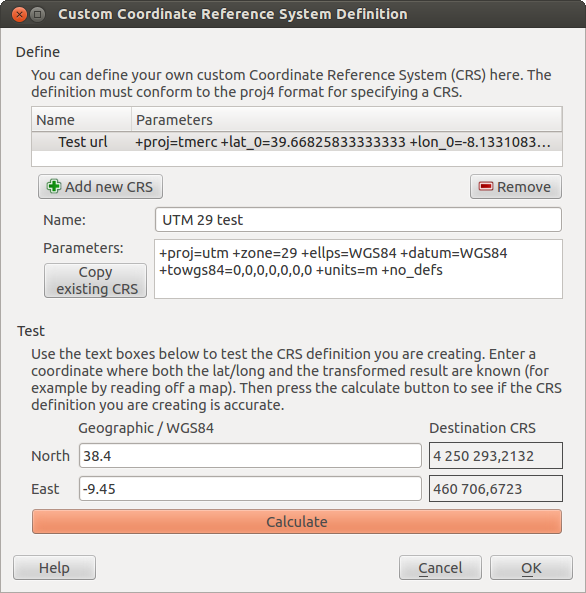
Custom CRS Dialog
Defining a custom CRS in QGIS requires a good understanding of the PROJ.4 projection library. To begin, refer to “Cartographic Projection Procedures for the UNIX Environment - A User’s Manual” by Gerald I. Evenden, U.S. Geological Survey Open-File Report 90-284, 1990 (available at ftp://ftp.remotesensing.org/proj/OF90-284.pdf).
This manual describes the use of the proj.4 and related command line utilities. The cartographic parameters used with proj.4 are described in the user manual and are the same as those used by QGIS.
La finestra di dialogo Definizione Sistema Riferimento Spaziale Personalizzato richiede solamente due parametri per definire un SR personalizzato:
Il nome
I parametri cartografici in formato PROJ.4.
To create a new CRS, click the  Add new CRS button and enter a
descriptive name and the CRS parameters.
Add new CRS button and enter a
descriptive name and the CRS parameters.
La voce Parametri deve iniziare con un blocco +proj=, per rappresentare il nuovo SR.
Puoi testare i parametri del tuo SR per vedere se danno risultati validi. Per farlo, inserisci due valori noti di latitudine e longitudine nel sistema WGS 84 rispettivamente in Nord ed Est. Clicca su [Calcola] e fai un paragone dei risultati con i valori noti del tuo SR personalizzato.
Trasformazioni datum predefinite
OTF depends on being able to transform data into a ‘default CRS’, and QGIS uses WGS84. For some CRS there are a number of transforms available. QGIS allows you to define the transformation used otherwise QGIS uses a default transformation.
In the CRS tab under Settings ‣
Options you can:
- set QGIS to ask you when it needs define a transformation using Ask for datum transformation when no default is defined
modificare la lista di trasformazioni specificate dall’utente.
QGIS asks which transformation to use by opening a dialogue box
displaying PROJ.4 text describing the source and destination
transforms. Further information may be found by hovering over a
transform. User defaults can be saved by selecting
Remember selection.