.
Formati supportati
QGIS uses the OGR library to read and write vector data formats, including ESRI shapefiles, MapInfo and MicroStation file formats, AutoCAD DXF, PostGIS, SpatiaLite, Oracle Spatial and MSSQL Spatial databases, and many more. GRASS vector and PostgreSQL support is supplied by native QGIS data provider plugins. Vector data can also be loaded in read mode from zip and gzip archives into QGIS. As of the date of this document, 69 vector formats are supported by the OGR library (see OGR-SOFTWARE-SUITE in Letteratura e riferimenti web). The complete list is available at http://www.gdal.org/ogr/ogr_formats.html.
Nota
Not all of the listed formats may work in QGIS for various reasons. For example, some require external commercial libraries, or the GDAL/OGR installation of your OS may not have been built to support the format you want to use. Only those formats that have been well tested will appear in the list of file types when loading a vector into QGIS. Other untested formats can be loaded by selecting *.*.
La sezione Integrazione con GRASS GIS ti mostra come lavorare con i dati di GRASS.
This section describes how to work with several common formats: ESRI shapefiles, PostGIS layers, SpatiaLite layers, OpenStreetMap vectors, and Comma Separated data (CSV). Many of the features available in QGIS work the same, regardless of the vector data source. This is by design, and it includes the identify, select, labeling and attributes functions.
Shapefile ESRI
The standard vector file format used in QGIS is the ESRI shapefile. Support is provided by the OGR Simple Feature Library (http://www.gdal.org/ogr/).
Uno shapefile è costituito da di un minimo di tre file:
.shp contente le geometrie
.dbf contenente gli attributi in formato dBase
.shx contenente l’indice
Uno shapefile può anche includere un file con suffisso .prj che contiene le informazioni sulla proiezione. Anche se non è obbligatorio, è molto utile avere informazioni sulla proiezione del file. Un insieme di dati shapefile può contenere anche altri tipi di file. Per ulteriori informazioni, vedi le specifiche tecniche di ESRI all’indirizzo http://www.esri.com/library/whitepapers/pdfs/shapefile.pdf.
Loading a Shapefile
To load a shapefile, start QGIS and click on the  Add Vector Layer toolbar button, or simply press Ctrl+Shift+V.
This will bring up a new window (see figure_vector_1).
Add Vector Layer toolbar button, or simply press Ctrl+Shift+V.
This will bring up a new window (see figure_vector_1).
Figure Vector 1:
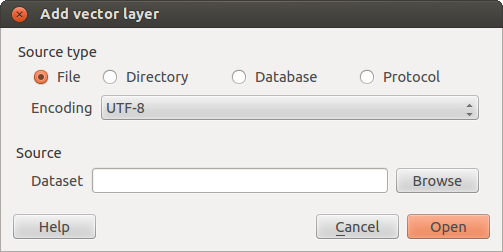
Add Vector Layer Dialog 
From the available options check  File. Click on
[Browse]. That will bring up a standard open file dialog
(see figure_vector_2), which allows you to navigate the file system and load a
shapefile or other supported data source. The selection box Filter
File. Click on
[Browse]. That will bring up a standard open file dialog
(see figure_vector_2), which allows you to navigate the file system and load a
shapefile or other supported data source. The selection box Filter
 allows you to preselect some OGR-supported file formats.
You can also select the encoding for the shapefile if desired.
Figure Vector 2:
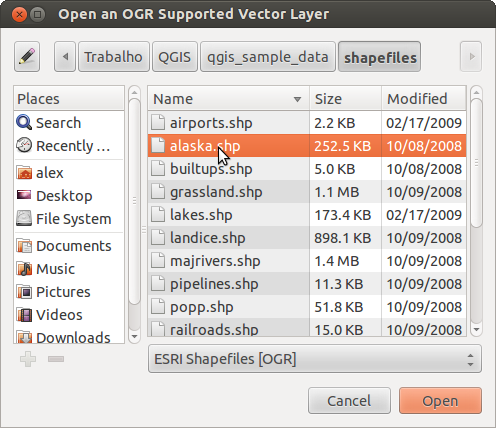
Open an OGR Supported Vector Layer Dialog
Selecting a shapefile from the list and clicking [Open] loads it into QGIS. Figure_vector_3 shows QGIS after loading the alaska.shp file.
Figure Vector 3:
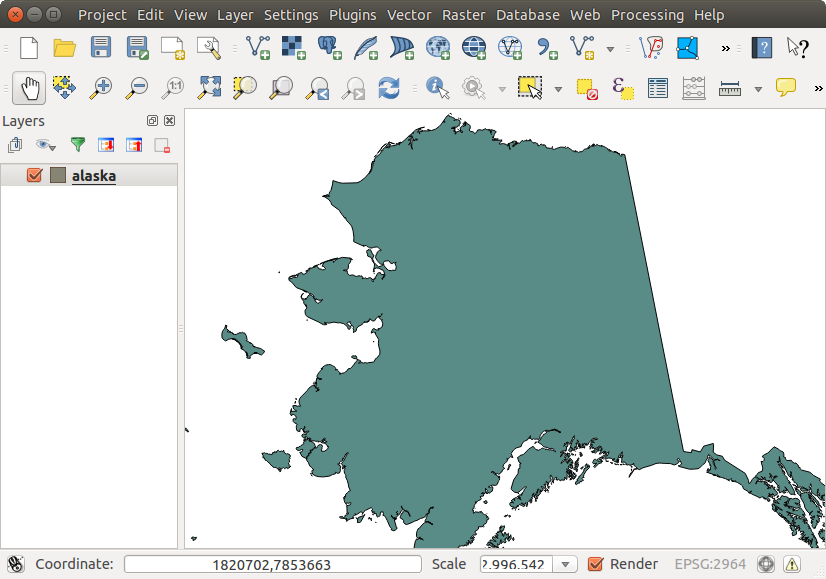
QGIS with Shapefile of Alaska loaded
Suggerimento
Colori dei vettori
Quando aggiungi un vettore alla mappa, gli viene assegnato un colore casuale. Se aggiungi più vettori in una sola volta, ciascuno avrà un colore diverso.
Once a shapefile is loaded, you can zoom around it using the map navigation tools. To change the style of a layer, open the Layer Properties dialog by double clicking on the layer name or by right-clicking on the name in the legend and choosing Properties from the context menu. See section Menu Stile for more information on setting symbology of vector layers.
Suggerimento
Caricare vettori e progetti da periferiche esterne in OS X
In OS X le periferiche esterne montate accanto al disco fisso principale non sono visibili nel menu File ‣ Apri progetto. Stiamo lavorando per cercare di risolvere questo problema con OS X; come soluzione temporanea digita /Volume nella casella Nome file e clicca invio. In questo modo potrai utilizzare le periferiche esterne.
Improving Performance for Shapefiles
To improve the performance of drawing a shapefile, you can create a spatial index. A spatial index will improve the speed of both zooming and panning. Spatial indexes used by QGIS have a .qix extension.
Segui questi passi per creare un indice spaziale:
- Load a shapefile by clicking on the Add Vector Layer
toolbar button or pressing Ctrl+Shift+V.
Apri la finestra di dialogo Proprietà layer facendo doppio click sul nome dello shapefile nella legenda o cliccandoci con il tasto destro e scegliendo Proprietà dal menu contestuale.
Nella scheda Generale clicca sul pulsante [Crea indice spaziale].
Problem loading a shape .prj file
If you load a shapefile with a .prj file and QGIS is not able to read the coordinate reference system from that file, you will need to define the proper projection manually within the General tab of the Layer Properties dialog of the layer by clicking the [Specify...] button. This is due to the fact that .prj files often do not provide the complete projection parameters as used in QGIS and listed in the CRS dialog.
For the same reason, if you create a new shapefile with QGIS, two different projection files are created: a .prj file with limited projection parameters, compatible with ESRI software, and a .qpj file, providing the complete parameters of the used CRS. Whenever QGIS finds a .qpj file, it will be used instead of the .prj.
Loading a MapInfo Layer
To load a MapInfo layer, click on the
Add Vector Layer toolbar button; or type Ctrl+Shift+V, change the
file type filter Files of type : to
‘Mapinfo File [OGR] (*.mif *.tab *.MIF *.TAB)’ and select the MapInfo layer you
want to load.
Loading an ArcInfo Binary Coverage
To load an ArcInfo Binary Coverage, click on the
Add Vector Layer toolbar button or press
Ctrl+Shift+V to open the Add Vector Layer dialog. Select
Directory as Source type. Change the
file type filter Files of type to
‘Arc/Info Binary Coverage’. Navigate to the directory that contains the
coverage file, and select it.
Similarly, you can load directory-based vector files in the UK National Transfer Format, as well as the raw TIGER Format of the US Census Bureau.
File di testo delimitato
I dati tabellari sono un formato molto comune ed utilizzato proprio grazie alla loro semplicità e leggibilità – infatti i dati possono essere visualizzati e modificati con un semplice editor di testo. Un file di testo delimitato è una tabella di attributi in cui ogni colonna è separata da un preciso carattere mentre le righe sono separate da un nuovo capoverso. Di solito la prima riga contiene i nomi delle colonne. Un formato molto comune è il CSV (Comma Separated Values), dove ogni colonna è separata da una virgola.
Questi dati possono anche contenere informazioni sulla posizione in due forme principali:
Come coordinate puntuali in colonne separate
Come rappresentazione geometrica in Well-Known-Text (WKT)
QGIS allows you to load a delimited text file as a layer or ordinal table. But first check that the file meets the following requirements:
Il file deve avere una riga di intestazione per il nome dei campi. Questa deve essere la prima riga del testo.
La riga di intestazione deve contenere campi relativi alla definizione geometrica. Questi campi possono avere un nome qualunque.
Le coordinate X e Y (se la geometria è identificata da coordinate) devono essere specificate come numeri. Il sistema di coordinate non è importante.
As an example of a valid text file, we import the elevation point data file elevp.csv that comes with the QGIS sample dataset (see section Dati campione):
X;Y;ELEV
-300120;7689960;13
-654360;7562040;52
1640;7512840;3
[...]
Alcune cose da tenere in considerazione in merito al file di testo:
Il file di testo usato come esempio usa ; (punto e virgola) come delimitatore. Ma qualsiasi carattere può essere usato per delimitare i campi.
La prima riga è la riga di intestazione. Questa contiene i campi X, Y e ELEV.
Nessun tipo di virgoletta (") dev’essere usata per delimitare i campi di testo.
Le coordinate X sono contenute nel campo X.
Le coordinate Y sono contenute nel campo Y.
Caricare un file di testo delimitato
Click the toolbar icon  Add Delimited Text Layer in the
Manage layers toolbar to open the Create a Layer from a
Delimited Text File dialog, as shown in figure_delimited_text_1.
Add Delimited Text Layer in the
Manage layers toolbar to open the Create a Layer from a
Delimited Text File dialog, as shown in figure_delimited_text_1.
Figure Delimited Text 1:
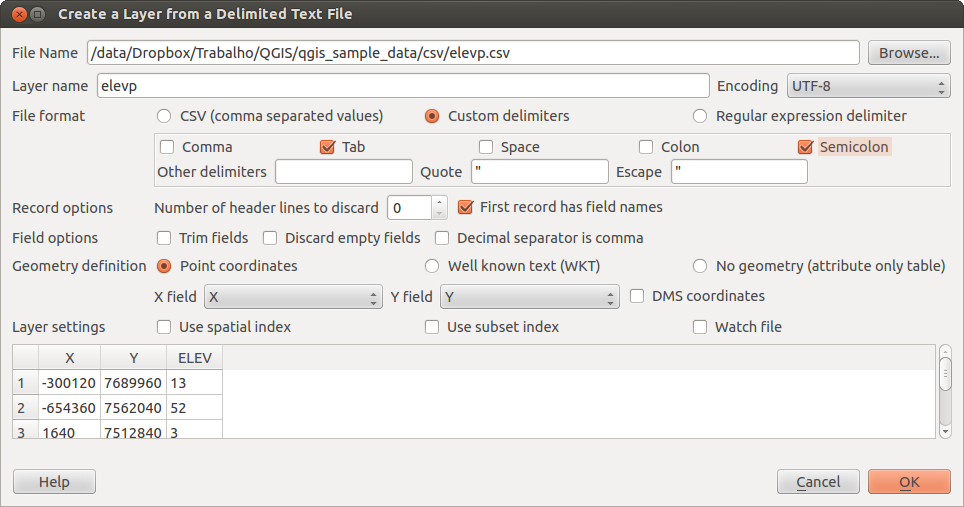
Delimited Text Dialog
First, select the file to import (e.g., qgis_sample_data/csv/elevp.csv)
by clicking on the [Browse] button. Once the file is selected, QGIS
attempts to parse the file with the most recently used delimiter. To enable QGIS to properly parse the
file, it is important to select the correct delimiter. You can specify a
delimiter by activating Custom delimiters, or by activating
Regular expression delimiter and entering
text into the Expression field. For example, to
change the delimiter to tab, use \t (this is a regular expression for the
tab character).
Once the file is parsed, set Geometry definition to
Point coordinates and choose the X and Y
fields from the dropdown lists. If the coordinates are defined as
degrees/minutes/seconds, activate the  DMS coordinates
checkbox.
DMS coordinates
checkbox.
Finally, enter a layer name (e.g., elevp), as shown in figure_delimited_text_1. To add the layer to the map, click [OK]. The delimited text file now behaves as any other map layer in QGIS.
Puoi anche tagliare gli spazi iniziali e finali dai campi spuntando la casella di controllo Rifinisci i campi. Inoltre puoi anche spuntare la casella di controllo Scarta i campi vuoti. Se è necessario puoi forzare la lettura della virgola come separatore decimale spuntando la casella di controllo La virgola è il separatore decimale.
If spatial information is represented by WKT, activate the
Well Known Text option and select the field with the WKT definition for
point, line or polygon objects. If the file contains non-spatial data, activate
No geometry (attribute only table) and it will be
loaded as an ordinal table.
Additionaly, you can enable:
- Usa indice spaziale per migliorare le prestazioni di visualizzazione di selezione delle geometrie.
- Usa indice di raggruppamento
- Watch file to watch for changes to the file by other
applications while QGIS is running.
Dati OpenStreetMap
In recent years, the OpenStreetMap project has gained popularity because in many countries no free geodata such as digital road maps are available. The objective of the OSM project is to create a free editable map of the world from GPS data, aerial photography or local knowledge. To support this objective, QGIS provides suppport for OSM data.
Caricare vettori OpenStreetMap
QGIS integrates OpenStreetMap import as a core functionality.
Per connetterti al server OSM e scaricare i dati, apri il menu Vettore ‣ OpenStreetMap ‣ Download dati. Puoi saltare questo passaggio se hai già a disposizione un file XML .osm ottenuto con JOSM, Overpass API o altre fonti.
Il menu Vettore ‣ OpenStreetMap ‣ Importa topologia da XML convertirà il tuo file .osm in un database SpatiaLite e creerà una connessione a questo database.
- The menu Vector ‣ Openstreetmap ‣ Export topology to
SpatiaLite then allows you to open the database connection, select the type
of data you want (points, lines, or polygons) and choose tags to import.
This creates a SpatiaLite geometry layer that you can add to your
project by clicking on the
 Add SpatiaLite Layer toolbar button or by selecting the
Add SpatiaLite Layer... option
from the Layer menu (see section Vettori SpatiaLite).
Add SpatiaLite Layer toolbar button or by selecting the
Add SpatiaLite Layer... option
from the Layer menu (see section Vettori SpatiaLite).
Vettori PostGIS
PostGIS layers are stored in a PostgreSQL database. The advantages of PostGIS are the spatial indexing, filtering and query capabilities it provides. Using PostGIS, vector functions such as select and identify work more accurately than they do with OGR layers in QGIS.
Creare una connessione
 The first time you use a PostGIS data source, you must
create a connection to the PostgreSQL database that contains the data. Begin by
clicking on the Add PostGIS Layer toolbar
button, selecting the Add PostGIS Layer...
option from the Layer menu, or typing Ctrl+Shift+D. You
can also open the Add Vector Layer dialog and select
Database. The Add PostGIS Table(s)
dialog will be displayed. To access the connection manager, click on the
[New] button to display the Create a New PostGIS Connection
dialog. The parameters required for a connection are:
The first time you use a PostGIS data source, you must
create a connection to the PostgreSQL database that contains the data. Begin by
clicking on the Add PostGIS Layer toolbar
button, selecting the Add PostGIS Layer...
option from the Layer menu, or typing Ctrl+Shift+D. You
can also open the Add Vector Layer dialog and select
Database. The Add PostGIS Table(s)
dialog will be displayed. To access the connection manager, click on the
[New] button to display the Create a New PostGIS Connection
dialog. The parameters required for a connection are:
Nome: Nome della connessione. Può essere uguale a quello del Database.
Servizio: Parametri del servizio da usare alternativamente a host/porta (e potenzialmente database). Lo puoi definire in pg_service.conf.
- Host: Name of the database host. This must be a resolvable host name such as would be used to open a telnet connection or ping the host. If the database is on the same computer as QGIS, simply enter ‘localhost’ here.
Porta: Numero della porta del server database PostgreSQ. La porta predefinita è 5432.
Database: Nome del database.
- SSL mode: How the SSL connection will be negotiated with the server. Note
that massive speedups in PostGIS layer rendering can be achieved by disabling
SSL in the connection editor. The following options are available:
disabilitato: prova solo una connessione SSL non criptata
permesso: tenta una connessione non-SSL, se questa fallisce ne tenta una SSL
preferito (predefinito): tenta una connessione SSL, se questa fallisce ne prova una non-SSL
richiesto: tenta solo una connessione SSL
Nome utente: Nome dell’utente usato per accedere al database.
Password: Password usata dallo Username per collegarsi al database.
Se vuoi, puoi attivare le seguenti caselle di controllo:
- Salva nome utente
- Salva Password
- Cercare solamente nella tabella geometry_columns
- Non risolvere tipo di geometria senza restrizioni (GEOMETRY)
- Cerca solamente nello schema
- Mostra anche tabelle senza geometria
- Usa i metadati stimati della tabella
Quando hai impostato tutti i parametri, puoi testare la connessione cliccando sul pulsante [Test Connessione].
Caricare un vettore PostGIS
Once you have one or more connections defined, you can
load layers from the PostgreSQL database. Of course, this requires having data in
PostgreSQL. See section Importare dati in PostgreSQL for a discussion on
importing data into the database.
Per caricare vettori PostGIS, segui i seguenti passaggi:
- If the Add PostGIS layers dialog is not already open,
selecting the Add PostGIS Layer...
option from the Layer menu or typing Ctrl+Shift+D
opens the dialog.
Scegli la connessione dal menu a tendina e clicca su [Connetti].
Seleziona/deseleziona
Mostra anche le tabelle senza geometria.Spunta la casella di controllo
Opzioni di ricerca per specificare quali elementi caricare dal vettore oppure usa [Imposta filtro] per avviare la finestra di dialogo Costruttore interrogazioni.Scegli il vettore che vuoi caricare dalla lista di quelli disponibili.
Seleziona il vettore cliccando sul nome. Puoi selezionare più vettori tenendo premuto il tasto Shift mentre stai selezionando. Vedi la sezione Costruttore di interrogazioni per informazioni su come usare il Costruttore di interrogazioni PostgreSQL.
Clicca su [Aggiungi] per aggiungere il vettore alla mappa.
Suggerimento
Vettori PostGIS
Normally, a PostGIS layer is defined by an entry in the geometry_columns table. From version 0.9.0 on, QGIS can load layers that do not have an entry in the geometry_columns table. This includes both tables and views. Defining a spatial view provides a powerful means to visualize your data. Refer to your PostgreSQL manual for information on creating views.
Alcuni dettagli sui vettori PostgreSQL
This section contains some details on how QGIS accesses PostgreSQL layers. Most of the time, QGIS should simply provide you with a list of database tables that can be loaded, and it will load them on request. However, if you have trouble loading a PostgreSQL table into QGIS, the information below may help you understand any QGIS messages and give you direction on changing the PostgreSQL table or view definition to allow QGIS to load it.
QGIS requires that PostgreSQL layers contain a column that can be used as a unique key for the layer. For tables, this usually means that the table needs a primary key, or a column with a unique constraint on it. In QGIS, this column needs to be of type int4 (an integer of size 4 bytes). Alternatively, the ctid column can be used as primary key. If a table lacks these items, the oid column will be used instead. Performance will be improved if the column is indexed (note that primary keys are automatically indexed in PostgreSQL).
If the PostgreSQL layer is a view, the same requirement exists, but views do not have primary keys or columns with unique constraints on them. You have to define a primary key field (has to be integer) in the QGIS dialog before you can load the view. If a suitable column does not exist in the view, QGIS will not load the layer. If this occurs, the solution is to alter the view so that it does include a suitable column (a type of integer and either a primary key or with a unique constraint, preferably indexed).
QGIS offers a checkbox Select at id that is activated by default. This option gets the ids without the attributes which is faster in most cases. It can make sense to disable this option when you use expensive views.
Suggerimento
Backup del database PostGIS con layer salvati da QGIS
If you want to make a backup of your PostGIS database using the pg_dump and pg_restore commands the default layer styles as saved by QGIS are failing to restore afterwards. You need to set the XML option to DOCUMENT and the restore will work.
Importare dati in PostgreSQL
Data can be imported into PostgreSQL/PostGIS using several tools, including the SPIT plugin and the command line tools shp2pgsql and ogr2ogr.
DB Manager
QGIS comes with a core plugin named  DB Manager. It can
be used to load shapefiles and other data formats, and it includes support for
schemas. See section Plugin DB Manager for more information.
DB Manager. It can
be used to load shapefiles and other data formats, and it includes support for
schemas. See section Plugin DB Manager for more information.
shp2pgsql
Puoi usare lo strumento shp2pgsql di PostGIS per importare shapefile in un database PostGIS. Per esempio, per importare uno shapefile chiamato lakes.shp in un database PostgreSQL chiamato gis_data, usa il seguente comando:
shp2pgsql -s 2964 lakes.shp lakes_new | psql gis_data
Questo comando crea un nuovo vettore, chiamato lakes_new, nel database gis_data. Il nuovo vettore avrà un identificatore del sistema di riferimento (Spatial Reference Identifier - SRID) corrispondente a 2964. Vedi la sezione Lavorare con le proiezioni per ulteriori informazioni sui sistemi di riferimento spaziali e sulle proiezioni.
Suggerimento
Esportare dati da PostGIS
Come lo strumento di importazione shp2pgsql, esiste anche il comando che permette di esportare set di dati da PostGIS come shapefile: pgsql2shp. Lo strumento è incluso con la tua versione di PostGIS.
ogr2ogr
Oltre a shp2pgsql e DB Manager c’è un altro strumento per caricare dati in PostGIS: ogr2ogr. Questo comando fa parte dell’installazione di GDAL.
Per importare uno shapefile in PostGIS con ogr2ogr digita il seguente comando:
ogr2ogr -f "PostgreSQL" PG:"dbname=postgis host=myhost.de user=postgres
password=topsecret" alaska.shp
Questo comando importerà lo shapefile alaska.shp nel database PostGIS postgis usando come utente postgres e come password topsecret sull’host myhost.de.
Nota che OGR deve essere compilato con il supporto PostgreSQL per poter effettuare questa operazione. Puoi verificarlo digitando
ogrinfo --formats | grep -i post
Se volessi usare il comando interno di PostgreSQL COPY al posto del metodo predefinito INSERT INTO, devi impostare le variabili d’ambiente come segue (su piattaforme e  ):
):
export PG_USE_COPY=YES
ogr2ogr non crea indici spaziali come shp2pgsl. Devi crearli manualmente, usando il comando SQL CREATE INDEX dopo l’importazione, come passo aggiuntivo (sezione Migliorare le prestazioni).
Migliorare le prestazioni
Retrieving features from a PostgreSQL database can be time-consuming, especially over a network. You can improve the drawing performance of PostgreSQL layers by ensuring that a PostGIS spatial index exists on each layer in the database. PostGIS supports creation of a GiST (Generalized Search Tree) index to speed up spatial searches of the data (GiST index information is taken from the PostGIS documentation available at http://postgis.refractions.net).
La sintassi per la creazione di un indice GiST è:
CREATE INDEX [indexname] ON [tablename]
  USING GIST ( [geometryfield] GIST_GEOMETRY_OPS );
Nota che per tabelle molto grandi, la creazione dell’indice può richiedere parecchio tempo. Non appena l’indice è stato creato, dovresti effettuare un VACUUM ANALYZE. Vedi la documentazione di PostGIS (POSTGIS-PROJECT Letteratura e riferimenti web) per ulteriori informazioni.
Segue un esempio di come creare un indice GiST:
gsherman@madison:~/current$ psql gis_data
Welcome to psql 8.3.0, the PostgreSQL interactive terminal.

Type:  \copyright for distribution terms
       \h for help with SQL commands
       \? for help with psql commands
       \g or terminate with semicolon to execute query
       \q to quit

gis_data=# CREATE INDEX sidx_alaska_lakes ON alaska_lakes
gis_data-# USING GIST (the_geom GIST_GEOMETRY_OPS);
CREATE INDEX
gis_data=# VACUUM ANALYZE alaska_lakes;
VACUUM
gis_data=# \q
gsherman@madison:~/current$
Vettori a cavallo dei 180° di longitudine
Many GIS packages don’t wrap vector maps with a geographic reference system (lat/lon) crossing the 180 degrees longitude line (http://postgis.refractions.net/documentation/manual-2.0/ST_Shift_Longitude.html). As result, if we open such a map in QGIS, we will see two far, distinct locations, that should appear near each other. In Figure_vector_4, the tiny point on the far left of the map canvas (Chatham Islands) should be within the grid, to the right of the New Zealand main islands.
Figure Vector 4:

Map in lat/lon crossing the 180° longitude line
Una soluzione consiste nel trasformare i valori di longitudine utilizzando PostGIS e la funzione ST_Shift_Longitude. Questa funzione legge i punti/vertici di ogni elemento di una geometria e se la coordinata di longitudine è < 0° , aggiunge 360°. Il risultato sarà una versione 0° - 360° dei dati, che verranno poi visualizzati su una mappa centrata a 180° .
Figure Vector 5:
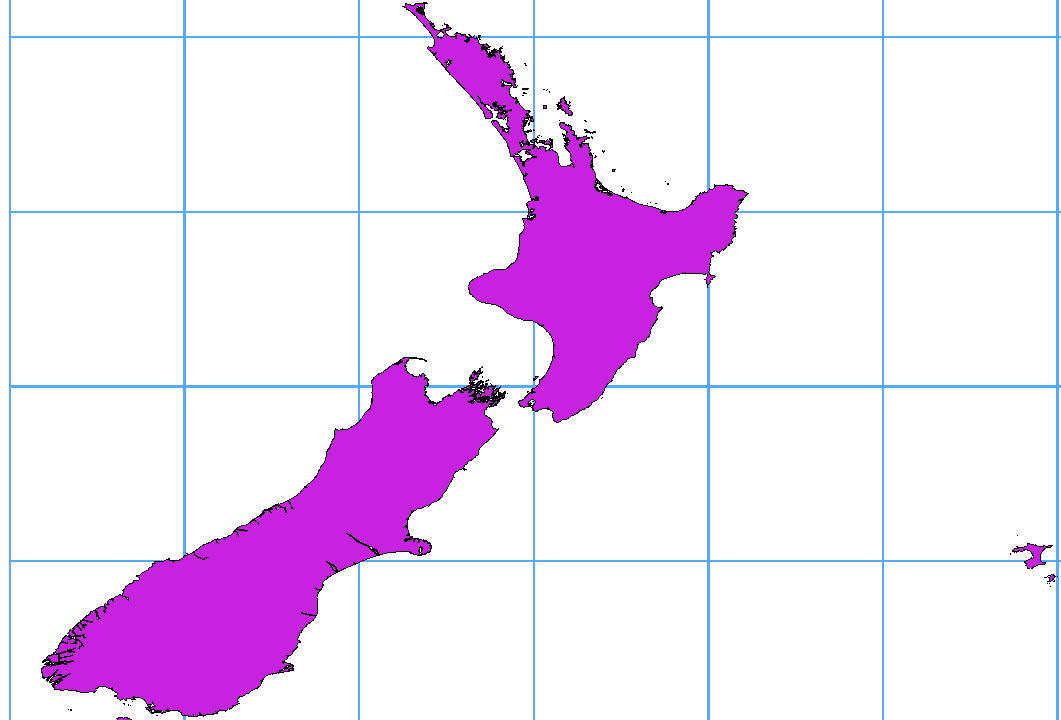
Vettori a cavallo di 180° di longitudine usando la funzione ST_Shift_Longitude
Guida all’uso
Importare i dati in PostGIS (Importare dati in PostgreSQL) usando, per esempio, il plugin DB Manager.
Usa l’interfaccia da linea di comando di PostGIS per dare il seguente comando (nell’esempio -“TABLE” è il nome della tua tabella PostGIS):
Se tutto è andato a buon fine, riceverai la conferma sul numero di elementi che sono stati aggiornati. Potrai cosi caricare la mappa e vedere le differenze (figura Figure_vector_5).
Vettori SpatiaLite
The first time you load data from a SpatiaLite
database, begin by clicking on the
Add SpatiaLite Layer toolbar button, or by selecting the
Add SpatiaLite Layer... option
from the Layer menu, or by typing Ctrl+Shift+L.
This will bring up a window that will allow you either to connect to a
SpatiaLite database already known to QGIS, which you can choose from the
drop-down menu, or to define a new connection to a new database. To define a
new connection, click on [New] and use the file browser to point to
your SpatiaLite database, which is a file with a .sqlite extension.
Per salvare un vettore in formato SpatialLite, clicca con il tasto destro del mouse sul vettore nella legenda e seleziona l’opzione Salva con nome..., scegli il nome del file in output, seleziona SQLite come formato e il SR che preferisci. Aggiungi anche SPATIALITE=YES nel riquadro Sorgente dati delle opzioni di creazione OGR. Vedi http://www.gdal.org/ogr/drv_sqlite.html per ulteriori informazioni.
QGIS also supports editable views in SpatiaLite.
Creare un nuovo vettore SpatiaLite
Per creare un nuovo vettore SpatiaLite, fai riferimento alla sezione Creare un nuovo layer SpatiaLite.
Suggerimento
SpatiaLite data management plugin
For SpatiaLite data management, you can also use several Python plugins: QSpatiaLite, SpatiaLite Manager or DB Manager (core plugin, recommended). If necessary, they can be downloaded and installed with the Plugin Installer.
Vettori Spatial MSSQL
 QGIS also provides native MS SQL 2008 support. The first
time you load MSSQL Spatial data, begin by clicking on the
Add MSSQL Spatial Layer toolbar button or by
selecting the Add MSSQL Spatial Layer...
option from the Layer menu, or by typing Ctrl+Shift+M.
QGIS also provides native MS SQL 2008 support. The first
time you load MSSQL Spatial data, begin by clicking on the
Add MSSQL Spatial Layer toolbar button or by
selecting the Add MSSQL Spatial Layer...
option from the Layer menu, or by typing Ctrl+Shift+M.
Vettori Oracle Spatial
The spatial features in Oracle Spatial aid users in managing geographic and location data in a native type within an Oracle database. QGIS now has support for such layers.
Creare una connessione
 The first time you use an Oracle Spatial data source,
you must create a connection to the database that contains the data. Begin by
clicking on the Add Orcale Spatial Layer toolbar
button, selecting the Add Orcale
Spatial Layer... option from the Layer menu, or typing
Ctrl+Shift+O. To access the connection manager, click on the [New]
button to display the Create a New Oracle Spatial Connection dialog.
The parameters required for a connection are:
The first time you use an Oracle Spatial data source,
you must create a connection to the database that contains the data. Begin by
clicking on the Add Orcale Spatial Layer toolbar
button, selecting the Add Orcale
Spatial Layer... option from the Layer menu, or typing
Ctrl+Shift+O. To access the connection manager, click on the [New]
button to display the Create a New Oracle Spatial Connection dialog.
The parameters required for a connection are:
Nome: Nome della connessione. Può essere uguale a quello del Database.
Database: SID o SERVICE_NAME dell’istanza Oracle.
- Host: Name of the database host. This must be a resolvable host name such as would be used to open a telnet connection or ping the host. If the database is on the same computer as QGIS, simply enter ‘localhost’ here.
Port: Numero di porta su cui il database Oracle rimane in ascolto. La porta predefinita è 1521.
Nome utente: Nome utente che accede al database.
Password: Password usata dallo Username per collegarsi al database.
Come opzione, puoi spuntare le seguenti caselle di controllo:
- Salva nome utente specifica se vuoi salvare il nome utente del database nelle configurazioni di connessione.
- Salva password specifica se vuoi salvare la password del database nelle configurazioni di connessione.
- Cerca solo nelle tabelle dei metadati restringe le tabelle visualizzate a quello che sono presenti nella vista all_sdo_geom_metadata. Questo procedimento velocizza la visualizzazione iniziale delle tabelle spaziali.
- Cerca solo tabelle dell’utente: nella ricerca di tabelle spaziali, si limita a quelle di proprietà dell’utente.
- Mostra anche tabelle senza geometria specifica che anche le tabelle senza geometria devono essere elencate.
- Usa i metadati stimati del vettore: quando il vettore è stato impostato, la tabella Oracle richiede diversi metadati. Sono necessarie informazioni come il conteggio delle righe della tabella, il tipo di geometria e l’estensione spaziale nella colonna geometria. Se la tabella contiene un grande numero di righe che descrivono i metadati, stimare questi metadati porterà via molto tempo. Attivando questa opzione verranno eseguite le seguenti rapide operazioni sulla tabella dei metadati: Il conteggio delle righe è determinato da all_tables.num_rows. Le estensioni della tabella saranno sempre determinate con la funzione SDO_TUNE.EXTENTS_OF anche se è stato applicato un filtro al vettore.
- Solo tipi di geometrie esistenti elenca solo i tipi di geometria esistenti e non permettere di aggiungerne altre.
Quando hai impostato tutti i parametri, puoi testare la connessione cliccando sul pulsante [Test Connessione].
Suggerimento
Impostazioni utente e sicurezza
Depending on your computing environment, storing passwords in your QGIS settings may be a security risk. Passwords are saved in clear text in the system configuration and in the project files! Your customized settings for QGIS are stored based on the operating system:
- le impostazioni sono salvate nella tua cartella home nel file ~/.qgis2.
 le impostazioni sono salvate nel registro di sistema.
Caricare un vettore Oracle Spatial
Once you have one or more connections defined, you can
load layers from the Oracle database. Of course, this requires having data in
Oracle.
Per caricare un vettore da Oracle Spatial, segui i seguenti passaggi:
- If the Add Oracle Spatial layers dialog is not already open,
click on the Add Oracle Spatial Layer toolbar
button.
Scegli la connessione dal menu a tendina e clicca su [Connetti].
Seleziona/deseleziona
Mostra anche le tabelle senza geometria.Spunta la casella di controllo
Opzioni di ricerca per specificare quali elementi caricare dal vettore oppure usa [Imposta filtro] per avviare la finestra di dialogo Costruttore interrogazioni.Scegli il vettore che vuoi caricare dalla lista di quelli disponibili.
Seleziona il vettore cliccando sul nome. Puoi selezionare più vettori tenendo premuto il tasto Shift mentre stai selezionando. Vedi la sezione Costruttore di interrogazioni per informazioni su come usare il Costruttore di interrogazioni Oracle.
Clicca su [Aggiungi] per aggiungere il vettore alla mappa.
Suggerimento
Vettori Oracle Spatial
Normalmente un vettore Oracle Spatial è definito con una voce nella tabella USER_SDO_METADATA.