그래픽 모델 생성기
The graphical modeler allows you to create complex models using a simple and easy-to-use interface. When working with a GIS, most analysis operations are not isolated, rather part of a chain of operations. Using the graphical modeler, that chain of operations can be wrapped into a single process, making it convenient to execute later with a different set of inputs. No matter how many steps and different algorithms it involves, a model is executed as a single algorithm, saving time and effort.
The graphical modeler can be opened from the Processing menu ().
The modeler has a working canvas where the structure of the model and the workflow it represents are shown. The left part of the window is a panel with two tabs that can be used to add new elements to the model.
모델 생성기 대화창
모델 생성은 다음 2단계로 이루어집니다:
필요한 입력물을 정의하기: 입력해야 할 항목들이 Inputs 탭의 Parameters 창에 추가되어 모델 실행 시 사용자가 그 값들을 설정할 수 있습니다. 모델은 그 자체로 알고리즘으로서, 공간 처리 프레임워크에서 사용할 수 있는 모든 알고리즘과 마찬가지로 파라미터 창을 자동적으로 생성합니다.
Definition of the workflow. Using the input data of the model, the workflow is defined by adding algorithms and selecting how they use the defined inputs or the outputs generated by other algorithms in the model.
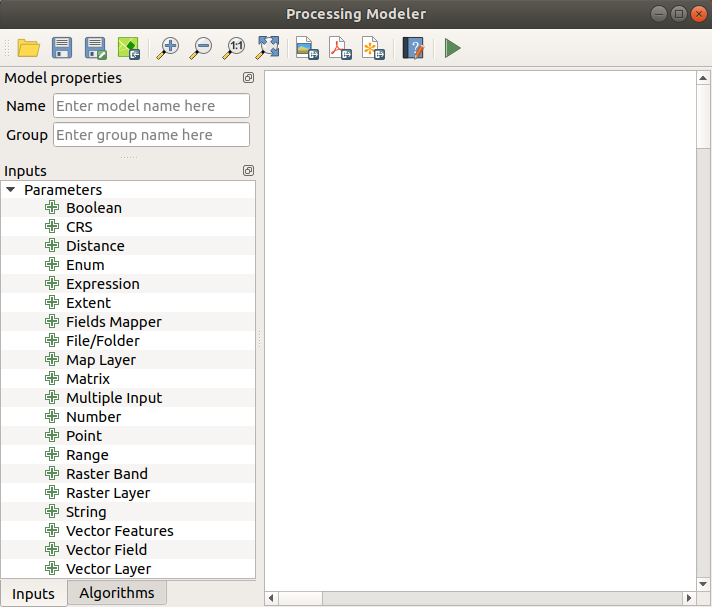
입력물 정의
The first step is to define the inputs for the model. The following elements are found in the Inputs tab on the left side of the modeler window:
불(Boolean)
CRS
Distance
Enum
Expression
범위(Extent)
Fields Mapper
File/Folder
Map Layer
Matrix
Multiple Input
숫자
Point
Range
Raster Band
Raster Layer
문자열
Vector Features
Vector Field
Vector Layer
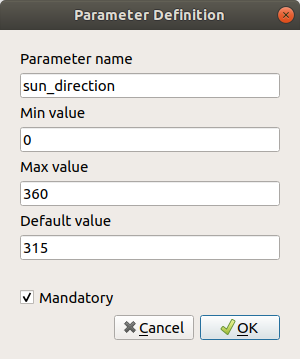
When double-clicking on an element, a dialog is shown that lets you define its characteristics. Depending on the parameter, the dialog will contain at least one basic element (the description, which is what the user will see when executing the model). When adding a numerical value, as can be seen in the next figure, in addition to the description of the parameter, you have to set a default value and the range of valid values.
모델 파라미터 정의하기
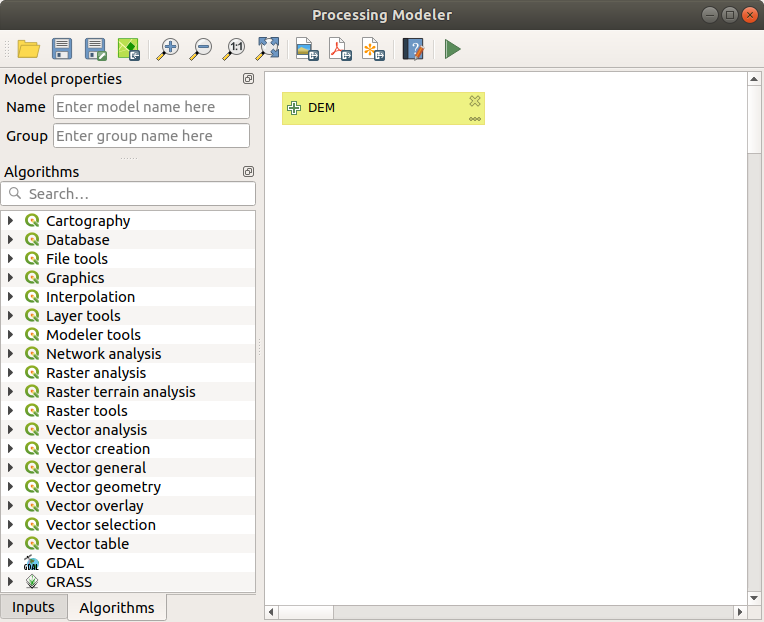
입력물을 추가할 때마다, 모델 생성기 캔버스에 새 항목이 추가됩니다.

Model Parameters
You can also add inputs by dragging the input type from the list and dropping it in the position where you want it in the modeler canvas.
작업 흐름 정의
Once the inputs have been defined, it is time to define the algorithms of the model. Algorithms can be found in the Algorithms tab, grouped much in the same way as they are in the Processing toolbox.
모델 입력물
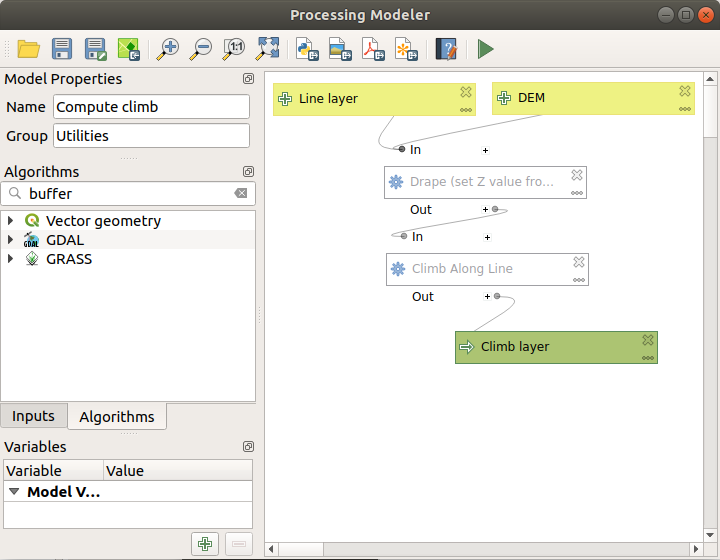
To add an algorithm to a model, double-click on its name or drag and drop it, just like for inputs. An execution dialog will appear, with a content similar to the one found in the execution panel that is shown when executing the algorithm from the toolbox. The ones shown next correspond to the QGIS 〈Drape (set Z value from raster)〉 algorithm and the QGIS 〈Climb along line〉 algorithm.
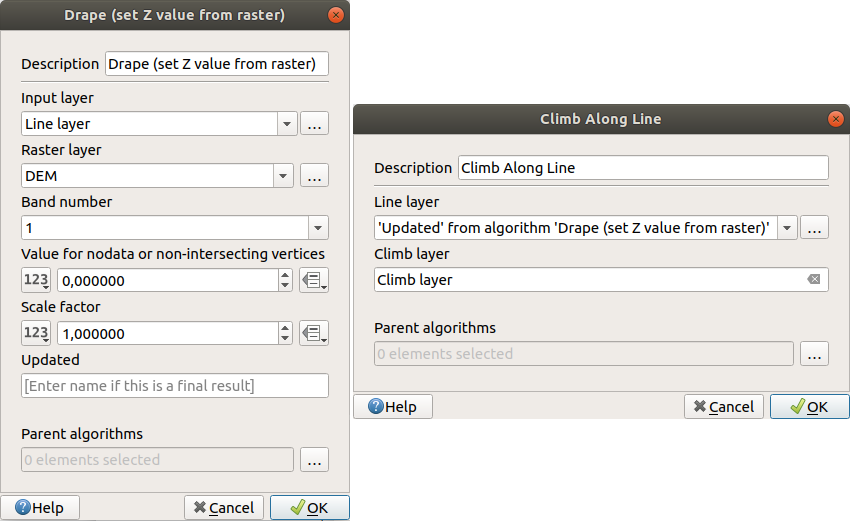
모델 알고리즘 파라미터
이 그림에서 몇몇 차이점을 볼 수 있습니다. 산출 레이어 및 테이블을 위한 파일 경로를 설정하는 파일 산출물 란 대신, 단순한 텍스트 란이 있습니다. 알고리즘이 생성한 레이어가 그저 다른 알고리즘의 입력물로 사용되는 임시 산출물로서 최종 산출물이 아닌 경우, 그냥 해당 텍스트 란을 편집하지 않으면 됩니다. 이 텍스트 란에 어떤 내용이라도 입력하면 산출물이 최종이라는 뜻이 되며, 사용자가 입력한 텍스트는 모델 실행 시 사용자가 보게 될 최종 산출물의 명칭이 될 것입니다.
각 파라미터의 값을 선택하는 과정도 조금씩 다릅니다. 모델 생성기의 맥락과 툴박스의 맥락 사이에는 중요한 차이가 있기 때문입니다. 각 파라미터 유형에 대한 값을 어떻게 설정하는지 살펴보겠습니다.
레이어(래스터 및 벡터) 및 테이블: 목록에서 선택할 수 있는 것은 동일하지만, 모델 생성기에서는 QGIS에 현재 불러온 레이어 또는 테이블을 선택하는 것이 아니라 해당 유형의 모델 입력물 또는 이미 모델에 추가된 기존 알고리즘이 생성하는 다른 레이어 또는 테이블 가운데 선택합니다.
Numerical values. Literal values can be introduced directly in the text box. Clicking on the button beside the text box, expressions can be entered. Available variables for expressions include numerical inputs of the model, outputs from model algorithms and also statistical values from available layers within the model.
String. Literal strings can be typed in the corresponding text box. Clicking on the button beside the text box, expressions can be entered, as for numerical values.
Vector Field. The fields of a vector layer cannot be known at design time, since they depend on the selection of the user each time the model is executed. To set the value for this parameter, type the name of a field directly in the text box, or use the list to select a table field. The validity of the selected field will be checked at run time.
이 모든 경우에, 툴박스에서 알고리즘을 호출할 때에는 볼 수 없었던 Parent algorithms 라는 추가 파라미터를 볼 수 있습니다. 이 파라미터는 한 알고리즘을 현재 알고리즘의 부모로 명확하게 정의함으로써, 부모 알고리즘이 현재 알고리즘 이전에 실행되도록 강제해서 알고리즘 실행 순서를 정의할 수 있습니다.
When you use the output of a previous algorithm as the input of your algorithm, that implicitly sets the previous algorithm as parent of the current one (and places the corresponding arrow in the modeler canvas). However, in some cases an algorithm might depend on another one even if it does not use any output object from it (for instance, an algorithm that executes a SQL sentence on a PostGIS database and another one that imports a layer into that same database). In that case, just select the previous algorithm in the Parent algorithms parameter and they will be executed in the correct order.
Once all the parameters have been assigned valid values, click on OK and the algorithm will be added to the canvas. It will be linked to the elements in the canvas (algorithms or inputs) that provide objects that are used as inputs for the algorithm.
Elements can be dragged to a different position on the canvas. This is useful to make the structure of the model more clear and intuitive. Links between elements are updated automatically. You can zoom in and out by using the mouse wheel.
A complete model
You can run your algorithm any time by clicking on the Run button. In order to use the algorithm from the toolbox, it has to be saved and the modeler dialog closed, to allow the toolbox to refresh its contents.
모델 저장 및 불러오기
Use the Save button to save the current model and the
Open button to open any previously saved model.
Models are saved with the .model3 extension.
If the model has been already been saved from the modeler window,
you will not be prompted for a filename.
Since there is already a file associated with the model, that file
will be used for subsequent saves.
Before saving a model, you have to enter a name and a group for it in the text boxes in the upper part of the window.
Models saved in the models folder (the default folder when you
are prompted for a filename to save the model) will appear in the
toolbox in the corresponding branch.
When the toolbox is invoked, it searches the models folder for
files with the .model3 extension and loads the models they
contain.
Since a model is itself an algorithm, it can be added to the toolbox
just like any other algorithm.
Models can also be saved within the project file using the
 Save model in project button.
Models saved using this method won’t be written as
Save model in project button.
Models saved using this method won’t be written as .model3 files
on the disk but will be embedded in the project file.
Project models are available in the
 Project models menu of the toolbox.
Processing Options 환경 설정 대화창의 Modeler 그룹에서 Model folder 를 설정할 수 있습니다.
Models loaded from the models folder appear not only in the
toolbox, but also in the algorithms tree in the Algorithms
tab of the modeler window.
That means that you can incorporate a model as a part of a bigger model,
just like other algorithms.
Models will show up in the Browser panel , and can be run from there.
Exporting a model as an image, PDF or SVG
A model can also be exported as an image, SVG or PDF (for illustration purposes).
모델 편집
You can edit the model you are currently creating, redefining the workflow and the relationships between the algorithms and inputs that define the model.
If you right-click on an algorithm in the canvas, you will see a context menu like the one shown next:
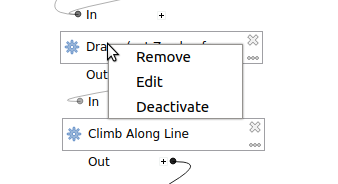
모델 생성기 오른쪽 클릭
Remove 옵션을 선택하면 선택한 알고리즘이 제거될 것입니다. 선택한 알고리즘에 종속되는 다른 알고리즘이 없는 경우에만 – 즉, 선택한 알고리즘의 산출물이 다른 알고리즘의 입력물로 사용되지 않는 경우에만 – 제거할 수 있습니다. 다른 알고리즘이 종속하고 있는 알고리즘을 제거하려 하는 경우, 다음 그림과 같은 경고 메시지를 보게 될 것입니다:
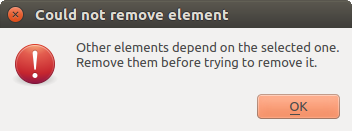
알고리즘을 삭제할 수 없습니다
Selecting the Edit option will show the parameter dialog of the algorithm, so you can change the inputs and parameter values. Not all input elements available in the model will appear as available inputs. Layers or values generated at a more advanced step in the workflow defined by the model will not be available if they cause circular dependencies.
Select the new values and click on the OK button as usual. The connections between the model elements will change in the modeler canvas accordingly.
모델의 알고리즘 가운데 일부를 비활성화시키면 모델을 부분 실행시킬 수 있습니다. 알고리즘 항목을 오른쪽 클릭했을 때 나타나는 컨텍스트 메뉴에 있는 Deactivate 옵션을 선택하면 됩니다. 선택한 알고리즘 및 모델에서 해당 알고리즘에 종속된 모든 알고리즘이 회색조로 표시되고, 모델의 일부로서 실행되지 않을 것입니다.
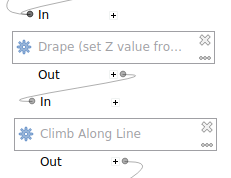
알고리즘이 비활성화된 모델
When right-clicking on an algorithm that is not active, you will see a Activate menu option that you can use to reactivate it.
모델 도움말 파일 및 메타 정보 편집
You can document your models from the modeler itself. Just click on the Edit Model Help button, and a dialog like the one shown next will appear.
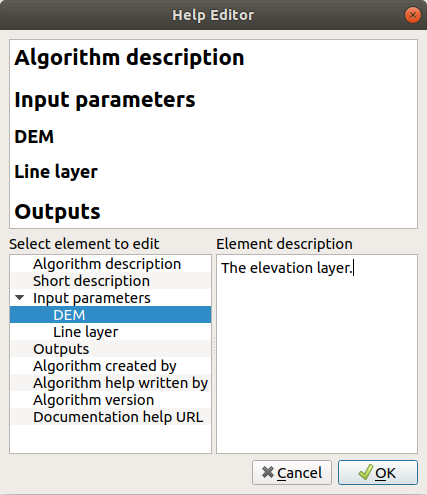
Editing Help
대화창 상단에는 간소한 HTML 페이지 창이 있습니다. 입력 파라미터 및 알고리즘 산출물의 명칭과 모델 또는 모델 생성자에 대한 일반적인 설명을 함께 사용해서 이 페이지의 내용을 생성합니다. 처음 도움말 편집기를 열면, 이 모든 내용이 비어 있습니다. 그러나 대화창 좌하단에 있는 항목들을 이용하면 이를 편집할 수 있습니다. 좌하단 패널에서 항목을 선택한 다음 우하단 텍스트 란에 명칭 및 설명을 작성하십시오.
모델 도움말은 모델의 일부로 저장됩니다.
Exporting a model as a Python script
As we will see in a later chapter, Processing algorithms can be called from the QGIS Python console, and new Processing algorithms can be created using Python. A quick way of creating such a Python script is to create a model and then to export is as a Python file.
To do so, right click on the name of the model in the Processing Toolbox and choose Export Model as Python Algorithm….
사용 가능한 알고리즘에 관해
You might notice that some algorithms that can be executed from the toolbox do not appear in the list of available algorithms when you are designing a model. To be included in a model, an algorithm must have the correct semantic. If an algorithm does not have such a well-defined semantic (for instance, if the number of output layers cannot be known in advance), then it is not possible to use it within a model, and it will not appear in the list of algorithms that you can find in the modeler dialog.