13.3. Esplorare i formati dati e i campi
13.3.1. Dati Raster
GIS raster data are matrices of discrete cells that represent features / phenomena on, above or below the earth’s surface. Each cell in the raster grid has the same size, and cells are usually rectangular (in QGIS they will always be rectangular). Typical raster datasets include remote sensing data, such as aerial photography, or satellite imagery and modelled data, such as elevation or temperature.
Unlike vector data, raster data typically do not have an associated database record for each cell. They are geocoded by pixel resolution and the X/Y coordinate of a corner pixel of the raster layer. This allows QGIS to position the data correctly on the map canvas.
The GeoPackage format is convenient for storing raster data when working with QGIS. The popular and powerful GeoTiff format is a good alternative.
QGIS makes use of georeference information inside the raster layer (e.g., GeoTiff) or an associated world file to properly display the data.
13.3.2. Dati vettoriali
Many of the features and tools available in QGIS work the same, regardless the vector data source. However, because of the differences in format specifications (GeoPackage, ESRI Shapefile, MapInfo and MicroStation file formats, AutoCAD DXF, PostGIS, SpatiaLite, DB2, Oracle Spatial, MSSQL Spatial databases, and many more), QGIS may handle some of their properties differently. Support is provided by the OGR Simple Feature Library. This section describes how to work with these specificities.
Nota
QGIS supports (multi)point, (multi)line, (multi)polygon, CircularString, CompoundCurve, CurvePolygon, MultiCurve, MultiSurface feature types, all optionally with Z and/or M values.
You should also note that some drivers don’t support some of these feature types, like CircularString, CompoundCurve, CurvePolygon, MultiCurve, MultiSurface feature type. QGIS will convert them.
13.3.2.1. GeoPackage
The GeoPackage (GPKG) format is platform-independent, and is implemented as a SQLite database container, and can be used to store both vector and raster data. The format was defined by the Open Geospatial Consortium (OGC), and was published in 2014.
GeoPackage can be used to store the following in a SQLite database:
vector features
tile matrix sets of imagery and raster maps
attributes (non-spatial data)
extensions
Since QGIS version 3.8, GeoPackage can also store QGIS projects. GeoPackage layers can have JSON fields.
GeoPackage is the default format for vector data in QGIS.
13.3.2.2. ESRI Shapefile format
The ESRI Shapefile format is still one of the most used vector file formats, even if it has some limitations compared to for instance GeoPackage and SpatiaLite.
An ESRI Shapefile format dataset consists of several files. The following three are required:
.shpfile contenente le geometrie.dbffile contenente gli attributi in formato dBase.shxfile indici
An ESRI Shapefile format dataset can also include a file with a
.prj suffix, which contains projection information.
While it is very useful to have a projection file, it is not
mandatory.
A Shapefile format dataset can contain additional files.
For further details, see the the ESRI technical specification at
https://www.esri.com/library/whitepapers/pdfs/shapefile.pdf.
GDAL 3.1 has read-write support for compressed ESRI Shapefile
format (shz and shp.zip).
Improving Performance for ESRI Shapefile format datasets
To improve the drawing performance for an ESRI Shapefile format
dataset, you can create a spatial index.
A spatial index will improve the speed of both zooming and panning.
Spatial indexes used by QGIS have a .qix extension.
Segui questi passi per creare un indice spaziale:
Load an ESRI Shapefile format dataset (see Il Pannello Browser)
Open the Layer Properties dialog by double-clicking on the layer name in the legend or by right-clicking and choosing from the context menu
In the Source tab, click the Create Spatial Index button
Problemi nel caricare un file .prj
If you load an ESRI Shapefile format dataset with a .prj file
and QGIS is not able to read the coordinate reference system from
that file, you will need to define the proper projection manually in
the tab of the layer by
clicking the  Select CRS button.
This is due to the fact that
Select CRS button.
This is due to the fact that .prj files often do not provide
the complete projection parameters as used in QGIS and listed in the
CRS dialog.
For the same reason, if you create a new ESRI Shapefile format dataset
with QGIS, two different projection files are created: a .prj
file with limited projection parameters, compatible with ESRI
software, and a .qpj file, providing all the parameters of the
CRS.
Whenever QGIS finds a .qpj file, it will be used instead of
the .prj.
13.3.2.3. Files Testo Limitato
Delimited text files are very common and widely used because of their simplicity and readability – data can be viewed and edited in a plain text editor. A delimited text file is tabular data with columns separated by a defined character and rows separated by line breaks. The first row usually contains the column names. A common type of delimited text file is a CSV (Comma Separated Values), with columns separated by commas. Delimited text files can also contain positional information (see Storing geometry information in delimited text files).
QGIS allows you to load a delimited text file as a layer or an ordinary table (see Il Pannello Browser or Importare file di testo delimitato). First check that the file meets the following requirements:
Il file deve avere una riga di intestazione con il nome dei campi. Questa deve essere la prima riga del file di testo (preferibilmente la prima riga del file di testo).
If geometry should be enabled, the file must contain field(s) that define the geometry. These field(s) can have any name.
Le coordinate X e Y (se la geometria è identificata da coordinate) devono essere specificate come numeri. Il sistema di coordinate non è importante.
If you have a CSV file with non-string columns, you must have an accompanying CSVT file (see section Utilizzo di file CSVT per controllare la formattazione del campo).
The elevation point data file elevp.csv in the QGIS sample
dataset (see section Dati campione) is an example of a
valid text file:
X;Y;ELEV
-300120;7689960;13
-654360;7562040;52
1640;7512840;3
[...]
Some things to note about the text file:
The example text file uses
;(semicolon) as delimiter (any character can be used to delimit the fields).La prima riga è la riga di intestazione. Questa contiene i campi
X,YeELEV.No quotes (
") are used to delimit text fieldsThe X coordinates are contained in the
XfieldThe Y coordinates are contained in the
Yfield
13.3.2.3.1. Storing geometry information in delimited text files
I file testo delimitato possono contenere informazioni sulla geometria in due forme principali:
As coordinates in separate columns (eg.
Xcol,Ycol… ), for point geometry data;Come well-known text (WKT) rappresentazione della geometria in una singola colonna, per qualsiasi tipo di geometria.
Features with curved geometries (CircularString, CurvePolygon and CompoundCurve) are supported. Here are some examples of geometry types in a delimited text file with geometries coded as WKT:
Label;WKT_geom
LineString;LINESTRING(10.0 20.0, 11.0 21.0, 13.0 25.5)
CircularString;CIRCULARSTRING(268 415,227 505,227 406)
CurvePolygon;CURVEPOLYGON(CIRCULARSTRING(1 3, 3 5, 4 7, 7 3, 1 3))
CompoundCurve;COMPOUNDCURVE((5 3, 5 13), CIRCULARSTRING(5 13, 7 15,
  9 13), (9 13, 9 3), CIRCULARSTRING(9 3, 7 1, 5 3))
Delimited text files also support Z and M coordinates in geometries:
LINESTRINGZ(10.0 20.0 30.0, 11.0 21.0 31.0, 11.0 22.0 30.0)
13.3.2.3.2. Utilizzo di file CSVT per controllare la formattazione del campo
When loading CSV files, the OGR driver assumes all fields are strings (i.e. text) unless it is told otherwise. You can create a CSVT file to tell OGR (and QGIS) the data type of the different columns:
Type |
Name |
Example |
|---|---|---|
Whole number |
Integer |
4 |
Decimal number |
Real |
3.456 |
Date |
Date (YYYY-MM-DD) |
2016-07-28 |
Time |
Time (HH:MM:SS+nn) |
18:33:12+00 |
Date & Time |
DateTime (YYYY-MM-DD HH:MM:SS+nn) |
2016-07-28 18:33:12+00 |
Il file CSVT è un file di testo normale di UNA sola riga con i tipi di dati racchiusi da virgolette e separati da virgole, ad esempio:
"Integer","Real","String"
Puoi anche specificare la larghezza e la precisione di ogni colonna, ad esempio:
"Integer(6)","Real(5.5)","String(22)"
Questo file viene salvato nella stessa cartella del file .csv, con lo stesso nome, ma con .csvt come estensione.
You can find more information at GDAL CSV Driver.
13.3.2.4. Layer PostGIS
PostGIS layers are stored in a PostgreSQL database. The advantages of PostGIS are spatial indexing, filtering and querying capabilities. Using PostGIS, vector functions such as select and identify work more accurately than they do with OGR layers in QGIS.
Suggerimento
Layer PostGIS
Normally, a PostGIS layer is identified by an entry in the geometry_columns table. QGIS can load layers that do not have an entry in the geometry_columns table. This includes both tables and views. Refer to your PostgreSQL manual for information on creating views.
This section contains some details on how QGIS accesses PostgreSQL layers. Most of the time, QGIS should simply provide you with a list of database tables that can be loaded, and it will load them on request. However, if you have trouble loading a PostgreSQL table into QGIS, the information below may help you understand QGIS messages and give you directions for modifying the PostgreSQL table or view definition to allow QGIS to load it.
13.3.2.4.1. Chiave primaria
QGIS richiede che i vettori PostgreSQL contengano una colonna che possa essere usata come chiave univoca per il vettore. Le tabelle devono contenere una chiave primaria o una colonna con un vincolo univoco. Questa colonna deve essere di tipo int4 (un numero intero di 4 byte). Alternativamente, la colonna ctid può essere usata come chiave primaria. Se a una tabella mancano queste informazioni, verrà usata la colonna oid. Le prestazioni saranno migliori se la colonna è indicizzata (le chiavi primarie sono indicizzate automaticamente in PostgreSQL).
QGIS offers a checkbox Select at id that is activated by default. This option gets the ids without the attributes, which is faster in most cases.
13.3.2.4.2. Viste
Se il layer di PostgreSQL è una vista sussistono gli stessi requisiti, ma non sempre necessitano chiavi primarie o colonne con vincoli univoci. Devi definire un campo della chiave primaria (deve essere un intero) nella finestra di dialogo di QGIS prima di caricare la vista. Se non c’è una colonna adatta nella vista, QGIS non caricherà il vettore. Se succede la soluzione è di modificare la vista in modo che contenga una colonna adatta (un intero e una chiave primaria con un vincolo univoco, preferibilmente indicizzato).
Come per le tabelle, una casella di controllo Seleziona all’ID è attiva per impostazione predefinita (vedere sopra per il significato della casella di controllo). Può aver senso disattivare questa opzione quando si utilizzano viste impegnative.
13.3.2.4.3. Stili di default dei layer QGIS e backup del database
Se vuoi fare una copia di backup del tuo database PostGIS usando i comandi pg_dump e pg_restore, e gli stili di default dei layer come salvati da QGIS non ripristinabili in seguito, devi impostare l’opzione XML su DOCUMENT prima del comando di ripristino.
SET XML OPTION DOCUMENT;
13.3.2.4.4. Filtro lato server
QGIS allows to filter features already on server side. Check
 to do so.
Only supported expressions will be sent to the database.
Expressions using unsupported operators or functions will gracefully
fallback to local evaluation.
to do so.
Only supported expressions will be sent to the database.
Expressions using unsupported operators or functions will gracefully
fallback to local evaluation.
13.3.2.4.5. Supporto di PostgreSQL alle diverse tipologie di dati
Data types supported by the PostgreSQL provider include: integer, float, boolean, binary object, varchar, geometry, timestamp, array, hstore and json.
13.3.2.5. Importare dati in PostgreSQL
I dati possono essere importati in PostreSQL/PostGIS usando diversi strumenti, come il plugin DB Manager e gli strumenti da riga di comando shp2pgsql e ogr2ogr
13.3.2.5.1. DB Manager
QGIS ha un plugin di base chiamato  DB Manager. Si può utilizzare per caricare dati, e include il supporto per gli schemi. Vedi la sezione Plugin DB Manager per ulteriori informazioni.
13.3.2.5.2. shp2pgsql
PostGIS includes a utility called shp2pgsql, that can be used to import
Shapefile format datasets into a PostGIS-enabled database.
For example, to import a Shapefile format dataset named
lakes.shp into a PostgreSQL database named gis_data, use
the following command:
shp2pgsql -s 2964 lakes.shp lakes_new | psql gis_data
This creates a new layer named lakes_new in the gis_data database.
The new layer will have a spatial reference identifier (SRID) of 2964.
See section Lavorare con le proiezioni for more information about spatial
reference systems and projections.
Suggerimento
Esportare dati da PostGIS
There is also a tool for exporting PostGIS datasets to Shapefile format: pgsql2shp. It is shipped within your PostGIS distribution.
13.3.2.5.3. ogr2ogr
In addition to shp2pgsql and DB Manager, there is another tool for feeding geographical data in PostGIS: ogr2ogr. It is part of your GDAL installation.
To import a Shapefile format dataset into PostGIS, do the following:
ogr2ogr -f "PostgreSQL" PG:"dbname=postgis host=myhost.de user=postgres
password=topsecret" alaska.shp
This will import the Shapefile format dataset alaska.shp into the
PostGIS database postgis using the user postgres with the password
topsecret on the host server myhost.de.
Note that OGR must be built with PostgreSQL to support PostGIS.
You can verify this by typing (in  ):
):
ogrinfo --formats | grep -i post
If you prefer to use the PostgreSQL’s COPY command instead of the default
INSERT INTO method, you can export the following environment variable
(at least available on and  ):
):
export PG_USE_COPY=YES
ogr2ogr does not create spatial indexes like shp2pgsl does. You need to create them manually, using the normal SQL command CREATE INDEX afterwards, as an extra step (as described in the next section Migliorare le prestazioni).
13.3.2.5.4. Migliorare le prestazioni
Retrieving features from a PostgreSQL database can be time-consuming, especially over a network. You can improve the drawing performance of PostgreSQL layers by ensuring that a PostGIS spatial index exists on each layer in the database. PostGIS supports creation of a GiST (Generalized Search Tree) index to speed up spatial searching (GiST index information is taken from the PostGIS documentation available at https://postgis.net).
Suggerimento
You can use the DBManager to create an index for your layer. You should first select the layer and click on , go to tab and click on Add Spatial Index.
The syntax for creating a GiST index is:
CREATE INDEX [indexname] ON [tablename]
  USING GIST ( [geometryfield] GIST_GEOMETRY_OPS );
Note that for large tables, creating the index can take a long time.
Once the index is created, you should perform a VACUUM ANALYZE.
See the PostGIS documentation (POSTGIS-PROJECT in
Letteratura e riferimenti web) for more information.
The following example creates a GiST index:
gsherman@madison:~/current$ psql gis_data
Welcome to psql 8.3.0, the PostgreSQL interactive terminal.

Type:  \copyright for distribution terms
       \h for help with SQL commands
       \? for help with psql commands
       \g or terminate with semicolon to execute query
       \q to quit

gis_data=# CREATE INDEX sidx_alaska_lakes ON alaska_lakes
gis_data-# USING GIST (the_geom GIST_GEOMETRY_OPS);
CREATE INDEX
gis_data=# VACUUM ANALYZE alaska_lakes;
VACUUM
gis_data=# \q
gsherman@madison:~/current$
13.3.2.6. Vettori a cavallo dei 180° di longitudine
Many GIS packages don’t wrap vector maps with a geographic reference system (lat/lon) crossing the 180 degrees longitude line (http://postgis.refractions.net/documentation/manual-2.0/ST_Shift_Longitude.html). As result, if we open such a map in QGIS, we could see two widely separated locations, that should appear near each other. In Figure_vector_crossing, the tiny point on the far left of the map canvas (Chatham Islands) should be within the grid, to the right of the New Zealand main islands.

Fig. 13.21 Mappa in lat/lon a cavallo dei 180° di longitudine
Una soluzione consiste nel trasformare i valori di longitudine utilizzando PostGIS e la funzione ST_Shift_Longitude. Questa funzione legge i punti/vertici di ogni elemento di una geometria e se la coordinata di longitudine è < 0° , aggiunge 360°. Il risultato sarà una versione 0° - 360° dei dati, che verranno poi visualizzati su una mappa centrata a 180°.
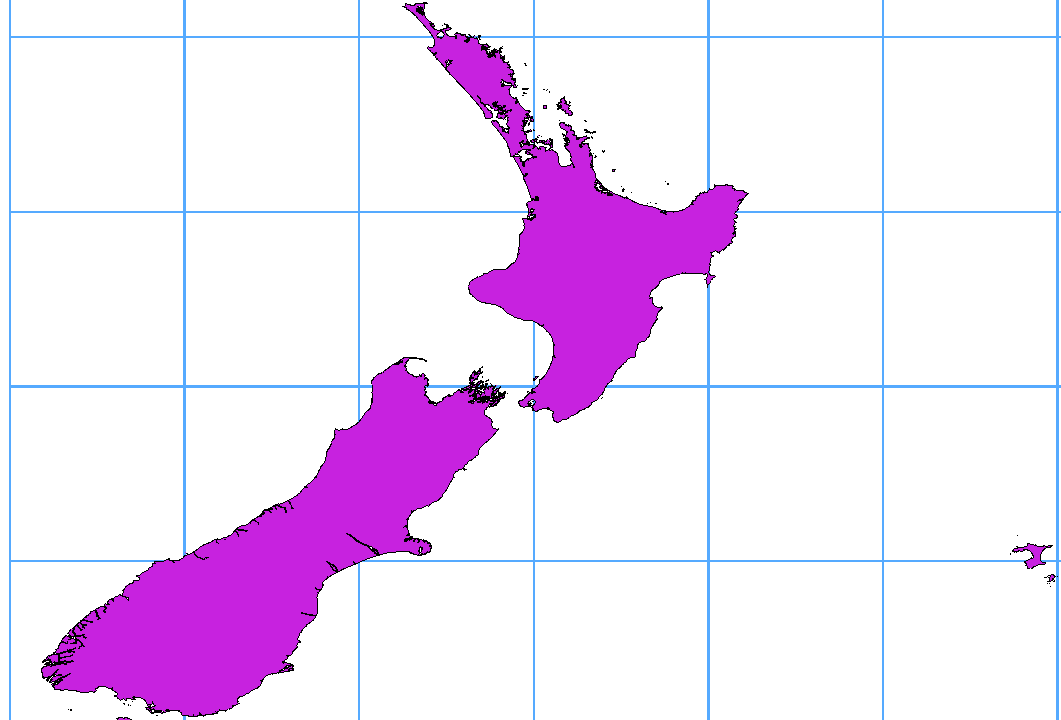
Fig. 13.22 Vettori a cavallo di 180° di longitudine usando la funzione ST_Shift_Longitude
13.3.2.6.1. Guida all’uso
Importa i dati in PostGIS (Importare dati in PostgreSQL) usando, per esempio, il plugin DB Manager.
Usa l’interfaccia da linea di comando di PostGIS per dare il seguente comando (nell’esempio “TABLE” è il nome della tua tabella PostGIS):
gis_data=# update TABLE set the_geom=ST_Shift_Longitude(the_geom);Se tutto è andato a buon fine, riceverai la conferma sul numero di geometrie che sono state aggiornate. Potrai cosi caricare la mappa e vedere le differenze (Figure_vector_crossing_map).
13.3.2.7. Vettori SpatiaLite
If you want to save a vector layer using the SpatiaLite format, you
can do this by following instructions at Creare nuovi layer da layer esistente.
You select SpatiaLite as Format and
enter both File name and Layer name.
Also, you can select SQLite as format and then add
SPATIALITE=YES in the
field.
This tells GDAL to create a SpatiaLite database.
See also https://gdal.org/drivers/vector/sqlite.html.
QGIS also supports editable views in SpatiaLite. For SpatiaLite data management, you can also use the core plugin DB Manager.
Se vuoi creare un nuovo layer SpatiaLite, fai riferimento alla sezione Creare un nuovo layer SpatiaLite.
13.3.2.8. Parametri specifici di GeoJSON
When exporting layers to GeoJSON, there are some specific Layer Options available. These options come from GDAL which is responsible for the writing of the file:
COORDINATE_PRECISION il numero massimo di cifre dopo il separatore decimale da inserire in coordinate. I valori predefiniti sono 15 (nota: per le coordinate Lat Lon 6 è considerato sufficiente). La troncatura si verifica per rimuovere gli zeri finali.
RFC7946 by default GeoJSON 2008 will be used. If set to YES, the updated RFC 7946 standard will be used. Default is NO (thus GeoJSON 2008). See https://gdal.org/drivers/vector/geojson.html#rfc-7946-write-support for the main differences, in short: only EPSG:4326 is allowed, other crs’s will be transformed, polygons will be written such as to follow the right-hand rule for orientation, values of a «bbox» array are [west, south, east, north], not [minx, miny, maxx, maxy]. Some extension member names are forbidden in FeatureCollection, Feature and Geometry objects, the default coordinate precision is 7 decimal digits
WRITE_BBOX set to YES to include the bounding box of the geometries at the feature and feature collection level
Besides GeoJSON there is also an option to export to «GeoJSON - Newline Delimited» (see https://gdal.org/drv_geojsonseq.html). Instead of a FeatureCollection with Features, you can stream one type (probably only Features) sequentially separated with newlines.
GeoJSON - Newline Delimited has some specific Layer options availabe too:
COORDINATE_PRECISION see above (same as for GeoJSON)
RS whether to start records with the RS=0x1E character. The difference is how the features are separated: only by a newline (LF) character (Newline Delimited JSON, geojsonl) or by also prepending a record-separator (RS) character (giving GeoJSON Text Sequences, geojsons). Default to NO. Files are given the
.jsonextension if extension is not provided.
13.3.2.9. Layer DB2 Spatial
IBM DB2 per Linux, Unix e Windows (DB2 LUW), i prodotti IBM DB2 per z/OS (mainframe) e IBM DashDB consentono agli utenti di memorizzare e analizzare i dati spaziali nelle colonne della tabella relazionale. La funzione DB2 per QGIS supporta la gamma completa di visualizzazione, analisi e manipolazione dei dati spaziali in questi database.
La documentazione utente su queste funzionalità può essere trovata in DB2 z/OS KnowledgeCenter, DB2 LUW KnowledgeCenter e DB2 DashDB KnowledgeCenter.
Per ulteriori informazioni sul funzionamento delle opzioni spaziali DB2, consulta il Tutorial DB2 Spatial Tutorial su IBM DeveloperWorks.
La funzionalità DB2 attualmente supporta solo l’ambiente Windows tramite il driver ODBC di Windows.
Il client che esegue QGIS deve disporre di uno dei seguenti componenti installati:
DB2 LUW
IBM Data Server Driver Package
IBM Data Server Client
To open a DB2 data in QGIS, see the Il Pannello Browser or Caricare layer da Database section.
If you are accessing a DB2 LUW database on the same machine or using DB2 LUW as a client, the DB2 executables and supporting files need to be included in the Windows path. This can be done by creating a batch file like the following with the name db2.bat and including it in the directory %OSGEO4W_ROOT%/etc/ini:
@echo off
REM Point the following to where DB2 is installed
SET db2path=C:\Program Files (x86)\sqllib
REM This should usually be ok - modify if necessary
SET gskpath=C:\Program Files (x86)\ibm\gsk8
SET Path=%db2path%\BIN;%db2path%\FUNCTION;%gskpath%\lib64;%gskpath%\lib;%path%