.
QGIS as OGC Data Client
L’Open Geospatial Consortium (OGC), è un’organizzazione internazionale che raggruppa più di 300 organizzazioni commerciali, governative, no-profit ed enti di ricerca. I suoi membri sviluppano e implementano standard per contenuti e servizi geospaziali, analisi GIS e scambio dati.
OGC ha elaborato un numero crescente di specifiche per la descrizione di un modello dati di base per elementi geografici: le specifiche sono orientate a garantire l’interoperabilità nell’ambito della tecnologia geospaziale. Ulteriori informazioni all’indirizzo http://www.opengeospatial.org/.
Important OGC specifications supported by QGIS are:
- WMS — Web Map Service (Client WMS/WMTS)
- WMTS — Web Map Tile Service (Client WMS/WMTS)
- WFS — Web Feature Service (Client WFS e WFS-T)
- WFS-T — Web Feature Service - Transactional (Client WFS e WFS-T)
- WCS — Web Coverage Service (Client WCS)
- SFS — Simple Features for SQL (Vettori PostGIS)
- GML — Geography Markup Language
OGC services are increasingly being used to exchange geospatial data between different GIS implementations and data stores. QGIS can deal with the above specifications as a client, being SFS (through support of the PostgreSQL / PostGIS data provider, see section Vettori PostGIS).
Client WMS/WMTS
Panoramica sul servizio WMS
QGIS currently can act as a WMS client that understands WMS 1.1, 1.1.1 and 1.3 servers. In particular, it has been tested against publicly accessible servers such as DEMIS.
A WMS server acts upon requests by the client (e.g., QGIS) for a raster map with a given extent, set of layers, symbolization style, and transparency. The WMS server then consults its local data sources, rasterizes the map, and sends it back to the client in a raster format. For QGIS, this format would typically be JPEG or PNG.
WMS is generically a REST (Representational State Transfer) service rather than a full-blown Web service. As such, you can actually take the URLs generated by QGIS and use them in a web browser to retrieve the same images that QGIS uses internally. This can be useful for troubleshooting, as there are several brands of WMS server on the market and they all have their own interpretation of the WMS standard.
I layer WMS possono essere aggiunti molto semplicemente, una volta disponibile l’indirizzo (URL) per accedere al server WMS, una connessione adatta e posto che il server usi HTTP come meccanismo di trasferimento dati.
Panoramica sul servizio WMTS
QGIS can also act as a WMTS client. WMTS is an OGC standard for distributing tile sets of geospatial data. This is a faster and more efficient way of distributing data than WMS because with WMTS, the tile sets are pre-generated, and the client only requests the transmission of the tiles, not their production. A WMS request typically involves both the generation and transmission of the data. A well-known example of a non-OGC standard for viewing tiled geospatial data is Google Maps.
Per visualizzare i dati a diverse scale, l’insieme delle mattonelle WMTS vengono prodotte con scale molto differenti fra loro in modo che per il client GIS sia più facile effettuare la richiesta.
Questo diagramma mostra il concetto delle mattonelle:
Figure WMTS 1:
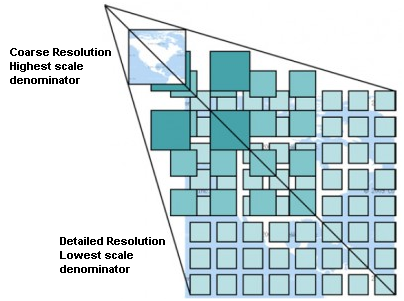
Concetto dell’insieme delle mattonelle WMTS
The two types of WMTS interfaces that QGIS supports are via Key-Value-Pairs (KVP) and RESTful. These two interfaces are different, and you need to specify them to QGIS differently.
1) In order to access a WMTS KVP service, a QGIS user must open the WMS/WMTS interface and add the following string to the URL of the WMTS tile service:
"?SERVICE=WMTS&REQUEST=GetCapabilities"
Un esempio di questo tipo di indirizzo è:
http://opencache.statkart.no/gatekeeper/gk/gk.open_wmts?\
  service=WMTS&request=GetCapabilities
Per vedere se il layer topo2 funziona correttamente in questo WMTS, aggiungi la stringa indicata che il servizio WMTS deve usare al posto del servizio WMS.
Il servizio RESTful WMTS segue un modulo diverso, ovvero un URL diretto. Il formato raccomandato da OGC è:
{WMTSBaseURL}/1.0.0/WMTSCapabilities.xml
This format helps you to recognize that it is a RESTful address. A RESTful WMTS is accessed in QGIS by simply adding its address in the WMS setup in the URL field of the form. An example of this type of address for the case of an Austrian basemap is http://maps.wien.gv.at/basemap/1.0.0/WMTSCapabilities.xml.
Nota
You can still find some old services called WMS-C. These services are quite similar to WMTS (i.e., same purpose but working a little bit differently). You can manage them the same as you do WMTS services. Just add ?tiled=true at the end of the url. See http://wiki.osgeo.org/wiki/Tile_Map_Service_Specification for more information about this specification.
Quando leggi WMTS, puoi anche pensare a WMS-C.
Selezionare server WMS/WMTS
The first time you use the WMS feature in QGIS, there are no servers defined.
Begin by clicking the  Add WMS layer button on the
toolbar, or selecting Layer ‣ Add WMS Layer....
Add WMS layer button on the
toolbar, or selecting Layer ‣ Add WMS Layer....
Si aprirà la finestra di dialogo: Aggiungi Layer da server. Puoi aggiungere alcuni server cliccando sul pulsante [Aggiungi server predefiniti]. Verranno quindi aggiunti due server WMS, il server DM Solutions Group ed il server Lizardtech. Per definire un nuovo server WMS nella sezione Layer, clicca sul pulsante [Nuovo] ed inserisci i parametri di connessione del server WMS desiderato, seguendo le indicazioni della tabella _OGC_1_:
Nome |
Un nome per la connessione. Questo nome verrà utilizzato nel menù a tendina dei server in modo da distinguere i vari server WMS. |
| URL | URL del server che fornisce i dati. Deve essere un indirizzo raggiungibile nello stesso formato che verrebbe usato per aprire una connessione telnet o pingare un host. |
| Username | Nome utente per accedere un WMS protetto. Questo parametro è opzionale. |
| Password | Password per accedere ad un WMS protetto. Questo parametro è opzionale. |
Ignora URI GetMap |
|
Ignora URI GetFeatureInfo |
|
Table OGC 1: Parametri di connessione WMS
If you need to set up a proxy server to be able to receive WMS services from the
internet, you can add your proxy server in the options. Choose
Settings ‣ Options and click on the Network & Proxy tab.
There, you can add your proxy settings and enable them by setting  Use proxy for web access. Make sure that you select the correct
proxy type from the Proxy type
Use proxy for web access. Make sure that you select the correct
proxy type from the Proxy type  drop-down menu.
Once the new WMS server connection has been created, it will be preserved for future QGIS sessions.
Suggerimento
A PROPOSITO DI INDIRIZZI DEI SERVER WMS
Quando inserisci l’indirizzo URL del server assicurati di usare l’indirizzo di base. Ad esempio non devi inserire frammenti tipo request=GetCapabilities o version=1.0.0 nell’indirizzo.
Caricare layer WMS/WMTS
Una volta riempiti tutti i campi dei parametri richiesti, usa il pulsante [Connetti] per caricare le capabilities dei server selezionati. Queste includono: le codifiche delle immagini, i layer, gli stili e le proiezioni. Dal momento che è un operazione eseguita in rete, la velocità di esecuzione dipende dalla velocità della tua connessione. Mentre vengono scaricati i dati dal server WMS, puoi vedere l’avanzamento nella parte inferiore della finestra di dialogo.
Il vostro schermo adesso dovrebbe essere simile a quello rappresentato nella figura_OGR_1, che mostra la risposta fornita dal server WMS dell’European Soil Portal.
Figure OGR 1:
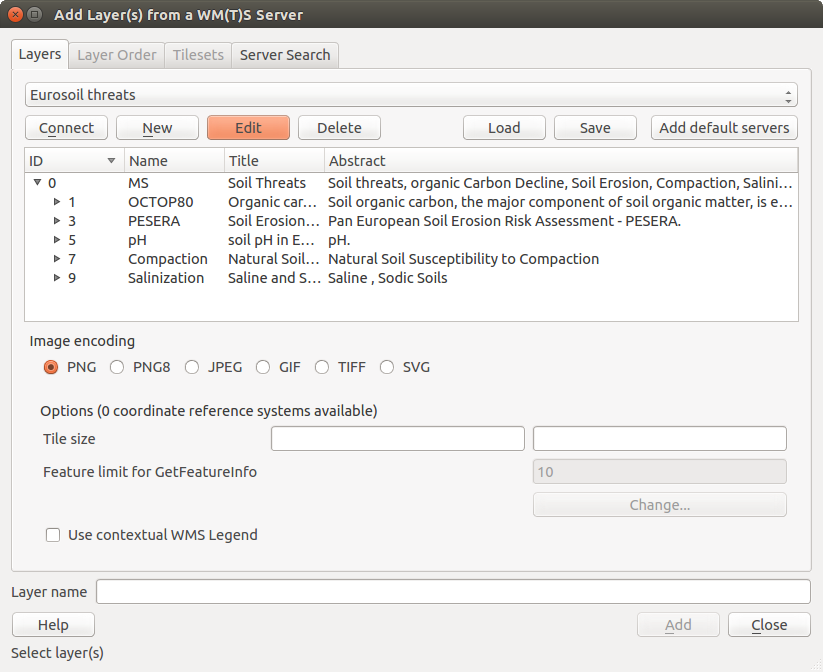
Dialog for adding a WMS server, showing its available layers 
Codifica immagine
La sezione Codifica immagine elenca i formati supportati sia dal client che dal server. La scelta è in funzione dei requisiti di accuratezza.
Suggerimento
Codifica immagine
Un server WMS offre normalmente la scelta fra immagini JPEG o PNG. Il formato JPEG è un formato di compressione lossy, mentre il formato PNG riproduce fedelmente i dati raster.
È meglio usare il formato JPEG per dati di natura fotografica e/o se la perdita parziale di qualità dell’immagine non causa problemi. Questa scelta riduce normalmente di cinque volte il volume di dati trasferiti rispetto al formato PNG.
L’uso del formato PNG permette una visualizzazione più precisa ed è da usare se non ci sono problemi per l’incremento dei dati trasferiti.
Opzioni
La sezione Opzioni mette a disposizione il campo testo Nome layer per dare un nome al layer WMS. Questo nome apparirà nella legenda a caricamento avvenuto.
Sotto il nome del layer puoi scegliere la Dimensione delle tile, (per esempio 256x256) in modo da dividere la richiesta WMS in richieste multiple.
Il campo Limite di elementi per GetFeatureInfo definisce quali elementi del server interrogare.
Selezionando un layer WMS dalla lista apparirà un campo con il sistema di proiezione predefinito dal server. Se il pulsante [Cambia...] è attivo, allora puoi scegliere un altro SR fornito dal server.
Finally you can activate Use contextual WMS-Legend if the
WMS Server supports this feature. Then only the relevant legend for your current map view extent
will be shown and thus will not include legend items for things you can’t see in the current map.
Ordine dei Layer
La scheda Ordine layer elenca i diversi layer disponibili sul server WMS a cui sei connesso. Puoi notare che alcuni layer sono espandibili; questo significa che puoi visualizzare quei layer con diversi stili di immagine.
You can select several layers at once, but only one image style per layer. When several layers are selected, they will be combined at the WMS server and transmitted to QGIS in one go.
Suggerimento
Ordine dei layer WMS
I layer WMS caricati sono sovrapposti in base all’ordine in cui sono elencati nella sezione Layer, ovvero dall’alto verso il basso. Se vuoi cambiare l’ordine di visualizzazione, usa la scheda Ordine layer.
Trasparenza
In this version of QGIS, the Global transparency setting from the Layer Properties is hard coded to be always on, where available.
Suggerimento
Trasparenza dei layer WMS
La possibilità di rendere trasparenti i layer WMS dipende dalla codifica tramite la quale sono stati caricati: PNG e GIF gestiscono la trasparenza mentre il JPEG no.
Sistema di Riferimento
A coordinate reference system (CRS) is the OGC terminology for a QGIS projection.
Ogni layer WMS può avere diversi SR, in funzione delle capacità del server.
Per scegliere uno dei SR disponibili, clicca su [Cambia...] per fare apparire una finestra simile a quella della figura 3 in Lavorare con le proiezioni. La differenza principale è che saranno mostrati solo i SR supportati dal server al quale sei connesso.
Ricerca Server
Within QGIS, you can search for WMS servers. Figure_OGC_2 shows the Server Search tab with the Add Layer(s) from a Server dialog.
Figure OGR 2:
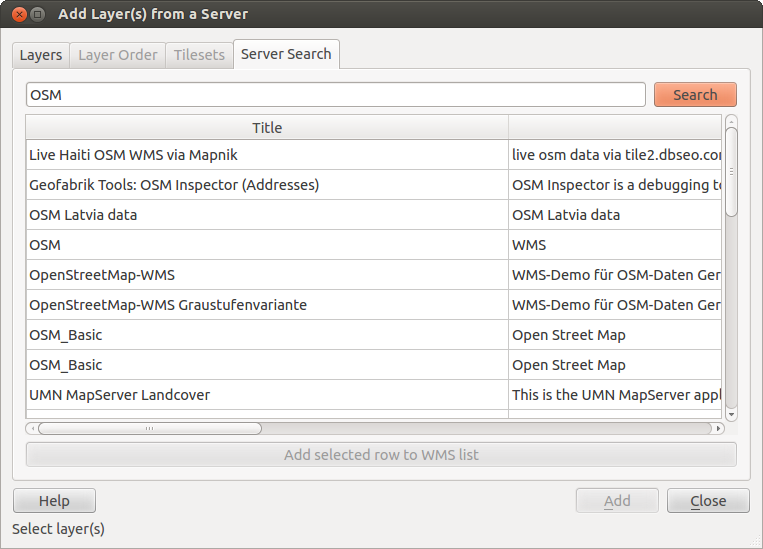
Dialog for searching WMS servers after some keywords
As you can see, it is possible to enter a search string in the text field and hit the [Search] button. After a short while, the search result will be populated into the list below the text field. Browse the result list and inspect your search results within the table. To visualize the results, select a table entry, press the [Add selected row to WMS list] button and change back to the Layers tab. QGIS has automatically updated your server list, and the selected search result is already enabled in the list of saved WMS servers in the Layers tab. You only need to request the list of layers by clicking the [Connect] button. This option is quite handy when you want to search maps by specific keywords.
Si tratta fondamentalmente di un front end alle API di http://geopole.org.
Set di tile
Quando usi servizi WMTS (Cached WMS) come
http://opencache.statkart.no/gatekeeper/gk/gk.open_wmts?\
  service=WMTS&request=GetCapabilities
you are able to browse through the Tilesets tab given by the server. Additional information like tile size, formats and supported CRS are listed in this table. In combination with this feature, you can use the tile scale slider by selecting Settings ‣ Panels (KDE and Windows) or View ‣ Panels (Gnome and MacOSX), then choosing Tile scale. This gives you the available scales from the tile server with a nice slider docked in.
Uso dello strumento di identificazione
Once you have added a WMS server, and if any layer from a WMS server is queryable,
you can then use the  Identify tool to select a pixel on
the map canvas. A query is made to the WMS server for each selection made.
The results of the query are returned in plain text. The formatting of this text
is dependent on the particular WMS server used.
Identify tool to select a pixel on
the map canvas. A query is made to the WMS server for each selection made.
The results of the query are returned in plain text. The formatting of this text
is dependent on the particular WMS server used.
Selezione formato
Se il server supporta diversi formati in output, un menu a tendina verrà automaticamente aggiunto alla finestra delle informazioni risultati in modo che i diversi formati possano essere memorizzati nel progetto.
Supporto formato GML
The Identify tool supports WMS server response (GetFeatureInfo) in GML format (it is called Feature in the QGIS GUI in this context). If “Feature” format is supported by the server and selected, results of the Identify tool are vector features, as from a regular vector layer. When a single feature is selected in the tree, it is highlighted in the map and it can be copied to the clipboard and pasted to another vector layer. See the example setup of the UMN Mapserver below to support GetFeatureInfo in GML format.
# in layer METADATA add which fields should be included and define geometry (example):

"gml_include_items"   "all"
"ows_geometries"      "mygeom"
"ows_mygeom_type"     "polygon"

# Then there are two possibilities/formats available, see a) and b):

# a) basic (output is generated by Mapserver and does not contain XSD)
# in WEB METADATA define formats (example):
"wms_getfeatureinfo_formatlist" "application/vnd.ogc.gml,text/html"

# b) using OGR (output is generated by OGR, it is send as multipart and contains XSD)
# in MAP define OUTPUTFORMAT (example):
OUTPUTFORMAT
    NAME "OGRGML"
    MIMETYPE "ogr/gml"
    DRIVER "OGR/GML"
    FORMATOPTION "FORM=multipart"
END

# in WEB METADATA define formats (example):
"wms_getfeatureinfo_formatlist" "OGRGML,text/html"
Proprietà del server
Una volta aggiunto un server WMS, puoi visualizzarne le proprietà cliccando con il tasto destro sul suo nome nella legenda e selezionando Proprietà.
Scheda Metadati
La scheda Metadati mostra molte informazioni sul server WMS: queste informazioni sono fornite dal server stesso in risposta alla richiesta di GetCapabilities fatta da QGIS. Puoi ricavare molte informazioni leggendo gli standard WMS (vediOPOPEN-GEOSPATIAL-CONSORTIUM Letteratura e riferimenti web). Di seguito alcune definizioni utili:
Proprietà del server
Versione WMS — La versione WMS supportata dal server.
- Image Formats — The list of MIME-types the server can respond with when drawing the map. QGIS supports whatever formats the underlying Qt libraries were built with, which is typically at least image/png and image/jpeg.
- Identity Formats — The list of MIME-types the server can respond with when you use the Identify tool. Currently, QGIS supports the text-plain type.
Propertà layer
Selezionato — Indica se il layer era selezionato quando il server è stato aggiunto al progetto.
- Visible — Whether or not this layer is selected as visible in the legend (not yet used in this version of QGIS).
Può interrogare —Indica se il layer fornisce o meno informazioni se si usa lo strumento Informazioni elementi.
- Can be Transparent — Whether or not this layer can be rendered with transparency. This version of QGIS will always use transparency if this is Yes and the image encoding supports transparency.
- Can Zoom In — Whether or not this layer can be zoomed in by the server. This version of QGIS assumes all WMS layers have this set to Yes. Deficient layers may be rendered strangely.
Conteggio a cascata — I server WMS possono fungere da proxy per altri server WMS dai quali ottengono i dati raster per un certo layer. La voce mostra quindi quante richieste per questo layer vengono inoltrate ai nodi per ottenere un risultato.
- Fixed Width, Fixed Height — Whether or not this layer has fixed source pixel dimensions. This version of QGIS assumes all WMS layers have this set to nothing. Deficient layers may be rendered strangely.
- WGS 84 Bounding Box — The bounding box of the layer, in WGS 84 coordinates. Some WMS servers do not set this correctly (e.g., UTM coordinates are used instead). If this is the case, then the initial view of this layer may be rendered with a very ‘zoomed-out’ appearance by QGIS. The WMS webmaster should be informed of this error, which they may know as the WMS XML elements LatLonBoundingBox, EX_GeographicBoundingBox or the CRS:84 BoundingBox.
Disponibilità in CRS — Sistemi di riferimento nel quale il layer può essere rappresentato dal server WMS, elencati nel formato nativo WMS.
Disponibile in stile — Stili visuali applicabili al layer dal server WMS.
Mostra la legenda WMS nella legenda e nel compositore di stampe
The QGIS WMS data provider is able to display a legend graphic in the table of contents’ layer list and in the map composer. The WMS legend will be shown only if the WMS server has GetLegendGraphic capability and the layer has getCapability url specified, so you additionally have to select a styling for the layer.
Se legendGraphic è disponibile, viene mostrato sotto il layer. È piuttosto piccolo e dovrai cliccarci sopra per aprirlo nelle dimensioni reali (fatto dovuto alle limitazioni QgsLegendInterface). Cliccando sulla legenda del layer si aprirà una finestra con la legenda alla massima risoluzione.
In the print composer, the legend will be integrated at it’s original (dowloaded) dimension. Resolution of the legend graphic can be set in the item properties under Legend -> WMS LegendGraphic to match your printing requirements
La legenda mostrerà informazioni contestuali riferite alla scala attuale. La legenda WMS verrà mostrata solo se il server WMS ha le capability GetLegendGraphic e se il layer ha le capability dell’url getCapability specificate, cosi puoi anche scegliere uno stile per il layer.
Limitazioni del client WMS
Not all possible WMS client functionality had been included in this version of QGIS. Some of the more noteworthy exceptions follow.
Modificare le impostazioni del layer WMS
Once you’ve completed the Add WMS layer procedure,
there is no way to change the settings. A work-around is to delete the layer
completely and start again.
Server WMS che richiedono un’autenticazione
Attualmente sono accessibili server pubblici e server protetti. Puoi accedere ai server protetti con autenticazione pubblica. Puoi aggiungere le credenziali (opzionali) quando carichi un server WMS. Vedi sezione Selezionare server WMS/WMTS per ulteriori dettagli.
Suggerimento
Accesso ai layer OCG protetti
Se devi accedere a layer protetti con password, puoi usare InteProxy come proxy trasparente, che supporta molti metodi di autenticazione diversi. Ulteriori informazioni sono disponibili nel manuale di InteProxy nel sito web http://inteproxy.wald.intevation.org.
Suggerimento
WMS Mapserver QGIS
Since Version 1.7.0, QGIS has its own implementation of a WMS 1.3.0 Mapserver. Read more about this in chapter QGIS as OGC Data Server.
Client WCS
 Un servizio WCS fornisce accesso a dati raster che sono utili per la visualizzazione lato client, come input per modelli scientifici e per molti altri usi. Quali sono le caratteristiche che distinguono un servizio WCS dai servizi WFS e WMS? Mentre i servizi WFS e WMS sono istanze server, il servizio WCS permette al client di scegliere le porzioni di server che contengono le informazioni desiderate. Queste informazioni possono essere filtrate attraverso limiti spaziali o altre tipologie di interrogazioni.
QGIS has a native WCS provider and supports both version 1.0 and 1.1 (which are significantly different), but currently it prefers 1.0, because 1.1 has many issues (i.e., each server implements it in a different way with various particularities).
The native WCS provider handles all network requests and uses all standard QGIS network settings (especially proxy). It is also possible to select cache mode (‘always cache’, ‘prefer cache’, ‘prefer network’, ‘always network’), and the provider also supports selection of time position, if temporal domain is offered by the server.
Client WFS e WFS-T
In QGIS, a WFS layer behaves pretty much like any other vector layer. You can identify and select features, and view the attribute table. Since QGIS 1.6, editing WFS-T is also supported.
Normalmente la procedura per l’aggiunta di un layer WFS è molto simile a quella vista per i WMS. La differenza sta nel fatto che non ci sono server predefiniti, quindi devi aggiungere manualmente i server noti.
Caricare un layer WFS
Come esempio puoi caricare il server WFS DM Solutions e visualizzare un layer. L’indirizzo da inserire è: http://www2.dmsolutions.ca/cgi-bin/mswfs_gmap
Clicca sullo strumento
 Aggiungi layer WFS nella barra dei layer ed apparirà la finestra di dialogo Aggiungi layer WFS da server.
Clicca su [Nuovo].
Inserisci il nome ‘DM Solutions’.
Inserisci l’indirizzo precedentemente indicato.
Clicca su [OK].
- Choose ‘DM Solutions’ from the Server Connections
drop-down list.
Clicca su [Connetti].
Aspetta che vengano caricati tutti i layer.
Seleziona dalla lista il layer Parks.
Clicca su [Applica] per aggiungere il layer alla mappa.
Ogni impostazione proxy presente nelle preferenze viene automaticamente riconosciuta.
Figure OGR 3:
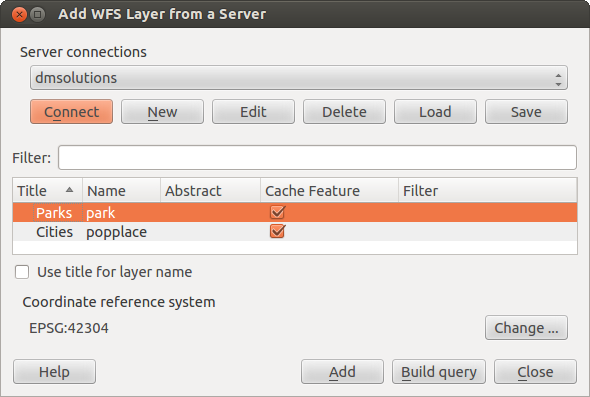
Adding a WFS layer
You’ll notice the download progress is visualized in the lower left of the QGIS main window. Once the layer is loaded, you can identify and select a province or two and view the attribute table.
Questo significa che attualmente è supportato solo WFS 1.0.0. Al momento non ci sono stati ancora molti test relativi a versioni di WFS basate su altri server. In caso di problemi con il plugin, non esitare a contattare il team di sviluppo. Vedi la sezione Aiuto e supporto per ulteriori informazioni sulle mailinglist.
Suggerimento
Cercare server WFS
You can find additional WFS servers by using Google or your favorite search engine. There are a number of lists with public URLs, some of them maintained and some not.