Modellatore grafico
The graphical modeler allows you to create complex models using a simple and easy-to-use interface. When working with a GIS, most analysis operations are not isolated, rather part of a chain of operations. Using the graphical modeler, that chain of operations can be wrapped into a single process, making it convenient to execute later with a different set of inputs. No matter how many steps and different algorithms it involves, a model is executed as a single algorithm, saving time and effort.
The graphical modeler can be opened from the Processing menu ().
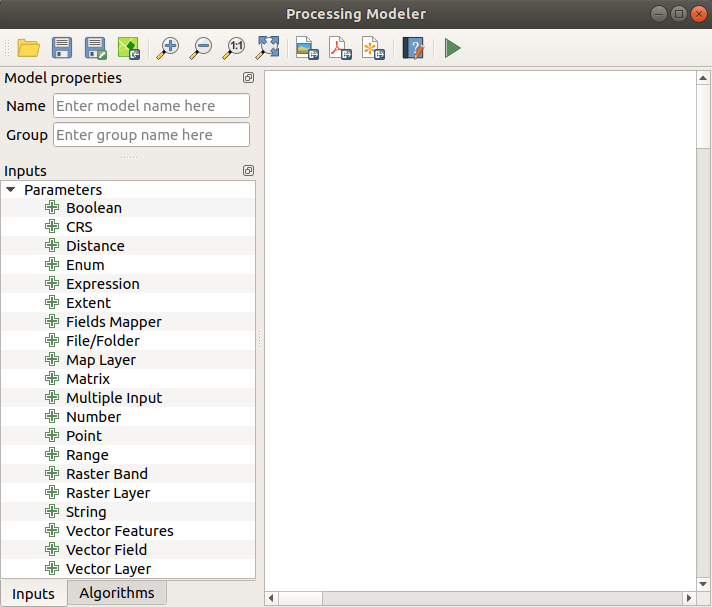
The modeler has a working canvas where the structure of the model and the workflow it represents are shown. The left part of the window is a panel with two tabs that can be used to add new elements to the model.
Modellatore
La creazione di un modello comporta due passaggi:
Definizione degli input necessari. Tutti gli input verranno aggiunti alla finestra dei parametri, in questo modo puoi impostare i valori durante l’esecuzione del modello. Il modello stesso è un algoritmo, quindi la finestra dei parametri viene automaticamente generata come accade con tutti gli algoritmi disponibili.
Definition of the workflow. Using the input data of the model, the workflow is defined by adding algorithms and selecting how they use the defined inputs or the outputs generated by other algorithms in the model.
Definizione dei dati di ingresso
The first step is to define the inputs for the model. The following elements are found in the Inputs tab on the left side of the modeler window:
Booleano
CRS
Distance
Enum
Expression
Estensione
Fields Mapper
File/Folder
Map Layer
Matrix
Multiple Input
Numero
Point
Range
Raster Band
Raster Layer
Stringhe di testo
Vector Features
Vector Field
Vector Layer
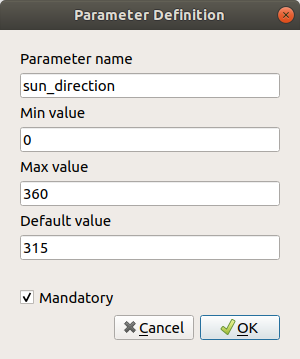
When double-clicking on an element, a dialog is shown that lets you define its characteristics. Depending on the parameter, the dialog will contain at least one basic element (the description, which is what the user will see when executing the model). When adding a numerical value, as can be seen in the next figure, in addition to the description of the parameter, you have to set a default value and the range of valid values.
Definizione Parametri del modello
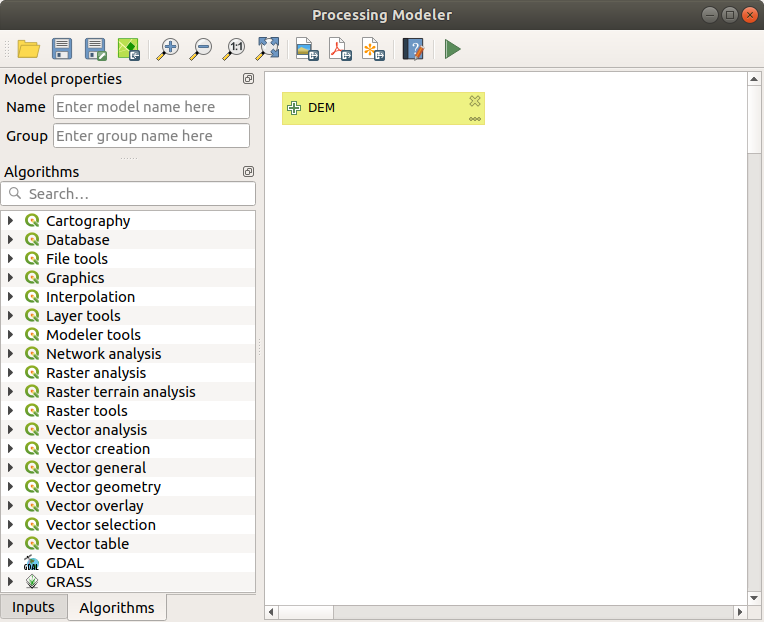
Per ogni dato di ingresso aggiunto, appare un nuovo elemento nel pannello grafico del modellatore.

Model Parameters
You can also add inputs by dragging the input type from the list and dropping it in the position where you want it in the modeler canvas.
Definizione del flusso operativo
Once the inputs have been defined, it is time to define the algorithms of the model. Algorithms can be found in the Algorithms tab, grouped much in the same way as they are in the Processing toolbox.
Input al modello
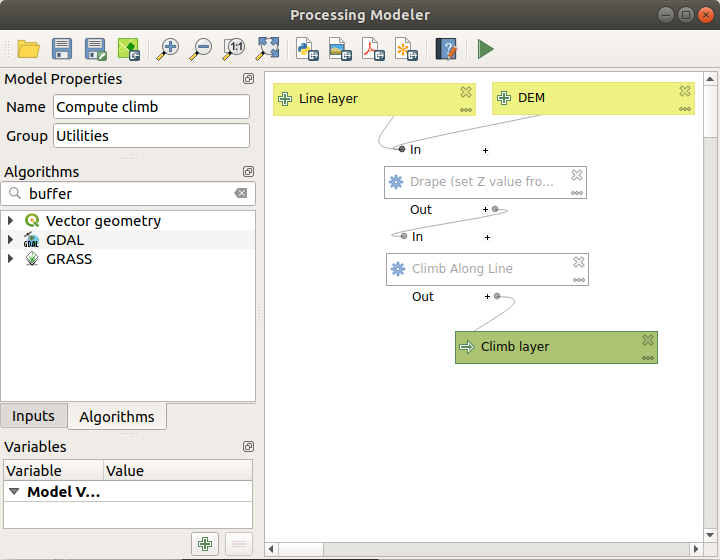
To add an algorithm to a model, double-click on its name or drag and drop it, just like for inputs. An execution dialog will appear, with a content similar to the one found in the execution panel that is shown when executing the algorithm from the toolbox. The ones shown next correspond to the QGIS “Drape (set Z value from raster)” algorithm and the QGIS “Climb along line” algorithm.
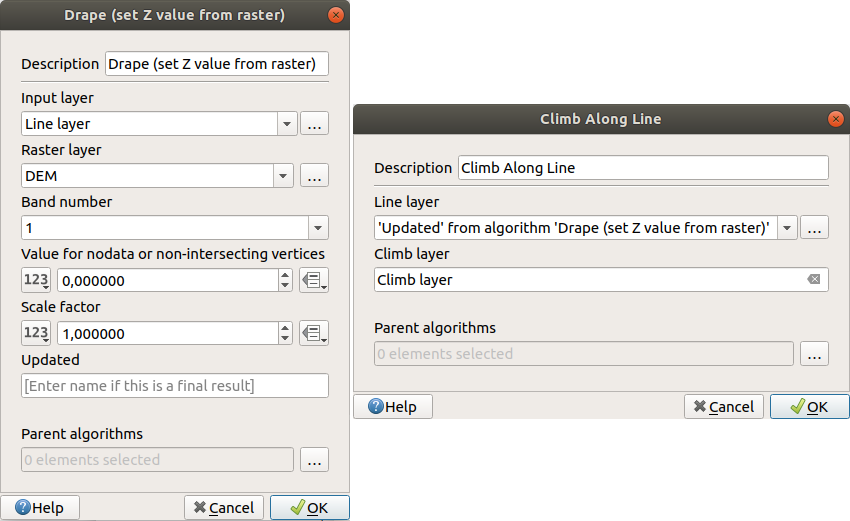
Parametri dell’algoritmo del modello
Come puoi vedere, ci sono diverse differenze. Al posto della casella di output dove potevi specificare il percorso dei layer e tabelle, qui c’è una semplice casella di testo. Se il layer generato da questo algoritmo è solamente un layer temporaneo che deve essere usato come input da un altro algoritmo, allora non inserire niente in questa casella. Se riempi questa casella significa che il risultato è finale e che il testo che hai inserito corrisponderà all’output finale.
Anche il valore di ogni parametro è leggermente diverso, dal momento che che ci sono importanti differenze fra il contesto del modello e quello degli Strumenti. Vediamo come inserire i valori per ogni tipologia di parametro.
Layer (raster e vettoriali) e tabelle. Devi selezionarle da una lista, ma in questo caso i valori possibili non sono i layer o le tabelle attualmente aperte in QGIS, bensì la lista dei dati di ingresso del modello corrispondente per tipo, o altri layer e tabelle generate da algoritmi già aggiunti al modello.
Numerical values. Literal values can be introduced directly in the text box. Clicking on the button beside the text box, expressions can be entered. Available variables for expressions include numerical inputs of the model, outputs from model algorithms and also statistical values from available layers within the model.
String. Literal strings can be typed in the corresponding text box. Clicking on the button beside the text box, expressions can be entered, as for numerical values.
Vector Field. The fields of a vector layer cannot be known at design time, since they depend on the selection of the user each time the model is executed. To set the value for this parameter, type the name of a field directly in the text box, or use the list to select a table field. The validity of the selected field will be checked at run time.
In tutti i casi troverai un parametro aggiunti chiamato Parent algorithms, non disponibile quando avvii un algoritmo dagli Strumenti. Questo parametro ti permette di definire l’ordine in cui gli algoritmi vengono eseguiti, in quanto scegli tu la nidificazione degli algoritmi. In altre parole, puoi forzare l’esecuzione di un algoritmo prima di un altro.
When you use the output of a previous algorithm as the input of your algorithm, that implicitly sets the previous algorithm as parent of the current one (and places the corresponding arrow in the modeler canvas). However, in some cases an algorithm might depend on another one even if it does not use any output object from it (for instance, an algorithm that executes a SQL sentence on a PostGIS database and another one that imports a layer into that same database). In that case, just select the previous algorithm in the Parent algorithms parameter and they will be executed in the correct order.
Once all the parameters have been assigned valid values, click on OK and the algorithm will be added to the canvas. It will be linked to the elements in the canvas (algorithms or inputs) that provide objects that are used as inputs for the algorithm.
Elements can be dragged to a different position on the canvas. This is useful to make the structure of the model more clear and intuitive. Links between elements are updated automatically. You can zoom in and out by using the mouse wheel.
A complete model
You can run your algorithm any time by clicking on the Run button. In order to use the algorithm from the toolbox, it has to be saved and the modeler dialog closed, to allow the toolbox to refresh its contents.
Salvataggio e caricamento di modelli
Use the Save button to save the current model and the
Open button to open any previously saved model.
Models are saved with the .model3 extension.
If the model has been already been saved from the modeler window,
you will not be prompted for a filename.
Since there is already a file associated with the model, that file
will be used for subsequent saves.
Before saving a model, you have to enter a name and a group for it in the text boxes in the upper part of the window.
Models saved in the models folder (the default folder when you
are prompted for a filename to save the model) will appear in the
toolbox in the corresponding branch.
When the toolbox is invoked, it searches the models folder for
files with the .model3 extension and loads the models they
contain.
Since a model is itself an algorithm, it can be added to the toolbox
just like any other algorithm.
Models can also be saved within the project file using the
 Save model in project button.
Models saved using this method won’t be written as
Save model in project button.
Models saved using this method won’t be written as .model3 files
on the disk but will be embedded in the project file.
Project models are available in the
 Project models menu of the toolbox.
Puoi specificare la cartella dei modelli nella finestra di configurazione di Processing, presente nel gruppo Modellatore.
Models loaded from the models folder appear not only in the
toolbox, but also in the algorithms tree in the Algorithms
tab of the modeler window.
That means that you can incorporate a model as a part of a bigger model,
just like other algorithms.
Models will show up in the Browser panel , and can be run from there.
Exporting a model as an image, PDF or SVG
A model can also be exported as an image, SVG or PDF (for illustration purposes).
Aggiornare il modello
You can edit the model you are currently creating, redefining the workflow and the relationships between the algorithms and inputs that define the model.
If you right-click on an algorithm in the canvas, you will see a context menu like the one shown next:
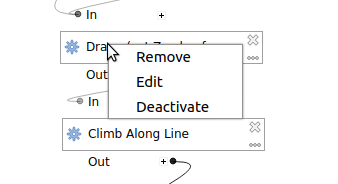
Click destro sul modello
Selezionando l’opzione Remove rimuoverai l’algoritmo selezionato. Non potrai rimuovere un algoritmo se altri algoritmi dipendono da lui, ovvero quando un algoritmo vuole come input il risultato di un altro algoritmo. Se provi a rimuovere comunque uno di questi algoritmi, apparirà una finestra di avviso.
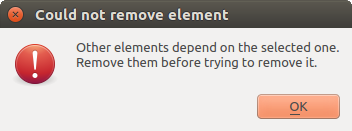
L’algoritmo non può essere eliminato
Selecting the Edit option will show the parameter dialog of the algorithm, so you can change the inputs and parameter values. Not all input elements available in the model will appear as available inputs. Layers or values generated at a more advanced step in the workflow defined by the model will not be available if they cause circular dependencies.
Select the new values and click on the OK button as usual. The connections between the model elements will change in the modeler canvas accordingly.
Un modello può essere eseguito parzialmente, disattivando alcuni dei suoi algoritmi. Per farlo, seleziona l’opzione Disattiva nel menu di scelta rapida che viene visualizzato quando fai click destro e su un elemento di algoritmo. L’algoritmo selezionato e tutti quelli del modello che ne dipendono verranno visualizzati in grigio e non verranno eseguiti come parte del modello.
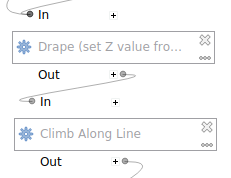
Algoritmo disattivato
When right-clicking on an algorithm that is not active, you will see a Activate menu option that you can use to reactivate it.
Informazioni ed aiuto per l’aggiornamento del modello
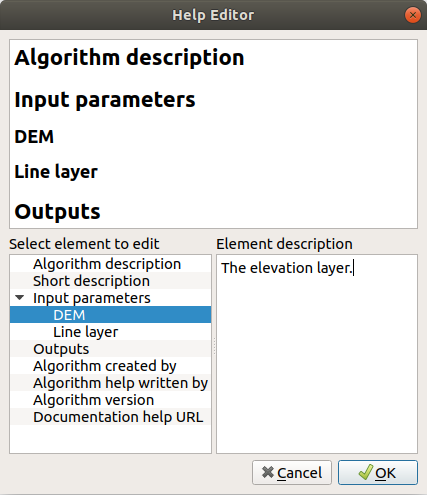
You can document your models from the modeler itself. Just click on the Edit Model Help button, and a dialog like the one shown next will appear.
Editing Help
Sulla parte destra vedrai una semplice pagina HTML, creata usando la descrizione dei parametri di input e di output dell’algoritmo insieme ad alcuni parametri aggiuntivi come la sua descrizione e l’autore. La prima volta che apri l’editor di aiuto, vedrai tutti i campi vuoti. Li puoi riempire usando le voci corrispondenti presenti nella parte sinistra della finestra di dialogo. Seleziona un elemento nella parte superiore e poi inserisci la descrizione nella casella di testo.
La guida del modello è salvata come parte del modello stesso
Exporting a model as a Python script
As we will see in a later chapter, Processing algorithms can be called from the QGIS Python console, and new Processing algorithms can be created using Python. A quick way of creating such a Python script is to create a model and then to export is as a Python file.
To do so, right click on the name of the model in the Processing Toolbox and choose Export Model as Python Algorithm….
A proposito degli algoritmi disponibili
You might notice that some algorithms that can be executed from the toolbox do not appear in the list of available algorithms when you are designing a model. To be included in a model, an algorithm must have the correct semantic. If an algorithm does not have such a well-defined semantic (for instance, if the number of output layers cannot be known in advance), then it is not possible to use it within a model, and it will not appear in the list of algorithms that you can find in the modeler dialog.