Crear salida
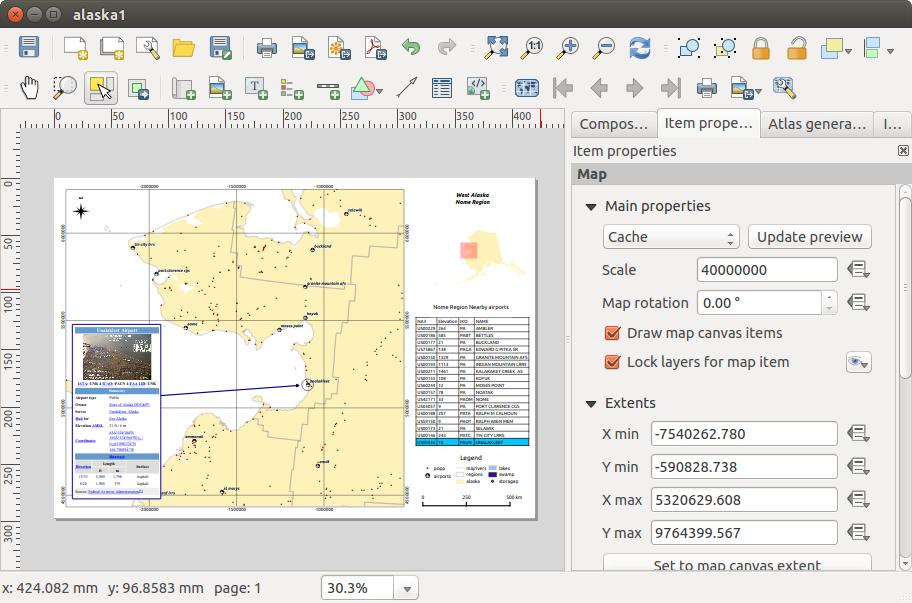
Figure_composer_output_1 shows el diseñador de impresión con un diseño de ejemplo de impresión, incluyendo cada tipo de elemento del mapa descrito en los apartados anteriores.
Figure Composer Output 1:

Print Composer with map view, legend, image, scale bar, coordinates, text and HTML frame added
Antes de imprimir un diseño tiene la posibilidad de ver su composición sin cuadros delimitadores. Esto de puede activar mediante la desactivación de Ver –>  Mostrar cuadros delimitadores o presionando el acceso directo
 Ctrl+Shift+B.
The Print Composer allows you to create several output formats, and it is possible to define the resolution (print quality) and paper size:
- The
 Print icon allows you to print the layout to a
connected printer or a PostScript file, depending on installed printer drivers.
 - The
 Export as image icon exports the Composer
canvas in several image formats, such as PNG, BPM, TIF, JPG,...
 - The
 Export as SVG icon saves the Print Composer canvas
as an SVG (Scalable Vector Graphic).
 - The
 Export as PDF icon saves the defined Print Composer
canvas directly as a PDF.
Export as Image
Clicking the  Export as image icon will ask you to
enter the filename to use to export composition: in case of multi-page composition,
each page will be exported to a file with the given name appended with the page
number.
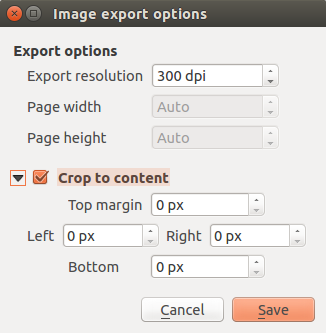
You can then override the print resolution (set in Composition tab) and resize exported image dimensions.
By checking  Crop to content option, the images output by
composer will include only the area of the composition with content.
There’s also an option for margins to add around the item bounds if required.
If the composition includes a single page, then the output will be sized to include EVERYTHING on the composition. If it’s a multi-page composition, then each page will be cropped to only include the area of that page with items.
Figure Composer Output 2:

Opciones de Exportación de Imagen
If you need to export your layout as a georeferenced image (e.g., to share
with other projects), you need to enable this feature under the Composition tab.
Check  World file on and choose the map item to use.
With this option, the ‘Export as image’ action will create a world file along
the exported image.
Nota
Exportar grandes ráster algunas veces puede fallar, incluso si parece haber suficiente memoria. Este es un problema con la administración Qt subyacente de los rásters.
Exportar como SVG
With  Export as SVG, you also need to fill the filename
(used as a basename for all files in case of multi_page composition) and then
can apply
  Crop to content option.
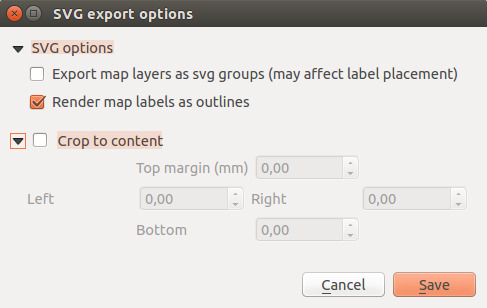
The SVG export options dialog allows also to :
- export map layers as svg groups:
- render map labels as outlines
Figure Composer Output 3:

Opciones de Exportación de SVG
Nota
Actualmente, la salida SVG es muy básica. Este no es un problema en QGIS, pero un problema con la biblioteca Qt subyacente. Esperamos que esto se solucione en futuras versiones.
Exportar como PDF
The  Export as PDF exports all the composition into a
single PDF file.
If you applied to your composition or any shown layer an advanced effect such as blend modes, transparency or symbol effects, these cannot be printed as vectors and your effects may be lost. Checking Print as a raster in Composition tab helps to keep the effects but rasterize the composition. Note that the Force layer to render as raster in the Rendering tab of Layer Properties is a layer-level alternative that avoids global composition rasterization.
Generar un Atlas
El Diseñador de impresión incluye funciones de generación que le permiten crear libros de mapas de una forma automática. El concepto es el uso de una capa de cobertura, que contiene geometrías y campos. Para cada geometría en la capa de cobertura, se generará una nueva salida en la que el contenido de algunos lienzos de mapas se moverán para resaltar la geometría actual. Los campos asociados con esta geometría se pueden utilizar dentro de etiquetas de texto.
Cada página se genera con cada objeto espacial. Para habilitar la generación de un atlas y parámetros de generación de acceso, consulte la pestaña Generación de atlas. Esta pestaña contiene los siguientes widgets (vea figure_composer_atlas_1):
Figure Composer Atlas 1:

Atlas generation tab
 Generar un atlas, que activa o desactiva la generación del atlas.
Una lista desplegable Capa de cobertura
 que le permite elegir la capa (vectorial) que contiene los elementos sobre los que iterar.
Una opcional
 Capa de cobertura oculta que, si es habilitada, ocultará la capa de cobertura (pero no a los demás) durante la generación.
- An optional Page name combo box to give a more explicit name to each feature page(s) when previewing atlas. You can select an attribute of the coverage layer or set an expression. If this option is empty, QGIS will use an internal ID, according to the filter and/or the sort order applied to the layer.
Una área de texto opcional Filtrar con que le permitirá especificar una expresión para filtrar objetos espaciales de la capa de cobertura. Si la expresión no esta vacía, solo los objetos espaciales que evalúa a
Trueserán seleccionados. El botón de la derecha le permitirá desplegar el constructor de expresión.Una opcional
 Ordenado por que, si es marcada le permite ordenar objetos espaciales de la capa de cobertura. La lista asociada le permite elegir que columna se utilizará como clave de clasificación. El orden de clasificación (ascendente o descendente) se establece mediante un botón de dos estados que muestran una flecha hacia arriba o hacia abajo.
You also have options to set the output of the atlas:
Una caja de texto Expresión de nombre de archivo de salida que se utiliza para generar un nombre de archivo para cada geometría si es necesario. Se basa en expresiones. Este campo es significativo solo para presentar múltiples archivos.
Una
 Exportación a un solo archivo cuando sea posible que permita forzar la generación de un solo archivo si es posible con el formato de salida elegido (PDF, por ejemplo). Si este campo es activado, el valor del campo Expresión de nombre de archivo de salida no tiene sentido.
Se puede utilizar múltiples elementos de mapa con la generación de atlas; cada mapa será representado de acuerdo a los objetos espaciales de cobertura. Para habilitar la generación de atlas para un elemento de mapa especifico, es necesario comprobar  Controlado por Atlas bajo las propiedades del elemento de un elemento mapa. Una vez marcado se puede establecer:
Un botón de radio
 Margen alrededor del objeto espacial que le permite seleccionar la cantidad de espacio añadido alrededor de cada geometría dentro del mapa asignado. Su valor es significativo sólo cuando utiliza el modo auto escala.
- A
 Predefined scale (best fit). It will use the best
fitting option from the list of predefined scales in your project properties settings
(see Project –> Project Properties –> General –> Project Scales
to configure these predefined scales).
 Una
 Escala fija que le permite cambiar entre modo auto-escala y escala fija. En el modo de escala fija, el mapa sólo se traducirá para cada geometría de estar centrado. En el modo de auto escala, la extensión del mapa se calcula de tal manera que cada geometría aparecerá en su totalidad.
Etiquetas
In order to adapt labels to the feature the atlas plugin iterates over, you can include expressions.
What you should take care of is to place expression part (including functions, fields or variables)
between [% and %].
For example, for a city layer with fields CITY_NAME and ZIPCODE, you could insert this:
The area of [% upper(CITY_NAME) || ',' || ZIPCODE || ' is '
format_number($area/1000000,2) %] km2
or, another combination:
The area of [% upper(CITY_NAME)%],[%ZIPCODE%] is
[%format_number($area/1000000,2) %] km2
The information [% upper(CITY_NAME) || ',' || ZIPCODE || ' is ' format_number($area/1000000,2) %]
is an expression used inside the label. both expressions would result in the generated atlas as:
The area of PARIS,75001 is 1.94 km2
Botones de anulación de datos definidos.
There are several places where you can use a ![]() Data Defined
Override button to override the selected setting. These options are particularly
useful with Atlas Generation.
Data Defined
Override button to override the selected setting. These options are particularly
useful with Atlas Generation.
Para los siguientes ejemplos la capa Regions del conjunto de datos de ejemplo de QGIS se utiliza y selecciona para Generación de Atlas. También asumimos el formato del papel A4 (210X297) es seleccionada en la pestaña Diseño para el campo Presets.
Con un botón Anulación definida por datos se puede establecer dinámicamente la orientación del papel. Cuando la altura (norte-sur) de las extensiones de una región es más grade que el ancho (este-oeste). que más bien desea utilizar la orientación vertical en lugar de horizontal para optimizar el uso del papel.
In the Composition you can set the field Orientation
and select Landscape or Portrait. We want to set the orientation dynamically
using an expression depending on the region geometry.
Press the ![]() button of field Orientation, select
Edit... so the Expression string builder dialog opens.
Enter the following expression:
button of field Orientation, select
Edit... so the Expression string builder dialog opens.
Enter the following expression:
CASE WHEN bounds_width($atlasgeometry) > bounds_height($atlasgeometry)
THEN 'Landscape' ELSE 'Portrait' END
Now the paper orients itself automatically. For each Region you need to reposition
the location of the composer item as well. For the map item you can
use the ![]() button of field Width to set it
dynamically using following expression:
button of field Width to set it
dynamically using following expression:
(CASE WHEN bounds_width($atlasgeometry) > bounds_height($atlasgeometry)
THEN 297 ELSE 210 END) - 20
Use the ![]() button of field Height to provide following
expression:
button of field Height to provide following
expression:
(CASE WHEN bounds_width($atlasgeometry) > bounds_height($atlasgeometry)
THEN 210 ELSE 297 END) - 20
When you want to give a title above the map in the center of the page,
insert a label item above the map. First use the item properties of the label
item to set the horizontal alignment to  Center.
Next activate from Reference point the upper middle checkbox.
You can provide the following expression for field X :
(CASE WHEN bounds_width($atlasgeometry) > bounds_height($atlasgeometry)
THEN 297 ELSE 210 END) / 2
For all other composer items you can set the position in a similar way so they are correctly positioned when the page is automatically rotated in portrait or landscape.
Information provided is derived from the excellent blog (in English and Portuguese) on the Data Defined Override options Multiple_format_map_series_using_QGIS_2.6 .
This is just one example of how you can use the Data Defined Override option.
Previsualizar y generar
Figure Composer Atlas 2:

Barra de herramienta Vista Previa del Atlas
Once the atlas settings have been configured and composer items (map, table,
image...) linked to it, you can create a preview of all the pages by clicking
Atlas ‣ Preview Atlas or ![]() Preview Atlas icon.
You can then use the arrows in the same toolbar to navigate through all the
features:
Preview Atlas icon.
You can then use the arrows in the same toolbar to navigate through all the
features:
You can also use the combo box to directly select and preview a specific feature. The combo box shows atlas features name according to the expression set in the atlas Page name option.
As for simple compositions, an atlas can be generated in different ways (see Crear salida for more information). Instead of Composer menu, rather use tools from Atlas menu or Atlas toolbar.
This means that you can directly print your compositions with Atlas ‣ Print Atlas.
You can also create a PDF using Atlas ‣ Export Atlas as PDF...:
The user will be asked for a directory to save all the generated PDF files,
except if the  Single file export when possible has been
selected. In that case, you’ll be prompted to give a filename.
With Atlas ‣ Export Atlas as Images... or Atlas ‣ Export Atlas as SVG... tool, you’re also prompted to select a folder. Each page of each atlas feature composition is exported to an image or SVG file.
Truco
Print a specific atlas feature
If you want to print or export the composition of only one feature of the atlas, simply start the preview, select the desired feature in the drop-down list and click on Composer ‣ Print (or export... to any supported file format).


