Delimited Text Plugin
The Delimited Text plugin allows you to load a delimited text file as a layer in QGIS.
Requirements
To view a delimited text file as layer, the text file must contain:
- A delimited header row of field names. This must be the first line in the text file.
- The header row must contain an X and Y field. These fields can have any name.
- The x and y coordinates must be specified as a number. The coordinate system is not important.
As an example of a valid text file we import the elevation point data file elevp.csv coming with the QGIS sample dataset (See Section Voorbeeld Data):
X;Y;ELEV
-300120;7689960;13
-654360;7562040;52
1640;7512840;3
[...]
Some items of note about the text file are:
- The example text file uses ; (semicolon) as delimiter. Any character can be used to delimit the fields.
- The first row is the header row. It contains the fields X, Y and ELEV.
- No quotes (") are used to delimit text fields.
- The x coordinates are contained in the X field.
- The y coordinates are contained in the Y field.
Using the Plugin
To use the plugin you must first enable it as described in Section Managing Plugins.
Click the new toolbar icon  Add Delimited Text Layer to
open the Delimited Text dialog as shown in figure_delimited_text_1.
Add Delimited Text Layer to
open the Delimited Text dialog as shown in figure_delimited_text_1.
Figure Delimited Text 1:
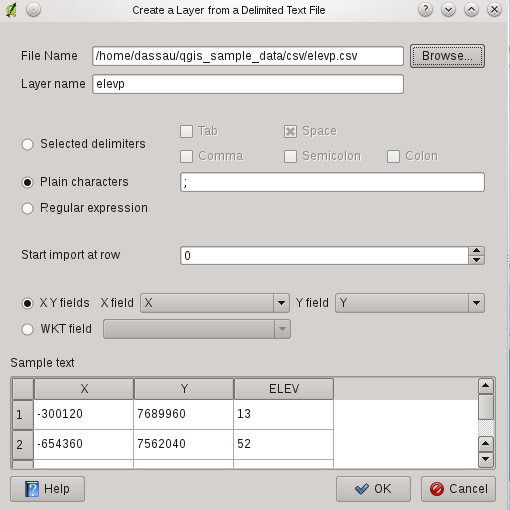
Delimited Text Dialog 
First select the file (e.g., qgis_sample_data/csv/elevp.csv) to import by clicking on the [Browse] button. Once the file is selected, the plugin attempts to parse the file using the last used delimiter, in this case a semicolon (;). To properly parse the file, it is important to select the correct delimiter. To change the delimiter to tab use \t (this is a regular expression for the tab character).
Once the file is parsed, choose the X and Y fields from the dropdown lists and if available also the WKT field for the CRS information. Finally enter a Layer name (e.g., elevp ) as shown in figure_delimited_text_1 . To add the layer to the map, click [OK]. The delimited text file now behaves as any other map layer in QGIS.