.
Calculatorul Raster
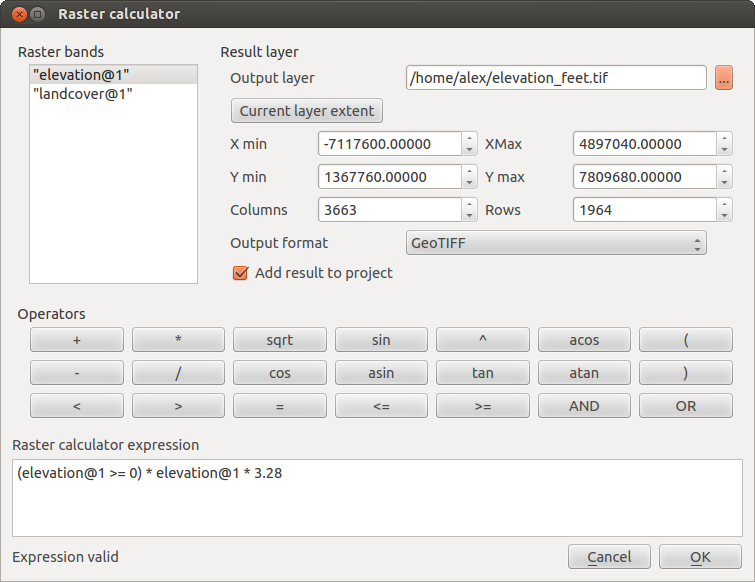
The Raster Calculator in the Raster menu allows you to perform calculations on the basis of existing raster pixel values (see figure_raster_10). The results are written to a new raster layer with a GDAL-supported format.
Figure Raster 10:
The Raster bands list contains all loaded raster layers that can be used. To add a raster to the raster calculator expression field, double click its name in the Fields list. You can then use the operators to construct calculation expressions, or you can just type them into the box.
In the Result layer section, you will need to define an output layer. You can then define the extent of the calculation area based on an input raster layer, or based on X,Y coordinates and on columns and rows, to set the resolution of the output layer. If the input layer has a different resolution, the values will be resampled with the nearest neighbor algorithm.
The Operators section contains all available operators. To add an operator
to the raster calculator expression box, click the appropriate button. Mathematical
calculations (+, -, *, ... ) and trigonometric functions (sin,
cos, tan, ... ) are available. Stay tuned for more operators to come!
With the  Add result to project checkbox, the result layer
will automatically be added to the legend area and can be visualized.
Exemple
Conversia valorilor de elevație de la metri la picioare
Pentru crearea unui raster de elevație în feet dintr-un raster în metri, trebuie să utilizați factorul de conversie de la metri la picioare: 3.28. Expresia este:
"elevation@1" * 3.28
Folosirea unei măști
Dacă doriți să mascați unele părți dintr-un raster - să zicem, de exemplu, pentru că vă interesează doar altitudinile de peste 0 metri - puteți utiliza următoarea expresie pentru a crea o mască și pentru a aplica rezultatul unui raster, într-un singur pas.
("elevation@1" >= 0) * "elevation@1"
Cu alte cuvinte, pentru fiecare celulă mai mare sau egală cu 0, valoarea sa va fi setată la 1. Altfel, va fi setată la 0. Aceasta creează masca “din zbor”.
În cazul în care doriți să clasificați un raster - să zicem, de exemplu, în două clase de altitudine, puteți utiliza următoarea expresie pentru a crea un raster cu două valori, 1 și 2, într-un singur pas.
("elevation@1" < 50) * 1 + ("elevation@1" >= 50) * 2
Cu alte cuvinte, pentru fiecare celulă mai mică de 50, valoarea sa va fi setată la 1. Pentru fiecare celulă mai mare sau egală cu 50 valoarea sa va fi setată la 2.

