.
Urmărirea live a GPS-ului
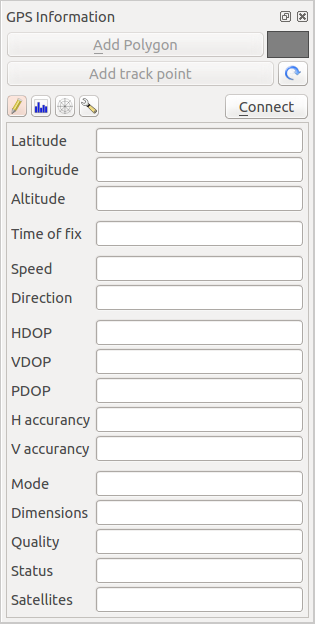
Pentru a activa urmărirea în direct a GPS-ului în QGIS, trebuie să selectați Settings ‣ Panels  GPS information. Veți vedea o fereastră nouă, andocată în partea stângă a canevas-ului.
Există patru ecrane posibile în această fereastră de urmărire GPS:
 Coordonatele GPS și o interfață pentru introducerea manuală a vertecșilor și a entităților
 Puterea semnalului GPS al conexiunilor prin satelit
 Ecran GPS polar, care prezintă numărul și poziția polară a sateliților
 Opțiunile ecranului GPS (a se vedea figure_gps_options)
With a plugged-in GPS receiver (has to be supported by your operating system), a simple click on [Connect] connects the GPS to QGIS. A second click (now on [Disconnect]) disconnects the GPS receiver from your computer. For GNU/Linux, gpsd support is integrated to support connection to most GPS receivers. Therefore, you first have to configure gpsd properly to connect QGIS to it.
Warning
If you want to record your position to the canvas, you have to create a new vector layer first and switch it to editable status to be able to record your track.
Poziția și atributele suplimentare
If the GPS is receiving signals from satellites, you will
see your position in latitude, longitude and altitude together with additional
attributes.
Figure GPS Position:
Urmărirea poziției GPS și atributele suplimentare 
Puterea semnalului GPS
Aici se poate vedea puterea semnalului pe care îl primiți de la sateliți.
Figure GPS Strength:
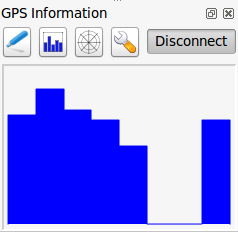
Puterea de urmărire a semnalului GPS
Fereastra polară GPS
If you want to know where in the sky all the connected
satellites are, you have to switch to the polar screen. You can also see the
ID numbers of the satellites you are receiving signals from.
Figure GPS polar window:
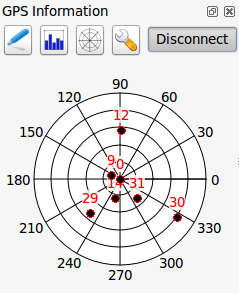
Fereastra polară de urmărire GPS
Opțiunile GPS
În cazul unor probleme de conectare, puteți comuta între:
 Autodetectare
 Intern
- Dispozitiv serial
- gpsd (selectează Gazda, Portul și Dispozitivul la care este conectat GPSul dvs.)
Un nou clic pe [Connect] inițiază conectarea la receptorul GPS.
Figure GPS Tracking 2:
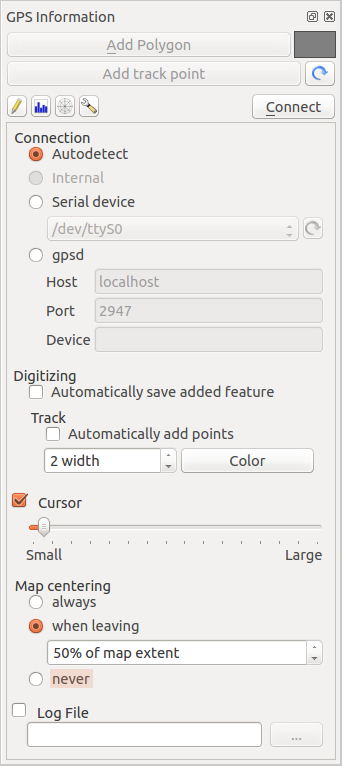
Fereastra opțiunilor de urmărire GPS
You can activate Automatically save added features
when you are in editing mode. Or you can activate
Automatically add points to the map canvas with a certain width
and color.
Activating Cursor, you can use a slider  to shrink
and grow the position cursor on the canvas.
to shrink
and grow the position cursor on the canvas.
Activating Map centering allows you to decide in which
way the canvas will be updated. This includes ‘always’, ‘when leaving’, if your
recorded coordinates start to move out of the canvas, or ‘never’, to keep map
extent.
Finally, you can activate Log file and define a path
and a file where log messages about the GPS tracking are logged.
If you want to set a feature manually, you have to go back to
Position and click on [Add Point] or [Add track point].
Conectaare la un GPS Bluetooth pentru urmărirea în direct a poziției
With QGIS you can connect a Bluetooth GPS for field data collection. To perform this task you need a GPS Bluetooth device and a Bluetooth receiver on your computer.
At first you must let your GPS device be recognized and paired to the computer. Turn on the GPS, go to the Bluetooth icon on your notification area and search for a New Device.
On the right side of the Device selection mask make sure that all devices are selected so your GPS unit will probably appear among those available. In the next step a serial connection service should be available, select it and click on [Configure] button.
Rețineți numărul portului COM atribuit conexiunii GPS, după cum rezultă din proprietățile Bluetooth.
După ce GPS-ul a fost recunoscut, creați asocierea pentru conexiune. De obicei, codul de autorizare este 0000.
Now open GPS information panel and switch to GPS
options screen. Select the COM port assigned to the GPS connection and click
the [Connect]. After a while a cursor indicating your position should
appear.
If QGIS can’t receive GPS data, then you should restart your GPS device, wait 5-10 seconds then try to connect again. Usually this solution work. If you receive again a connection error make sure you don’t have another Bluetooth receiver near you, paired with the same GPS unit.
Folosirea GPSMAP 60cs
MS Windows
Cel mai simplu mod de lucru constă în utilizarea unui middleware (gratuit, dar fără sursă deschisă), denumit GpsGate.
Launch the program, make it scan for GPS devices (works for both USB and BT
ones) and then in QGIS just click [Connect] in the Live tracking panel
using the Autodetect mode.
Ubuntu/Mint GNU/Linux
As for Windows the easiest way is to use a server in the middle, in this case GPSD, so
sudo apt-get install gpsd
Apoi, încărcați nucleul garmin_gps
sudo modprobe garmin_gps
And then connect the unit. Then check with dmesg the actual device being
used bu the unit, for example /dev/ttyUSB0. Now you can launch gpsd
gpsd /dev/ttyUSB0
Și, la final, conectați-va la instrumentul de urmărire în direct din QGIS.
Folosirea datalogger-ului BTGP-38KM (doar Bluetooth)
Folosirea GPSD (în Linux) sau GPSGate (în Windows) se face fâră efort.
Folosirea datalogger-ului BlueMax GPS-4044 (atât BT cât și USB)
MS Windows
The live tracking works for both USB and BT modes, by using GPSGate or even
without it, just use the Autodetect mode, or point
the tool the right port.
Ubuntu/Mint GNU/Linux
Pentru USB
The live tracking works both with GPSD
gpsd /dev/ttyACM3
or without it, by connecting the QGIS live tracking tool directly to the
device (for example /dev/ttyACM3).
Pentru Bluetooth
The live tracking works both with GPSD
gpsd /dev/rfcomm0
or without it, by connecting the QGIS live tracking tool directly to the device
(for example /dev/rfcomm0).