.
Formats de données gérés
QGIS uses the OGR library to read and write vector data formats, including ESRI shapefiles, MapInfo and MicroStation file formats, AutoCAD DXF, PostGIS, SpatiaLite, Oracle Spatial and MSSQL Spatial databases, and many more. GRASS vector and PostgreSQL support is supplied by native QGIS data provider plugins. Vector data can also be loaded in read mode from zip and gzip archives into QGIS. As of the date of this document, 69 vector formats are supported by the OGR library (see OGR-SOFTWARE-SUITE in Bibliographie). The complete list is available at http://www.gdal.org/ogr/ogr_formats.html.
Note
Not all of the listed formats may work in QGIS for various reasons. For
example, some require external commercial libraries, or the GDAL/OGR
installation of your OS may not have been built to support the format you
want to use. Only those formats that have been well tested will appear in
the list of file types when loading a vector into QGIS. Other untested
formats can be loaded by selecting *.*.
Le travail sur des couches vectorielles GRASS est décrit dans la Section Intégration du SIG GRASS.
This section describes how to work with several common formats: ESRI shapefiles, PostGIS layers, SpatiaLite layers, OpenStreetMap vectors, and Comma Separated data (CSV). Many of the features available in QGIS work the same, regardless of the vector data source. This is by design, and it includes the identify, select, labeling and attributes functions.
Shapefiles ESRI
The standard vector file format used in QGIS is the ESRI shapefile. Support is provided by the OGR Simple Feature Library (http://www.gdal.org/ogr/).
Un shapefile est en réalité composé de plusieurs fichiers. Les trois suivants sont requis :
.shpfichier contenant la géométrie des entités..dbffichier contenant les attributs au format dBase..shxfichier d’index.
Un shapefile inclus également un fichier ayant l’extension .prj qui contient les informations sur le système de coordonnées. Bien que ces informations soient très utiles elles ne sont pas obligatoires. Il peut y avoir encore d’autres fichiers associés aux données shapefile. Si vous souhaitez avoir plus de détails, nous vous recommandons de vous reporter aux spécifications techniques du format shapefile, qui se trouve notamment sur http://www.esri.com/library/whitepapers/pdfs/shapefile.pdf.
Loading a Shapefile
To load a shapefile, start QGIS and click on the  Add Vector Layer toolbar button, or simply press
 Ctrl+Shift+V.
This will bring up a new window (see figure_vector_1).
Figure Vector 1:

Add Vector Layer Dialog 
From the available options check  File. Click on
[Browse]. That will bring up a standard open file dialog
(see figure_vector_2), which allows you to navigate the file system and load a
shapefile or other supported data source. The selection box Filter
File. Click on
[Browse]. That will bring up a standard open file dialog
(see figure_vector_2), which allows you to navigate the file system and load a
shapefile or other supported data source. The selection box Filter
 allows you to preselect some OGR-supported file formats.
You can also select the encoding for the shapefile if desired.
Figure Vector 2:
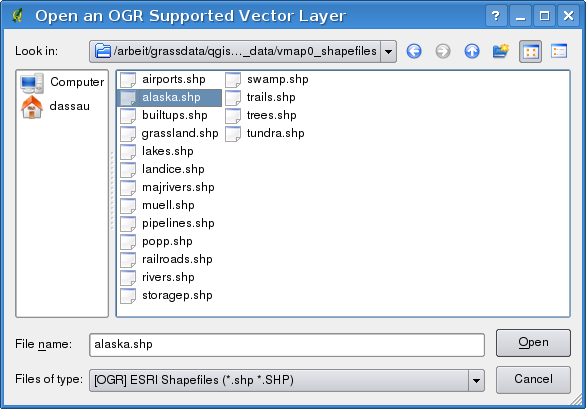
Open an OGR Supported Vector Layer Dialog
Selecting a shapefile from the list and clicking [Open] loads it into QGIS.
Figure_vector_3 shows QGIS after loading the alaska.shp file.
Figure Vector 3:
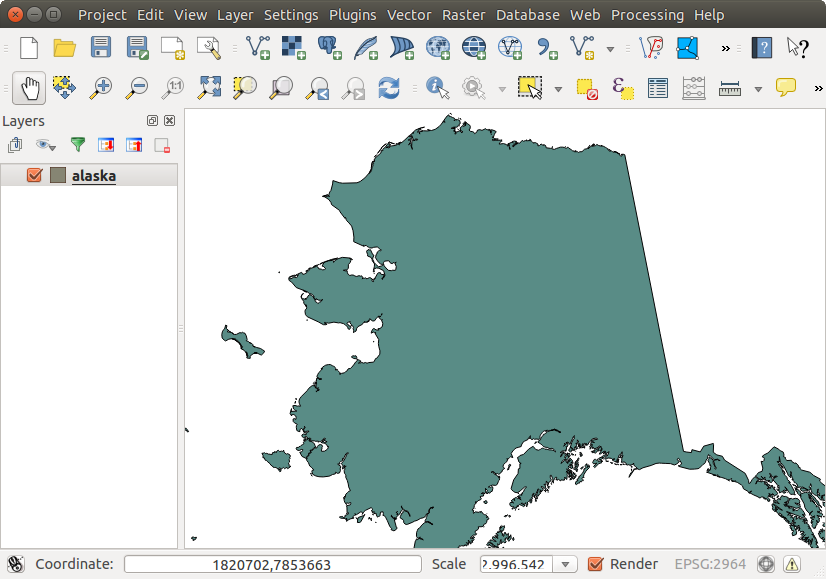
QGIS with Shapefile of Alaska loaded
Astuce
Couleur des couches
Quand vous ajoutez une couche sur une carte, une couleur aléatoire lui est assignée. En ajoutant plusieurs couches en une fois, différentes couleurs sont assignées à chacune des couches.
Once a shapefile is loaded, you can zoom around it using the map navigation tools. To change the style of a layer, open the Layer Properties dialog by double clicking on the layer name or by right-clicking on the name in the legend and choosing Properties from the context menu. See section Onglet Style for more information on setting symbology of vector layers.
Astuce
Charger une couche et un projet depuis un lecteur externe sous OS X
Sous OS X, les lecteurs portables qui sont montés à côté du disque dur primaire n’apparaissent pas dans Fichier ‣ Ouvrir un Projet. Nous travaillons sur le support des fenêtres d’ouverture/enregistrement natives d’OS X pour résoudre ce problème. Pour y pallier, vous pouvez taper /Volumes dans la boîte Nom de fichier et appuyer sur Entrée. Vous pouvez ensuite parcourir les lecteurs externes et réseaux montés.
Improving Performance for Shapefiles
To improve the performance of drawing a shapefile, you can create a spatial
index. A spatial index will improve the speed of both zooming and panning.
Spatial indexes used by QGIS have a .qix extension.
Voici les étapes de création d’un index spatial :
- Load a shapefile by clicking on the Add Vector Layer
toolbar button or pressing
Ctrl+Shift+V. Ouvrez la fenêtre Propriétés de la Couche en double-cliquant sur le nom de la couche dans la légende ou en faisant un clic droit et en choisissant Propriétés dans le menu qui apparait.
Dans l’onglet Général, cliquez sur le bouton [Créer un index spatial].
Problem loading a shape .prj file
If you load a shapefile with a .prj file and QGIS is not able to read the
coordinate reference system from that file, you will need to define the proper
projection manually within the General tab of the
Layer Properties dialog of the layer by clicking the
[Specify...] button. This is due to the fact that .prj files
often do not provide the complete projection parameters as used in QGIS and
listed in the CRS dialog.
For the same reason, if you create a new shapefile with QGIS, two different
projection files are created: a .prj file with limited projection
parameters, compatible with ESRI software, and a .qpj file, providing
the complete parameters of the used CRS. Whenever QGIS finds a .qpj
file, it will be used instead of the .prj.
Loading a MapInfo Layer
To load a MapInfo layer, click on the
Add Vector Layer toolbar button; or type Ctrl+Shift+V, change the
file type filter Files of type : to
‘Mapinfo File [OGR] (*.mif *.tab *.MIF *.TAB)’ and select the MapInfo layer you
want to load.
Loading an ArcInfo Binary Coverage
To load an ArcInfo Binary Coverage, click on the
Add Vector Layer toolbar button or press
Ctrl+Shift+V to open the Add Vector Layer dialog. Select
Directory as Source type. Change the
file type filter Files of type to
‘Arc/Info Binary Coverage’. Navigate to the directory that contains the
coverage file, and select it.
Similarly, you can load directory-based vector files in the UK National Transfer Format, as well as the raw TIGER Format of the US Census Bureau.
Fichiers de Texte Délimité
Les données séparées par des tabulations sont utilisées très couramment pour leur simplicité et leur lisibilité, les données pouvant être lues et modifiées dans un éditeur de texte basique. Les données séparées par un délimiteur sont écrites par lignes dans lesquelles les données sont séparées par un caractère défini (virgule, point-virgule, espace, etc) La première ligne contient généralement le nom des colonnes. Le CSV (Comma Separated Values = Données Séparées par une Virgule) est très courant.
De tels fichiers de données peuvent aussi contenir des informations de positionnement dans deux formes différentes :
Avec des coordonnées de points en colonnes séparées
Avec une représentation
well-known text(WKT) de la géométrie
QGIS allows you to load a delimited text file as a layer or ordinal table. But first check that the file meets the following requirements:
Le fichier doit avoir une ligne d’entête délimitée avec les noms des champs. Il doit s’agir de la première ligne du fichier.
La ligne d’entête doit contenir un ou plusieurs champs stockant la géométrie. Ils peuvent porter n’importe quel nom.
Les coordonnées X et Y doivent être de type numérique (si la géométrie est définie par des coordonnées). Le système de coordonnées n’est pas important.
As an example of a valid text file, we import the elevation point data file
elevp.csv that comes with the QGIS sample dataset (see section
Échantillon de données):
X;Y;ELEV
-300120;7689960;13
-654360;7562040;52
1640;7512840;3
[...]
Notons les points suivants à propos du fichier texte :
Le fichier texte d’exemple utilise le
;comme délimiteur. N’importe quel caractère peut être utilisé comme délimiteur de champ.La première ligne est la ligne d’entête. Elle contient les champs
X,YetELEV.Aucun guillemet (
") n’est utilisé pour délimiter les champs textes.Les coordonnées X sont stockées dans le champ
X.Les coordonnées Y sont stockées dans le champ
Y.
Charger un fichier texte délimité
Click the toolbar icon  Add Delimited Text Layer in the
Manage layers toolbar to open the Create a Layer from a
Delimited Text File dialog, as shown in figure_delimited_text_1.
Add Delimited Text Layer in the
Manage layers toolbar to open the Create a Layer from a
Delimited Text File dialog, as shown in figure_delimited_text_1.
Figure Delimited Text 1:
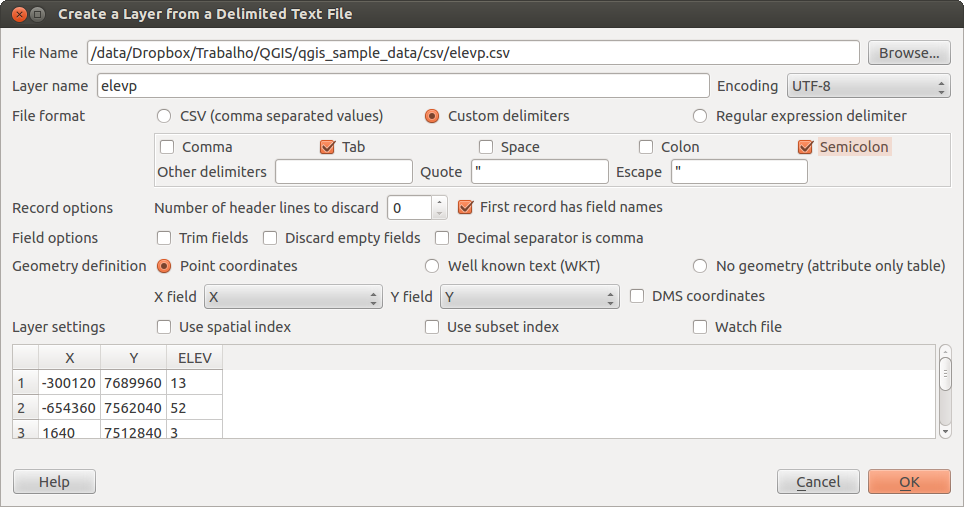
Delimited Text Dialog
First, select the file to import (e.g., qgis_sample_data/csv/elevp.csv)
by clicking on the [Browse] button. Once the file is selected, QGIS
attempts to parse the file with the most recently used delimiter. To enable QGIS to properly parse the
file, it is important to select the correct delimiter. You can specify a
delimiter by activating Custom delimiters, or by activating
Regular expression delimiter and entering
text into the Expression field. For example, to
change the delimiter to tab, use \t (this is a regular expression for the
tab character).
Once the file is parsed, set Geometry definition to
Point coordinates and choose the X and Y
fields from the dropdown lists. If the coordinates are defined as
degrees/minutes/seconds, activate the  DMS coordinates
checkbox.
DMS coordinates
checkbox.
Finally, enter a layer name (e.g., elevp), as shown in
figure_delimited_text_1. To add the layer to the map, click [OK]. The
delimited text file now behaves as any other map layer in QGIS.
Il y a aussi une option qui vous aide à supprimer les espaces de début et de fin des champs, à savoir Réduire les champs. Vous pouvez aussi Ignorer les champs vides dans chaque enregistrement ou si nécessaire, définir la Virgule en séparateur décimal.
If spatial information is represented by WKT, activate the
Well Known Text option and select the field with the WKT definition for
point, line or polygon objects. If the file contains non-spatial data, activate
No geometry (attribute only table) and it will be
loaded as an ordinal table.
Additionaly, you can enable:
- Index spatial pour améliorer les performances d’affichage et de sélection spatiale des entités.
- Index des sous-ensembles.
- Watch file to watch for changes to the file by other
applications while QGIS is running.
Données OpenStreetMap
In recent years, the OpenStreetMap project has gained popularity because in many countries no free geodata such as digital road maps are available. The objective of the OSM project is to create a free editable map of the world from GPS data, aerial photography or local knowledge. To support this objective, QGIS provides suppport for OSM data.
Charger des vecteurs OpenStreetMap
QGIS integrates OpenStreetMap import as a core functionality.
Pour vous connecter au serveur OSM et télécharger des données, ouvrez le menu Vecteur ‣ OpenStreetMap ‣ Télécharger des données OSM.... Vous pouvez ignorer cette étape si vous avez déjà obtenu un fichier XML .osm à l’aide du logiciel JOSM, de l’Overpass API ou de toute autre source.
Le menu Vecteur ‣ OpenStreetMap ‣ Importer la topologie depuis un XML... convertira votre fichier .osm en une base de données Spatialite, et créera la connexion à la base.
- The menu Vector ‣ Openstreetmap ‣ Export topology to
SpatiaLite then allows you to open the database connection, select the type
of data you want (points, lines, or polygons) and choose tags to import.
This creates a SpatiaLite geometry layer that you can add to your
project by clicking on the
 Add SpatiaLite Layer toolbar button or by selecting the
Add SpatiaLite Layer... option
from the Layer menu (see section Couches SpatiaLite).
Add SpatiaLite Layer toolbar button or by selecting the
Add SpatiaLite Layer... option
from the Layer menu (see section Couches SpatiaLite).
Couches PostGIS
PostGIS layers are stored in a PostgreSQL database. The advantages of PostGIS are the spatial indexing, filtering and query capabilities it provides. Using PostGIS, vector functions such as select and identify work more accurately than they do with OGR layers in QGIS.
Créer une connexion enregistrée
 The first time you use a PostGIS data source, you must
create a connection to the PostgreSQL database that contains the data. Begin by
clicking on the Add PostGIS Layer toolbar
button, selecting the Add PostGIS Layer...
option from the Layer menu, or typing
The first time you use a PostGIS data source, you must
create a connection to the PostgreSQL database that contains the data. Begin by
clicking on the Add PostGIS Layer toolbar
button, selecting the Add PostGIS Layer...
option from the Layer menu, or typing Ctrl+Shift+D. You
can also open the Add Vector Layer dialog and select
Database. The Add PostGIS Table(s)
dialog will be displayed. To access the connection manager, click on the
[New] button to display the Create a New PostGIS Connection
dialog. The parameters required for a connection are:
Nom : Un nom pour cette connexion. Il peut être identique à Base de données.
Service : Paramètre de service à utiliser en alternative à l’hôte et le port (et potentiellement la base de données). Il peut être défini dans
pg_service.conf.- Host: Name of the database host. This must be a resolvable host name such as would be used to open a telnet connection or ping the host. If the database is on the same computer as QGIS, simply enter ‘localhost’ here.
Port : numéro de port que le serveur de base de données PostgreSQL écoute. Le port par défaut est 5432.
Base de données : nom de la base de données.
- SSL mode: How the SSL connection will be negotiated with the server. Note
that massive speedups in PostGIS layer rendering can be achieved by disabling
SSL in the connection editor. The following options are available:
Désactive : Essaye uniquement une connexion SSL non cryptée.
Permet : Essaye une connexion non-SSL. En cas d’échec, essaye une connexion SSL.
Préfère (par défaut) : Essaye une connexion SSL. En cas d’échec, essaye une connexion non-SSL.
Requiert : Essaye uniquement une connexion SSL.
Nom d’utilisateur : Nom d’utilisateur utilisé pour se connecter à la base de données.
Mot de passe : mot de passe associé au Nom d’utilisateur pour se connecter à la base de données.
Vous pouvez également activer les options suivantes :
- Enregistrer le nom d’utilisateur
- Enregistrer le mot de passe
- Ne regarder que dans la table geometry_columns
- Ne pas résoudre le type pour les géométries non restreintes (GEOMETRY)
- Ne regarder que dans le schéma ‘public’
- Lister les tables sans géométrie
- Utiliser la table des métadonnées estimées
Une fois que tous les paramètres et les options sont définis, vous pouvez tester la connexion en cliquant sur le bouton [Test la connexion].
Charger une couche PostGIS
Once you have one or more connections defined, you can
load layers from the PostgreSQL database. Of course, this requires having data in
PostgreSQL. See section Importer des données dans PostgreSQL for a discussion on
importing data into the database.
Pour charger une couche PostGIS, suivez ces étapes :
- If the Add PostGIS layers dialog is not already open,
selecting the Add PostGIS Layer...
option from the Layer menu or typing
Ctrl+Shift+Dopens the dialog. Choisissez la connexion dans la liste déroulante et cliquez sur [Connecter].
Cochez ou décochez selon votre besoin
Lister les tables sans géométrieUtilisez si besoin des
Options de recherche pour définir quelles entités charger ou utilisez le bouton [Construire une requête] pour ouvrir la fenêtre Construction de requête.Trouvez la ou les couches que vous souhaitez ajouter dans la liste des couches disponibles.
Sélectionnez-la en cliquant dessus. Vous pouvez sélectionner plusieurs couches en maintenant la touche
Shiftenfoncée quand vous cliquez. Référez-vous à la section Constructeur de requête pour plus d’informations sur l’utilisation du Constructeur de requête de PostgreSQL pour mieux définir la couche.Cliquez sur le bouton [Ajouter] pour ajouter la couche à la carte.
Astuce
Couches PostGIS
Normally, a PostGIS layer is defined by an entry in the geometry_columns table. From version 0.9.0 on, QGIS can load layers that do not have an entry in the geometry_columns table. This includes both tables and views. Defining a spatial view provides a powerful means to visualize your data. Refer to your PostgreSQL manual for information on creating views.
Quelques éléments de détail à propos des couches PostgreSQL
This section contains some details on how QGIS accesses PostgreSQL layers. Most of the time, QGIS should simply provide you with a list of database tables that can be loaded, and it will load them on request. However, if you have trouble loading a PostgreSQL table into QGIS, the information below may help you understand any QGIS messages and give you direction on changing the PostgreSQL table or view definition to allow QGIS to load it.
QGIS requires that PostgreSQL layers contain a column that can be used as a unique key for the layer. For tables, this usually means that the table needs a primary key, or a column with a unique constraint on it. In QGIS, this column needs to be of type int4 (an integer of size 4 bytes). Alternatively, the ctid column can be used as primary key. If a table lacks these items, the oid column will be used instead. Performance will be improved if the column is indexed (note that primary keys are automatically indexed in PostgreSQL).
If the PostgreSQL layer is a view, the same requirement exists, but views do not have primary keys or columns with unique constraints on them. You have to define a primary key field (has to be integer) in the QGIS dialog before you can load the view. If a suitable column does not exist in the view, QGIS will not load the layer. If this occurs, the solution is to alter the view so that it does include a suitable column (a type of integer and either a primary key or with a unique constraint, preferably indexed).
QGIS offers a checkbox Select at id that is activated by default. This option gets the ids without the attributes which is faster in most cases. It can make sense to disable this option when you use expensive views.
Astuce
Sauvegarde d’une base de données PostGIS ayant des couches sauvées par QGIS
If you want to make a backup of your PostGIS database using the pg_dump and
pg_restore commands the default layer styles as saved by QGIS are failing to
restore afterwards. You need to set the XML option to DOCUMENT and the
restore will work.
Importer des données dans PostgreSQL
Data can be imported into PostgreSQL/PostGIS using several tools, including the SPIT plugin and the command line tools shp2pgsql and ogr2ogr.
DB Manager
QGIS comes with a core plugin named  DB Manager. It can
be used to load shapefiles and other data formats, and it includes support for
schemas. See section Extension DB Manager for more information.
DB Manager. It can
be used to load shapefiles and other data formats, and it includes support for
schemas. See section Extension DB Manager for more information.
shp2pgsql
PostGIS intègre un utilitaire nommé shp2pgsql qui peut être utilisé pour importer des shapefiles dans une base de données PostgreSQL/PostGIS. Par exemple, pour importer un shapefile nommé lakes.shp dans une base PostgreSQL nommé gis_data, utilisez la commande suivante :
shp2pgsql -s 2964 lakes.shp lakes_new | psql gis_data
Ceci crée une nouvelle couche nommée lakes_new dans la base de données gis_data. La nouvelle couche aura l’identifiant de référence spatiale (SRID) 2964. Référez-vous à la section Utiliser les projections pour plus d’informations sur les systèmes de référence spatiale et les projections.
Astuce
Exporter des jeux de données depuis PostGIS
De la même manière que l’outil d’importation shp2pgsql, il y a également un outil d’exportation de jeux de données PostGIS en shapefile : pgsql2shp. Cet outil est inclus dans la distribution de PostGIS.
ogr2ogr
En plus de shp2pgsql et DB Manager, un autre outil est fourni pour importer des données géographiques dans PostGIS : ogr2ogr. Il est inclus dans GDAL.
Pour importer un shapefile dans PostGIS, lancez la commande suivante :
ogr2ogr -f "PostgreSQL" PG:"dbname=postgis host=myhost.de user=postgres
password=topsecret" alaska.shp
Ceci va importer le shapefile alaska.shp dans la base de données PostGIS nommée postgis en utilisant l’utilisateur postgres avec le mot de passe topsecret sur l’hôte myhost.de.
Notez qu’OGR doit être compilé avec PostgreSQL pour gérer PostGIS. Vous pouvez le vérifier en tapant (sous ):
ogrinfo --formats | grep -i post
Si vous préférez utiliser la commande COPY de PostgreSQL au lieu de la méthode INSERT INTO par défaut, vous pouvez exporter la variable d’environnement suivante (au moins sur et  ):
):
export PG_USE_COPY=YES
ogr2ogr ne crée pas d’index spatial comme le fait shp2pgsl. Vous devez donc effectuer une étape supplémentaire en le créant manuellement avec la commande SQL classique CREATE INDEX (comme détaillé dans la section suivante Améliorer les performances).
Améliorer les performances
Retrieving features from a PostgreSQL database can be time-consuming, especially over a network. You can improve the drawing performance of PostgreSQL layers by ensuring that a PostGIS spatial index exists on each layer in the database. PostGIS supports creation of a GiST (Generalized Search Tree) index to speed up spatial searches of the data (GiST index information is taken from the PostGIS documentation available at http://postgis.refractions.net).
La syntaxe pour créer un index GiST est la suivante :
CREATE INDEX [indexname] ON [tablename]
  USING GIST ( [geometryfield] GIST_GEOMETRY_OPS );
Notez que pour de grandes tables, créer un index peut prendre du temps. Une fois cet index créé, vous devriez faire une VACUUM ANALYZE. Référez-vous à la documentation de PostGIS (POSTGIS-PROJECT Bibliographie) pour plus d’informations.
Voici un exemple de création d’un index GiST :
gsherman@madison:~/current$ psql gis_data
Welcome to psql 8.3.0, the PostgreSQL interactive terminal.

Type:  \copyright for distribution terms
       \h for help with SQL commands
       \? for help with psql commands
       \g or terminate with semicolon to execute query
       \q to quit

gis_data=# CREATE INDEX sidx_alaska_lakes ON alaska_lakes
gis_data-# USING GIST (the_geom GIST_GEOMETRY_OPS);
CREATE INDEX
gis_data=# VACUUM ANALYZE alaska_lakes;
VACUUM
gis_data=# \q
gsherman@madison:~/current$
Couches vectorielles dépassant les 180° de longitude
Many GIS packages don’t wrap vector maps with a geographic reference system (lat/lon) crossing the 180 degrees longitude line (http://postgis.refractions.net/documentation/manual-2.0/ST_Shift_Longitude.html). As result, if we open such a map in QGIS, we will see two far, distinct locations, that should appear near each other. In Figure_vector_4, the tiny point on the far left of the map canvas (Chatham Islands) should be within the grid, to the right of the New Zealand main islands.
Figure Vector 4:

Map in lat/lon crossing the 180° longitude line
Une solution est de transformer les valeurs longitudinales en utilisant PostGIS et la fonction ST_Shift_Longitude. Cette fonction lit chaque point/sommet de chacune des entités dans une géométrie et si la coordonnée de longitude est inférieure à 0°, elle lui ajoute 360°. Le résultat est une version 0° - 360° des données sur une carte centrée à 180°.
Figure Vector 5:

Traversée de la longitude 180° en utilisant la fonction ST_Shift_Longitude
Usage
Importer des données dans PostGIS (Importer des données dans PostgreSQL) en utilisant, par exemple, l’extension DB Manager.
Utiliser l’interface en ligne de commande PostGIS pour exécuter la commande suivante (dans cet exemple, “TABLE” est bien le nom de votre table PostGIS):
gis_data=# update TABLE set the_geom=ST_Shift_Longitude(the_geom);Si tout s’est bien passé, vous devriez recevoir une confirmation sur le nombre d’entités qui ont été mises à jour. Ensuite, vous pouvez charger la carte et voir la différence (Figure_vector_5).
Couches SpatiaLite
The first time you load data from a SpatiaLite
database, begin by clicking on the
Add SpatiaLite Layer toolbar button, or by selecting the
Add SpatiaLite Layer... option
from the Layer menu, or by typing Ctrl+Shift+L.
This will bring up a window that will allow you either to connect to a
SpatiaLite database already known to QGIS, which you can choose from the
drop-down menu, or to define a new connection to a new database. To define a
new connection, click on [New] and use the file browser to point to
your SpatiaLite database, which is a file with a .sqlite extension.
Si vous souhaitez sauvegarder une couche vecteur au format SpatiaLite, vous pouvez le faire par un clic-droit sur la couche dans la légende. Cliquez ensuite sur Enregistrer sous..., définissez le nom du fichier et le SCR en sortie, choisisez ‘SpatiaLite’ comme format. Vous pouvez également sélectionner ‘SQLite’ comme format et ajouter SPATIALITE=YES comme source de données dans les options OGR de création. OGR crée alors une base de données SpatiaLite. Voir également http://www.gdal.org/ogr/drv_sqlite.html.
QGIS also supports editable views in SpatiaLite.
Créer une nouvelle couche SpatiaLite
Si vous souhaitez créer une nouvelle couche SpatiaLite, référez-vous à la section Créer une nouvelle couche SpatiaLite.
Astuce
Extensions de gestion de données SpatiaLite
For SpatiaLite data management, you can also use several Python plugins: QSpatiaLite, SpatiaLite Manager or DB Manager (core plugin, recommended). If necessary, they can be downloaded and installed with the Plugin Installer.
Couches MSSQL Spatial
 QGIS also provides native MS SQL 2008 support. The first
time you load MSSQL Spatial data, begin by clicking on the
Add MSSQL Spatial Layer toolbar button or by
selecting the Add MSSQL Spatial Layer...
option from the Layer menu, or by typing
QGIS also provides native MS SQL 2008 support. The first
time you load MSSQL Spatial data, begin by clicking on the
Add MSSQL Spatial Layer toolbar button or by
selecting the Add MSSQL Spatial Layer...
option from the Layer menu, or by typing Ctrl+Shift+M.
Couches Oracle Spatial
The spatial features in Oracle Spatial aid users in managing geographic and location data in a native type within an Oracle database. QGIS now has support for such layers.
Créer une connexion enregistrée
 The first time you use an Oracle Spatial data source,
you must create a connection to the database that contains the data. Begin by
clicking on the Add Orcale Spatial Layer toolbar
button, selecting the Add Orcale
Spatial Layer... option from the Layer menu, or typing
The first time you use an Oracle Spatial data source,
you must create a connection to the database that contains the data. Begin by
clicking on the Add Orcale Spatial Layer toolbar
button, selecting the Add Orcale
Spatial Layer... option from the Layer menu, or typing
Ctrl+Shift+O. To access the connection manager, click on the [New]
button to display the Create a New Oracle Spatial Connection dialog.
The parameters required for a connection are:
Nom : Un nom pour cette connexion. Il peut être identique à Base de données.
Base de données : SID ou SERVICE_NAME de l’instance Oracle.
- Host: Name of the database host. This must be a resolvable host name such as would be used to open a telnet connection or ping the host. If the database is on the same computer as QGIS, simply enter ‘localhost’ here.
Port : numéro de port que le serveur de base de données Oracle écoute. Le port par défaut est 1521.
Nom d’utilisateur : Nom d’utilisateur utilisé pour se connecter à la base de données.
Mot de passe : mot de passe associé au Nom d’utilisateur pour se connecter à la base de données.
Vous pouvez également activer les options suivantes :
- Enregistrer le nom d’utilisateur indique s’il faut ou non sauvegarder le nom de l’utilisateur de la base de données dans la configuration de la connexion.
- Enregistrer le mot de passe indique s’il faut ou non sauvegarder le mot de passe de connexion à la base de données dans les paramètres de connexion.
- Chercher uniquement dans la table de métadonnées restreint la liste des tables affichées à celles qui sont dans la vue all_sdo_geom_metadata. Ceci peut accélerer l’affichage initial des tables spatiales.
- Chercher uniquement les tables de l’utilisateur limite la recherche des tables spatiales à celles dont l’utilisateur est propriétaire.
- Lister les tables sans géométries indique que les tables sans géométrie seront aussi listées par défaut.
- Utilisez la table de métadonnées estimées quand la couche est définie, plusieurs métadonnées sont nécessaires pour la table Oracle. Cela inclut des informations sur le nombre de lignes de la table, le type de géométrie et l’étendue spatiale des données pour la colonne géométrique. Si cette table contient un grand nombre de lignes, déterminer cette métadonnée est coûteuse en temps. En activant cette option, les opérations rapides suivantes sur les métadonnées de la table sont réalisées : le décompte des lignes est réalisé à partir de
all_tables.num_rows. Les étendues des tables sont toujours déterminées avec la fonction SDO_TUNE.EXTENTS_OF même si un filtre est appliqué sur la couche. La géométrie de la table est déterminée à partir des 100 premières lignes dans la table. - Seulement les types de géométrie existants liste seulement les types géométriques existants et ne permet pas d’ajouter les autres.
Une fois que tous les paramètres et les options sont définis, vous pouvez tester la connexion en cliquant sur le bouton [Test la connexion].
Astuce
Paramètres utilisateur de QGIS et Sécurité
Depending on your computing environment, storing passwords in your QGIS settings may be a security risk. Passwords are saved in clear text in the system configuration and in the project files! Your customized settings for QGIS are stored based on the operating system:
- Les paramètres sont stockés dans votre répertoire home dans
~/.qgis2.  Les paramètres sont stockés dans la base de registre.
Charger une couche Oracle Spatial
Once you have one or more connections defined, you can
load layers from the Oracle database. Of course, this requires having data in
Oracle.
Pour charger une couche Oracle Spatial, suivez ces étapes :
- If the Add Oracle Spatial layers dialog is not already open,
click on the Add Oracle Spatial Layer toolbar
button.
Choisissez la connexion dans la liste déroulante et cliquez sur [Connecter].
Cochez ou décochez selon votre besoin
Lister les tables sans géométrieUtilisez si besoin des
Options de recherche pour définir quelles entités charger ou utilisez le bouton [Construire une requête] pour ouvrir la fenêtre Construction de requête.Trouvez la ou les couches que vous souhaitez ajouter dans la liste des couches disponibles.
Sélectionnez-la en cliquant dessus. Vous pouvez sélectionner plusieurs couches en gardant la touche
Shiftenfoncée quand vous cliquez. Référez-vous à la section Constructeur de requête pour plus d’informations sur l’utilisation du Constructeur de requête d’Oracle pour mieux définir la couche.Cliquez sur le bouton [Ajouter] pour ajouter la couche à la carte.
Astuce
Couches Oracle Spatial
Normalement, une couche Oracle Spatial est définie par une entrée dans la table USER_SDO_METADATA.