.
Utiliser les projections
QGIS allows users to define a global and project-wide CRS (coordinate reference system) for layers without a pre-defined CRS. It also allows the user to define custom coordinate reference systems and supports on-the-fly (OTF) projection of vector and raster layers. All of these features allow the user to display layers with different CRSs and have them overlay properly.
Aperçu de la gestion des projections
QGIS has support for approximately 2,700 known CRSs. Definitions for each CRS are stored in a SQLite database that is installed with QGIS. Normally, you do not need to manipulate the database directly. In fact, doing so may cause projection support to fail. Custom CRSs are stored in a user database. See section Système de Coordonnées de Référence personnalisé for information on managing your custom coordinate reference systems.
The CRSs available in QGIS are based on those defined by the European Petroleum Search Group (EPSG) and the Institut Geographique National de France (IGNF) and are largely abstracted from the spatial reference tables used in GDAL. EPSG identifiers are present in the database and can be used to specify a CRS in QGIS.
In order to use OTF projection, either your data must contain information about its
coordinate reference system or you will need to define a global, layer or
project-wide CRS. For PostGIS layers, QGIS uses the spatial reference identifier
that was specified when the layer was created. For data supported by OGR, QGIS
relies on the presence of a recognized means of specifying the CRS. In the case
of shapefiles, this means a file containing the well-known text (WKT)
specification of the CRS. This projection file has the same base name as the
shapefile and a .prj extension. For example, a shapefile named
alaska.shp would have a corresponding projection file named
alaska.prj.
Whenever you select a new CRS, the layer units will automatically be
changed in the General tab of the  Project Properties dialog under the Project (Gnome,
OS X) or Settings (KDE, Windows) menu.
Project Properties dialog under the Project (Gnome,
OS X) or Settings (KDE, Windows) menu.
Spécification globale d’une projection
QGIS starts each new project using the global default projection. The global
default CRS is EPSG:4326 - WGS 84 (proj=longlat +ellps=WGS84 +datum=WGS84 +no_defs),
and it comes predefined in QGIS. This default can be changed via the
[Select...] button in the first section, which is used to define the default
coordinate reference system for new projects, as shown in
figure_projection_1. This choice will be saved for use in subsequent QGIS
sessions.
Figure Projection 1:
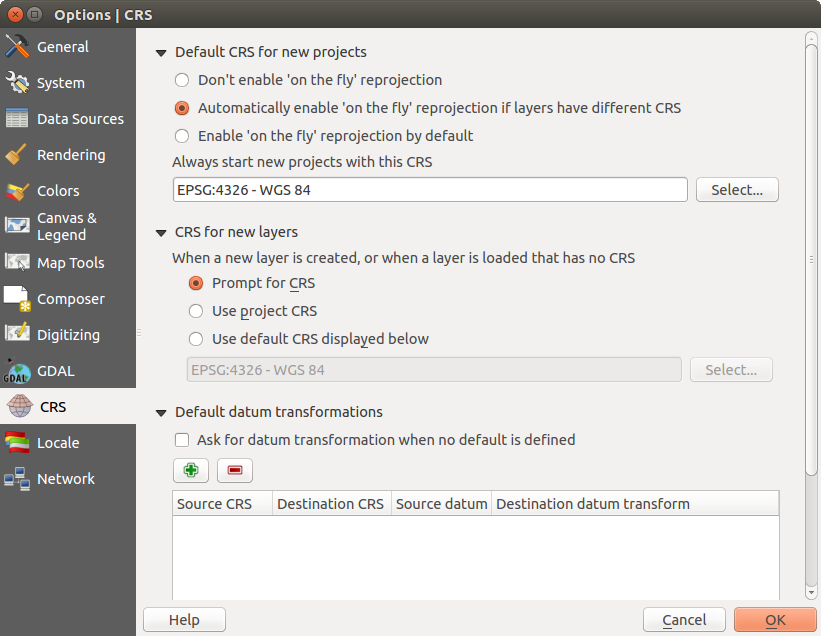
CRS tab in the QGIS Options Dialog 
When you use layers that do not have a CRS, you need to define how QGIS
responds to these layers. This can be done globally or project-wide in the
CRS tab under Settings ‣
Options.
Les options montrées sur figure_projection_1 sont :
 Prompt for CRS
 Use project CRS
- Use default CRS displayed below
If you want to define the coordinate reference system for a certain layer without CRS information, you can also do that in the General tab of the raster and vector properties dialog (see Onglet Général for rasters and Onglet Général for vectors). If your layer already has a CRS defined, it will be displayed as shown in Vector Layer Properties Dialog .
Astuce
SCR depuis la légende de la carte
Un clic-droit sur une couche dans la légende (section Map Legend) propose deux raccourcis concernant les SCR. Définir le SCR de la couche ouvre directement la fenêtre de sélection de SCR (voir figure_projection_2). Définir le SCR du projet depuis cette couche applique le SCR de la couche au projet.
Définir la projection à la volée
QGIS supports OTF reprojection for both raster and vector data. However, OTF is
not activated by default. To use OTF projection, you must activate the
 Enable on the fly CRS transformation checkbox in the
CRS tab of the
Enable on the fly CRS transformation checkbox in the
CRS tab of the  Project
Properties dialog.
Project
Properties dialog.
Il y a trois manières de le faire :
- Select Project Properties from the
Project (Gnome, OSX) or Settings (KDE,
Windows) menu.
Cliquer sur l’icône
 Statut de la projection depuis le coin inférieur droit de la barre d’état.
Choisir d’activer la projection à la volée par défaut en cochant la case
Activer la reprojection ‘à la volée’ par défaut dans l’onglet SCR de la fenêtre des Options ou Activer automatiquement la projection à la volée si les couches ont des SCR différents.
Si vous avez déjà chargé une couche, et désirez activer la projection à la volée, la meilleure façon de faire est d’ouvrir l’onglet SCR de la fenêtre des Propriétés du projet, de sélectionner le SCR de la couche chargée, et de cocher la case Activer la projection ‘à la volée’. L’icône Statut de la projection ne sera plus grisé et toutes les couches chargées plus tard seront projetées à la volée dans le SCR défini qui apparait à gauche de l’icône.
Figure Projection 2:
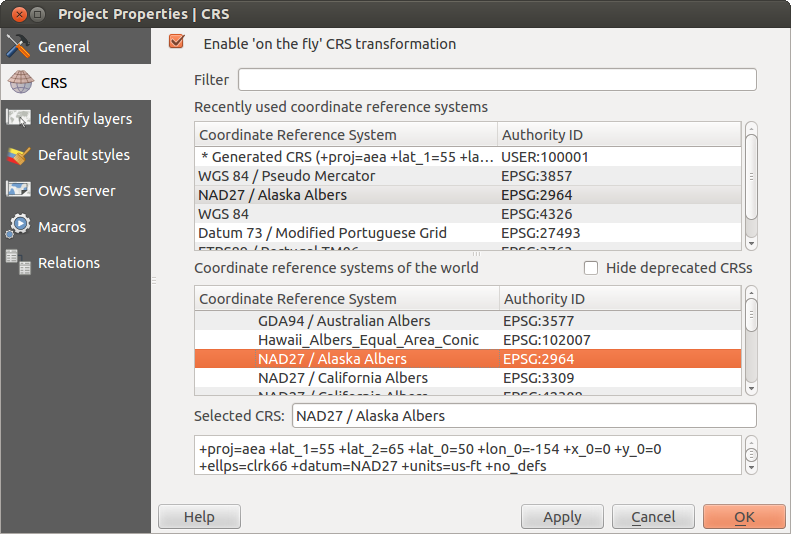
Project Properties Dialog
L’onglet SCR de la fenêtre de Propriétés du projet contient cinq composants importants, comme indiqué sur la figure Figure_projection_2 et décrit ci-dessous :
Activer la projection ‘à la volée’ — Cette case à cocher est utilisée pour activer ou désactiver la projection à la volée. Lorsqu’elle est décochée, chaque couche est dessinée en utilisant les coordonnées lues dans la source de données et les composants décrits ci-dessous sont inactifs. Lorsqu’elle est activée, les coordonnées de chaque couche sont projetées dans le système de coordonnées de référence défini pour la carte.
Rechercher — Si vous connaissez le code EPSG, l’identifiant ou le nom d’un système de coordonnées de référence, vous pouvez utiliser la fonction rechercher pour le retrouver. Entrez le code EPSG, l’identifiant ou le nom à chercher.
système de coordonnées de référence récemment uilisés — Si vous utilisez certains SCR fréquemment dans vos travaux quotidiens, ils seront affichés dans cette liste. Cliquez sur l’un d’entre eux pour sélectionner le SCR du projet.
- Coordinate reference systems of the world — This is a list of all CRSs supported by QGIS, including Geographic, Projected and Custom coordinate reference systems. To define a CRS, select it from the list by expanding the appropriate node and selecting the CRS. The active CRS is preselected.
Texte PROJ.4 — C’est la liste des paramètres décrivant le SCR telle qu’elle est utilisée par le moteur de projection Proj4. Ce texte est en lecture seule et est fourni à titre informatif.
Astuce
Fenêtre Propriétés du projet
Si vous ouvrez la fenêtre Propriétés du projet à partir du menu Projet, vous devez cliquer sur l’onglet SCR pour voir les définitions des SCR.
Ouvrir la fenêtre à partir de l’icône Statut de la projection vous amènera directement dans l’onglet Système de Coordonnées de Référence.
Système de Coordonnées de Référence personnalisé
If QGIS does not provide the coordinate reference system you need, you can
define a custom CRS. To define a CRS, select  Custom CRS... from the Settings menu. Custom CRSs
are stored in your QGIS user database. In addition to your custom CRSs, this
database also contains your spatial bookmarks and other custom data.
Custom CRS... from the Settings menu. Custom CRSs
are stored in your QGIS user database. In addition to your custom CRSs, this
database also contains your spatial bookmarks and other custom data.
Figure Projection 3:
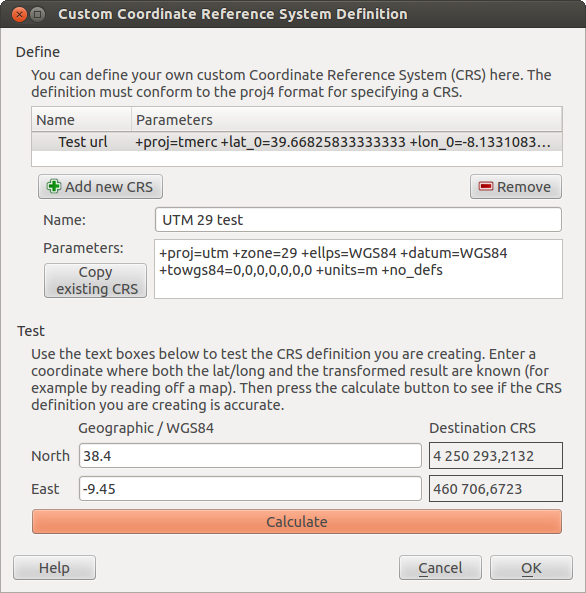
Custom CRS Dialog
Defining a custom CRS in QGIS requires a good understanding of the PROJ.4 projection library. To begin, refer to “Cartographic Projection Procedures for the UNIX Environment - A User’s Manual” by Gerald I. Evenden, U.S. Geological Survey Open-File Report 90-284, 1990 (available at ftp://ftp.remotesensing.org/proj/OF90-284.pdf).
This manual describes the use of the proj.4 and related command line
utilities. The cartographic parameters used with proj.4 are described in
the user manual and are the same as those used by QGIS.
La fenêtre Définir un système de coordonnées de référence personnalisé nécessite seulement deux paramètres pour définir un SCR personnalisé :
Un nom descriptif
Les paramètres cartographiques au format PROJ.4.
To create a new CRS, click the  Add new CRS button and enter a
descriptive name and the CRS parameters.
Add new CRS button and enter a
descriptive name and the CRS parameters.
Remarquez que les Paramètres doivent débuter par un bloc +proj= pour représenter le nouveau système de coordonnées de référence.
Vous pouvez tester vos paramètres de SCR pour voir s’ils produisent des résultats valides. Entrez des latitude et longitude connues en WGS 84 dans les champs Nord et Est respectivement. Cliquez sur le bouton [Calculer] et comparez les résultats avec les valeurs connues dans votre système de coordonnées de référence.
Transformations géodésiques par défaut
OTF depends on being able to transform data into a ‘default CRS’, and QGIS uses WGS84. For some CRS there are a number of transforms available. QGIS allows you to define the transformation used otherwise QGIS uses a default transformation.
In the CRS tab under Settings ‣
Options you can:
- set QGIS to ask you when it needs define a transformation using Ask for datum transformation when no default is defined
éditer une liste de transformations par défaut de l’utilisateur.
QGIS asks which transformation to use by opening a dialogue box
displaying PROJ.4 text describing the source and destination
transforms. Further information may be found by hovering over a
transform. User defaults can be saved by selecting
Remember selection.