.
Printvormgeving
De Printvormgeving verschaft een groeiend aantal mogelijkheden voor lay-out en afdrukken. Het stelt u in staat elementen toe te voegen zoals het kaartvenster van QGIS, tekstlabels, afbeeldingen, legenda’s, schaalbalken, basisvormen, pijlen, attributentabellen en HTML-objecten. U kunt elk element wijzigen van grootte, groeperen, uitlijnen en de positie bepalen en de eigenschappen aanpassen om uw lay-out te maken. De lay-out kan worden afgedrukt of geëxporteerd naar indelingen voor afbeeldingen, PostScript, PDF of naar SVG (exporteren naar SVG werkt nog niet correct met enkele recente versies van Qt4; u zou dat individueel moeten proberen en controleren op uw systeem). U kunt de lay-out opslaan als een sjabloon en het opnieuw laden in een andere sessie. Tenslotte kunnen verscheidene kaarten worden gegenereerd die zijn gebaseerd op een sjabloon met behulp van de atlas-generator. Bekijk een lijst van gereedschappen in table_composer_1:
Pictogram
|
Doel
|
Pictogram
|
Doel
|
|---|
| |
|
|
|
 |
Project opslaan
|
 |
Nieuwe Printvormgeving
|
 |
Dupliceer lay-out
|
 |
Printvormgeving-manager
|
 |
Laden uit sjabloon
|
 |
Opslaan als sjabloon
|
 |
Afdrukken of exporteren als PostScript
|
 |
Exporteren naar afbeelding
|
 |
Exporteren printvormgeving naar SVG
|
 |
Exporteren als PDF
|
 |
Laatste wijziging ongedaan maken
|
 |
Laatste wijziging opnieuw
|
 |
Zoomen naar volledig bereik
|
 |
Zoomen naar 100%
|
 |
Inzoomen
|
|
Uitzoomen
|
 |
Scherm verversen
|
|
|
 |
Schuiven
|
 |
Zoomen naar specifiek gebied
|
 |
Selecteren/Verplaatsen item in printvormgeving
|
 |
Verplaatsen inhoud binnen een item
|
 |
Toevoegen nieuwe kaart vanuit QGIS kaartvenster
|
 |
Afbeelding toevoegen aan printvormgeving
|
 |
Label toevoegen aan printvormgeving
|
 |
Nieuwe legenda toevoegen aan printvormgeving
|
 |
Schaalbalk toevoegen aan printvormgeving
|
 |
Basisvorm toevoegen aan printvormgeving
|
 |
Pijl toevoegen aan printvormgeving
|
 |
Attributentabel toevoegen aan printvormgeving
|
 |
Een HTML-object toevoegen
|
|
|
 |
Groeperen van items van printvormgeving
|
 |
Groeperen opheffen van items van printvormgeving
|
| |
Vastzetten geselecteerde items
|
|
Alle items losmaken
|
 |
Geselecteerde items verhogen
|
 |
Geselecteerde items verlagen
|
 |
Verplaats geselecteerde items als bovenste
|
 |
Verplaats geselecteerde items als onderste
|
 |
Links uitlijnen geselecteerde items
|
 |
Rechts uitlijnen geselecteerde items
|
 |
Gecentreerd uitlijnen geselecteerde items
|
 |
Verticaal gecentreerd uitlijnen geselecteerde items
|
 |
Boven uitlijnen geselecteerde items
|
 |
Onder uitlijnen geselecteerde items
|
 |
Voorvertoning Atlas
|
 |
Eerste object
|
 |
Vorige object
|
 |
Volgende object
|
 |
Laatste object
|
|
Afdrukken Atlas
|
|
Exporteer Atlas als afbeeldingen
|
 |
Instellingen voor Atlas
|
Tabel Composer 1: gereedschappen Printvormgeving
Alle gereedschappen voor Printvormgeving zijn beschikbaar in menu’s en als pictogrammen in een werkbalk. De werkbalk kan in- en uitgeschakeld worden met behulp van de rechter muisknop boven de werkbalk.
Eerste stappen
Open een nieuw sjabloon voor Printvormgeving
Vóórdat u begint te werken met de Printvormgeving dient u enkele raster- en vectorlagen te laden in het kaartvenster van QGIS en hun eigenschappen aan te passen om te voldoen aan uw eigen wensen. Nadat alles volgens uw wensen is gerenderd en gesymboliseerd, klik op het pictogram Nieuwe Printvormgeving in de werkbalk of kies . U zult naar een nieuwe titel worden gevraagd voor de nieuwe Printvormgeving.
Using Print Composer
Opening the Print Composer provides you with a blank canvas to which you can add
the current QGIS map canvas, text labels, images, legends, scale bars, basic
shapes, arrows, attribute tables and HTML frames. Figure_composer_1 shows the
initial view of the Print Composer before any elements are added.
Figure Composer 1:
The Print Composer provides four tabs:
In het onderste gedeelte van het venster van Printvormgeving vindt u een statusbalk met daarin de positie van de muis, huidige paginanummer en een combinatievak voor het instellen van het niveau van zoomen.
U kunt meerdere items toevoegen aan de Printvormgeving. Het is ook mogelijk om meer dan één kaartweergave of legenda of schaalbalk in het kaartvenster van Printvormgeving te hebben, op één of verscheidene pagina’s. Elk item heeft zijn eigen eigenschappen en, in het geval van de kaart, zijn eigen bereik. Als u een item uit het kaartvenster van Printvormgeving wilt verwijderen kunt u dat doen met de toetsen Delete of Backspace.
Print Composer Options
Via kunt u enkele opties instellen die als standaard zullen worden gebruikt gedurende uw werkzaamheden.
Standaardwaarden opmaak laat u het te gebruiken standaard lettertype specificeren.
Met Ruitennetweergave kunt u de stijl voor het raster en de kleur daarvan instellen.
Ruitennetstandaarden definieert afstand, verschuiving en tolerantie van het raster. Er zijn drie typen raster: Stippels, Doorgetrokken lijnen en Kruisjes.
Hulplijnstandaarden definieert de tolerantie voor de hulplijnen.
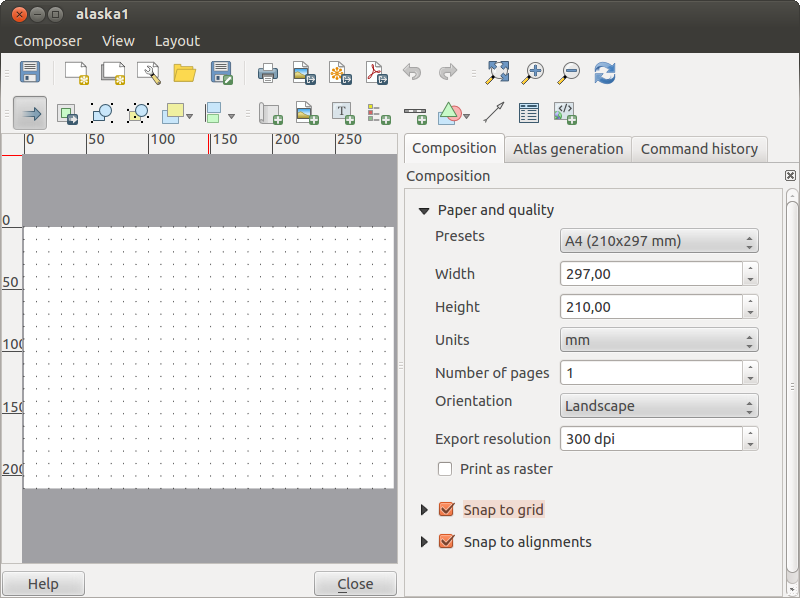
tab Lay-out — Algemene instellingen voor lay-out
In de tab Lay-out kunt u de globale instellingen voor uw compositie definiëren.
U kunt kiezen uit één van de Voorinstellingen voor uw blad papier, of uw aangepaste Breedte en Hoogte invoeren.
Printvormgeving kan nu worden opgedeeld in meerdere pagina’s. De eerste pagina ka, bijvoorbeeld, een kaartvenster weergeven en een tweede pagina kan de attributentabel, die is geassocieerd met een laag, weergeven, terwijl een derde een HTML-object weergeeft dat is gekoppeld aan de website van uw organisatie. Stel Aantal pagina’s in op de gewenste waarde. U kunt de Oriëntatie van de pagina kiezen en de Export-resolutie. Wanneer  Als raster afdrukken is geselecteerd betekent dat dat alle items zullen worden gerasterd vóór het afdrukken of opslaan als PostScript of PDF.
Grid laat u de instellingen voor het raster, zoals Tussenruimte, Grid verspringing en Tolerantie, naar uw behoeften aanpassen.
In Snappen naar uitlijning kunt u de Tolerantie wijzigen, wat de maximale afstand is waarop een item zal worden gevangen door hulplijnen.
Aan grid ‘snappen’ en/of aan hulplijnen kan worden ingeschakeld vanuit het menu . In dat menu kunt u ook het raster en de hulplijnen verbergen of weergeven.
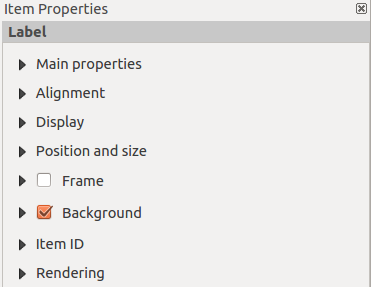
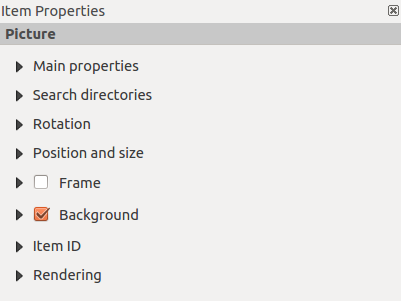
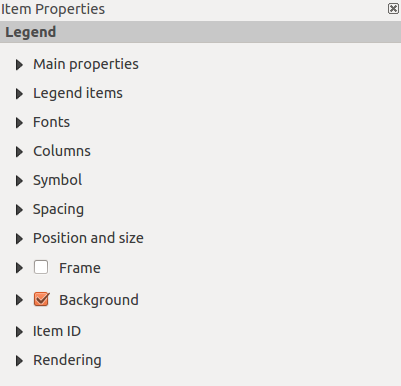
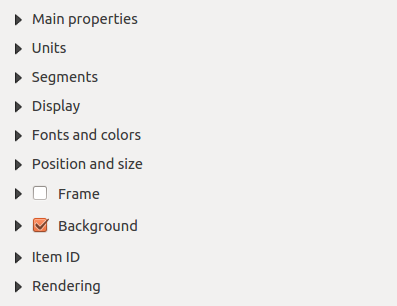
Composer items general options
Composer items have a set of common properties you will find on the bottom of the Item Properties tab: Position and size, Frame,
Background, Item ID and Rendering (See figure_composer_2).
Figure Composer 2:
Het dialoogvenster Positie en grootte laat u de grootte en de positie definiëren van het frame dat het item bevat. U kunt ook kiezen welk Referentiepunt zal worden ingesteld op de eerder gedefinieerde X- en Y-coördinaten.
De Rotatie stelt de rotatie van het item in (in graden).
Het Frame toont of verbergt het frame rondom het label. Klik op de knoppen [Kleur] en [Dikte] om deze eigenschappen aan te passen.
De Achtergrond schakelt een achtergrondkleur in- of uit. Klik op de knop [Kleur...] om een dialoogvenster weer te geven waar u een kleur of een aangepaste instelling kunt kiezen. Transparantie kan ook worden aangepast via het veld Alpha channel.
Gebruik Item ID om een relatie te maken naar andere items van Printvormgeving. Dit wordt gebruikt met de server van QGIS en een potentiële webcliënt. U kunt een ID instellen voor een item (bijv.,een kaart en een label), en dan kan de webcliënt gegevens verzenden om een eigenschap in te stellen (bijv., tekst voor een label) voor dat specifieke item. De opdracht GetProjectSettings zal vermelden welke items en welke ID’s beschikbaar zijn in een lay-out.
Modus Rendering kan worden geselecteerd in het optieveld. Zie Rendering_Mode.
Modus Rendering
QGIS staat nu geavanceerde rendering toe voor items van Printvormgeving net zoals voor vector- en rasterlagen.
Figure Composer 3:
Transparantie  : U kunt met dit gereedschap het onderliggende item in Printvormgeving zichtbaar maken. Gebruik de schuifbalk om de zichtbaarheid van uw item aan uw behoeften aan te passen. U kunt ook een precieze definitie van het percentage zichtbaarheid instellen in het menu naast de schuifbalk.
Meng-modus: U kunt speciale effecten voor renderen bereiken met deze gereedschappen die u mogelijk eerder pas kende vanuit grafische programma’s. De pixels van uw bovenliggende en onderliggende items worden gemengd via de hieronder beschreven instellingen.
Normaal: Dit is de standaard meng-modus, die het alfakanaal van de bovenste pixel gebruikt om te mengen met de pixel eronder; de kleuren worden niet gemengd.
Lichter maken: Dit selecteert de maximum waarden van elke component van de pixels van de voor- en achtergrond. Onthoud dat het resultaat vaak ruw, grof en kartelig is.
Screen: Lichte pixels van de bronlaag worden getekend over de doellaag, bij donkere pixels gebeurt dat niet. Deze modus is bijzonder geschikt voor het mengen van de textuur van de ene laag met die van een andere laag. (bijv. u kunt deze gebruiken om schaduwen van heuvels in te brengen in een andere laag.
Dodge: Hoe lichter de bovenliggende pixel is des te feller en met meer kleur zullen de onderliggende pixels getoond worden. Dus:, heldere pixels bovenop zorgen er voor dat de verzadiging en helderheid van de onderliggende pixels wordt verhoogt. Dit werkt het beste wanneer de bovenste pixels niet te fel zijn, anders wordt het resultaat te extreem.
Toevoegen: Deze meng-modus telt de waarden van pixels van de ene laag op bij die van de andere. Wanneer de waarden boven de 1 uitkomen (zoals het geval is bij RGB), wordt wit weergegeven. Deze modus is geschikt om objecten te accentueren.
Donkerder maken: Dit maakt een resulterende pixel die de laagste componenten van de pixel voor voor- en achtergrond behoud. Net zoals bij de modus Lichter maken is het resultaat vaak ruw, grof en gekarteld
Vermenigvuldigen: Dit vermenigvuldigt de waarden voor elke pixel van de bovenste laag met die van de corresponderende pixel van de onderste laag. Het resultaat is een donkerder kaartbeeld.
Branden: Donkere kleuren in de bovenste laag zorgen ervoor dat onderliggende lagen donkerder worden. Branden kan worden gebruikt om de kleuren van onderliggende lagen bij te stellen.
Overlay: Combineert de meng-modi Vermenigvuldigen en Screen. In het resulterende kaartbeeld worden de lichtere delen lichter en donkere delen donkerder.
Zacht licht: Lijkt erg op Overlay, maar in plaats van de combinatie Vermenigvuldigen/Screen wordt de combinatie Branden/Dodge gebruikt. Deze modus wordt geacht het schijnen van een zacht licht op een afbeelding na te bootsen.
Hard licht: Hard licht lijkt veel op de modus Overlay. Het wordt geacht het projecteren van een zeer intens licht op een afbeelding na te bootsen.
Verschil: Verschil haalt de waarde van de bovenste pixel van de onderste pixel af of omgekeerd, zodat er altijd een positieve waarde ontstaat. Het mengen met zwart levert geen wijziging op, omdat het verschil met alle kleuren nul is.
Aftrekken: Deze meng-modus trekt eenvoudigweg de pixelwaarden van de ene laag af van die van de andere. Bij negatieve waarden wordt zwart weergegeven.
Items Printvormgeving
Adding a current QGIS map canvas to the Print Composer
Klik op de werkbalkknop Nieuwe kaart toevoegen op de werkbalk Printvormgeving om het kaartvenster van QGIS toe te voegen. Sleep nu, met de linker muisknop, een rechthoek op het kaartvenster van Printvormgeving om de kaart toe te voegen. U kunt kiezen uit drie verschillende modi op de tab Item-eigenschappen van de kaart om de huidige kaart weer te geven:
Rechthoek is de standaard instelling. Het geeft alleen een leeg vak weer met het bericht ‘Kaart zal hier worden afgedrukt’.
Werkgeheugen rendert de kaart in de huidige resolutie van het scherm. Als u op het venster van Printvormgeving in- of uitzoomt, wordt de kaart niet opnieuw gerenderd maar de afbeelding zal op schaal worden gebracht.
Renderen betekent dat als u op het venster van Printvormgeving in- of uitzoomt, de kaart opnieuw zal worden gerenderd, maar, om redenen van maatvoering, slechts tot een maximale resolutie.
Werkgeheugen is de standaard modus voor voorvertoning voor nieuw toegevoegde kaarten in Printvormgeving.
U kunt d egrootte van het kaartitem wijzigen door te klikken op de knop Selecteren/Verplaatsen item, het item te selecteren, en te slepen aan een van de blauwe handvatten in de hoeken van de kaart. Met de geselecteerde kaart kunt u nu meer eigenschappen aanpassen op de tab Item-eigenschappen van de kaart.
To move layers within the map element, select the map element, click the
Move item content icon and move the layers within
the map element frame with the left mouse button. After you have found the right place
for an element, you can lock the element position within the Print Composer
canvas. Select the map element and click on the right mouse button to  Lock the element position and again to unlock the element. You can also lock
the map element by activating the Lock layers for map
item checkbox in the Map dialog of the Item Properties
tab.
Lock the element position and again to unlock the element. You can also lock
the map element by activating the Lock layers for map
item checkbox in the Map dialog of the Item Properties
tab.
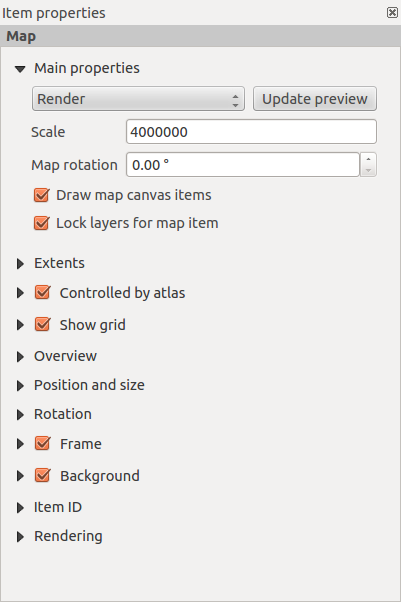
Algemene eigenschappen
The Main properties dialog of the map Item Properies tab provides the
following functionalities (see figure_composer_4):
Figure Composer 4:
Het gebied Voorvertoning stelt u in staat de modi voor de voorvertoning ‘Rechthoek’, ‘Werkgeheugen’ en ‘Renderen’ in te stellen, zoals boven beschreven. Als u de weergave van het kaartvenster van QGIS wijzigt door eigenschappen van vector of raster te veranderen, kunt u de weergave in de Printvormgeving bijwerken door te het kaartitem te selecteren in de Printvormgeving en te klikken op de knop [Voorvertoning bijwerken].
Het veld Schaal  stelt een handmatige schaal in.
Het veld Rotatie stelt u in staat het kaartitem met de klok mee te roteren in graden. Onthoud dat een coördinatenframe alleen kan worden toegevoegd met de standaardwaarde 0.
Kaartvenster objecten tekenen laat u annotaties weergeven die kunnen zijn geplaatst op het kaartvenster in het hoofdvenster van QGIS.
- You can choose to lock the layers shown on a map item. Check Lock layers for map item. After this is checked, any layer that would be
displayed or hidden in the main QGIS window won’t appear or be hidden in the map item of the Composer. But style and
labels of a locked layer are still refreshed according to the main QGIS interface.
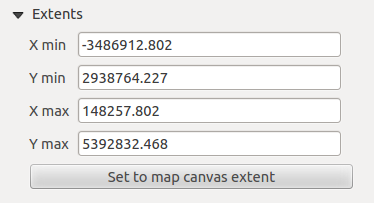
Bereik
The Extents dialog of the map item tab provides the following
functionalities (see figure_composer_5):
Figure Composer 5:
- The Map extent area allows you to specify the map extent using Y and X min/max
values or by clicking the [Set to map canvas extent] button.
If you change the view on the QGIS map canvas by changing
vector or raster properties, you can update the Print Composer view by selecting
the map element in the Print Composer and clicking the [Update preview] button
in the map Item Properties tab (see figure_composer_2).
Raster
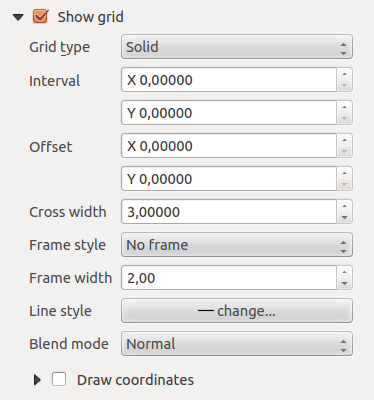
The Grid dialog of the map Item Properties tab provides the
following functionalities (see Figure_composer_6):
Figure Composer 6:
- The Show grid checkbox allows you to overlay a grid onto the
map element. As grid type, you can specify to use a solid line or cross. Symbology of
the grid can be chosen. See section Rendering_Mode.
Furthermore, you can define an interval in the X and Y directions, an X and Y offset,
and the width used for the cross or line grid type.
- You can choose to paint the frame with a zebra style. If not selected, the general frame option is used (see section Frame_dialog).
Advanced rendering mode is also available for grids (see section Rendering_mode).
Het keuzevak Teken coördinaten stelt u in staat coördinaten toe te voegen aan het frame van de kaart. De annotatie kan binnen of buiten het frame van de kaart worden getekend. De richting van de annotatie kan worden gedefinieerd als horizontaal, verticaal, horizontaal en verticaal, of in de richting van de begrenzing, voor elke begrenzing individueel. Eenheden mogen zijn in meters of in graden. Tenslotte kunt u de rasterkleur definiëren, het lettertype van de annotatie, de afstand van de annotatie tot het frame van de kaart en de precisie van de getekende coördinaten.
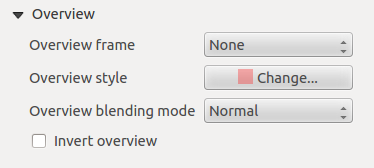
Overview
The Overview dialog of the map Item Properties tab provides the
following functionalities (see Figure_composer_7):
Figure Composer 7:
If the Composer has more than one map, you can choose to use a first map to show the extents of a second map.
The Overview dialog of the map Item Properties tab allows you to customize the appearance of that feature.
- The Overview frame combo list references the map item whose extents will be drawn on the present map item.
- The Overview Style allows you to change the frame color. See section vector_style_manager .
- The Overview Blend mode allows you to set different transparency blend modes, to enhance visibility of the frame. See Rendering_Mode.
- If checked, Invert overview creates a mask around the extents: the referenced map extents are shown clearly,
whereas everything else is blended with the frame color.
Adding a Label item to the Print Composer
Klik, om een label toe te voegen, op het pictogram Label toevoegen, plaats het item met de linker muisknop op het kaartvenster van Printvormgeving en positioneer het en pas het uiterlijk aan op de tab Item-eigenschappen van Label.
The Item Properties tab of a label item provides the following functionalities:
Figure Composer 8:
Algemene eigenschappen
The Main properties dialog of the label Item Properties tab provides the
following functionalities (see Figure_composer_9):
Figure Composer 9:
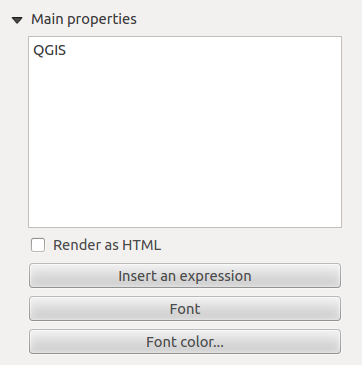
Het dialoogvenster Algemene eigenschappen is waar de tekst (HTML of niet) of de benodigde expressie om het label te vullen wordt toegevoegd aan het kaartvenster van Printvormgeving.
Labels kunnen worden geïnterpreteerd als HTML-code: selecteer Renderen als HTML. U kunt nu een URL invoeren, een aan te klikken afbeelding die verwijst naar een webpagina of iets meer complex.
- You can also insert an expression. Click on [Insert an expression] to open a new dialog. Build an expression by clicking the
functions available in the left side of the panel. On the right side of the Insert an expression dialog, the help file
associated with the function selected is displayed. Two special categories can be useful, particularly associated with the atlas functionality:
geometry functions and records functions. At the bottom, a preview of the expression is shown.
- Define font and font color by clicking on the [Font] and [Font color...] buttons.
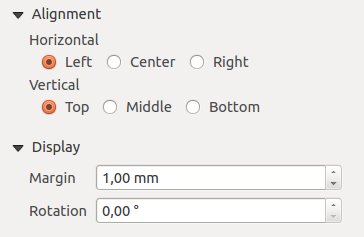
Uitlijning en Tonen
The Alignment and Display dialogs of the label Item Properties tab provide the
following functionalities (see Figure_composer_10):
Figure Composer 10:
Adding an Image item to the Print Composer
Klik, om een afbeelding toe te voegen, op het pictogram Afbeelding toevoegen, plaats het item met de linker muisknop op het kaartvenster van Printvormgeving en positioneer het en pas het uiterlijk aan op de tab Item-eigenschappen.
The image Item Properties tab provides the following functionalities (see figure_composer_11):
Figure Composer 11:
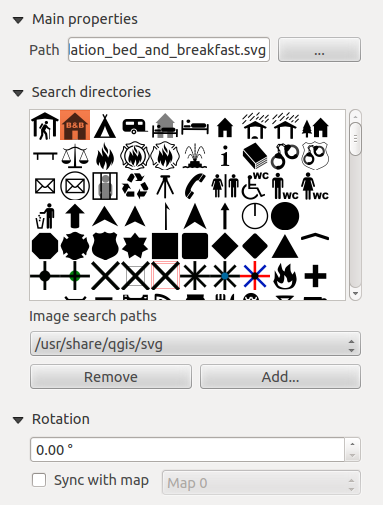
Main properties, Search directories and Rotation
The Main properties and Search directories dialogs of the image Item Properties tab provide the
following functionalities (see Figure_composer_12):
Figure Composer 12:
- The Main properties dialog shows the current image that is displayed in the image item.
Click on the [...] button to select a file on your computer.
- This dialog shows all pictures stored in the selected directories.
- The Search directories area allows you to add and remove directories with
images in SVG format to the picture database.
- Images can be rotated with the Rotation field.
- Activating the Sync with
map checkbox synchronizes the rotation of a picture in the QGIS map canvas
(i.e., a rotated north arrow) with the appropriate Print Composer image.
Adding a Legend item to the Print Composer
Klik, om een legenda voor de kaart toe te voegen, op het pictogram Nieuwe legenda toevoegen, plaats het item met de linker muisknop op het kaartvenster van Printvormgeving en positioneer het en pas het uiterlijk aan op de tab Item-eigenschappen van de Legenda..
The Item properties of a legend item tab provides the following
functionalities (see figure_composer_14):
Figure Composer 13:
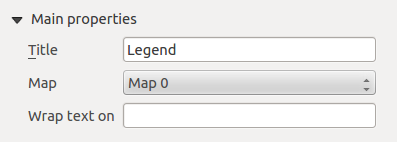
Algemene eigenschappen
The Main properties dialog of the legend Item Properties tab
provides the following functionalities (see figure_composer_14):
Figure Composer 14:
- Here, you can adapt the legend title.
- You can also choose which Map item the current legend will refer to in the select list.
- Since QGIS 1.8, you can wrap the text of the legend title on a given character.
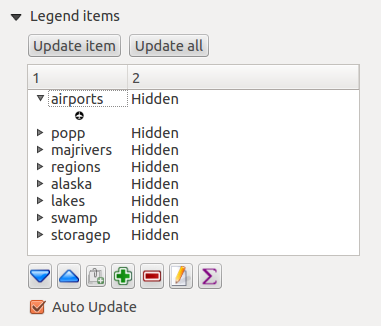
Items voor legenda
The Legend items dialog of the legend Item Properties tab
provides the following functionalities (see figure_composer_15):
Figure Composer 15:
- The legend items window lists all legend items and allows you to change item order,
group layers, remove and restore items in the list, and edit layer names. After changing the
symbology in the QGIS main window, you can click on [Update] to adapt the
changes in the legend element of the Print Composer. The item order can be
changed using the [Up] and [Down] buttons or with ‘drag-and-drop’
functionality.
- The feature count for each vector layer can be shown by enabling the [Sigma] button.
- The legend will be updated automatically if Auto-update is checked.
Fonts, Columns, Symbol and Spacing
The Fonts, Columns, Symbol and Spacing dialogs of the legend Item Properties tab
provide the following functionalities (see figure_composer_16):
Figure Composer 16:
U kunt het lettertype wijzigen van de titel van de legenda, groeperen, subgroeperen en de items (laag) in de items van de legenda. Klik op een knop voor een categorie om een dialoogvenster Selecteer lettertype te openen.
- All these items will get the same Color.
- Legend items can be arranged in several columns. Select the correct value in the Count field.
Gelijke kolombreedtes stelt in hoe kolommen van legenda’s zouden moeten worden aangepast.
De optie Kaartlagen splitsen stelt u in staat een legenda voor een gecategoriseerde of een graduele laag op te delen in kolommen.
U kunt in dit dialoogvenster de breedte en hoogte van het symbool van de legenda wijzigen.
- Spacing aroung title, group, subgroup, symbol, icon label, box space or column space can be customized through this dialog.
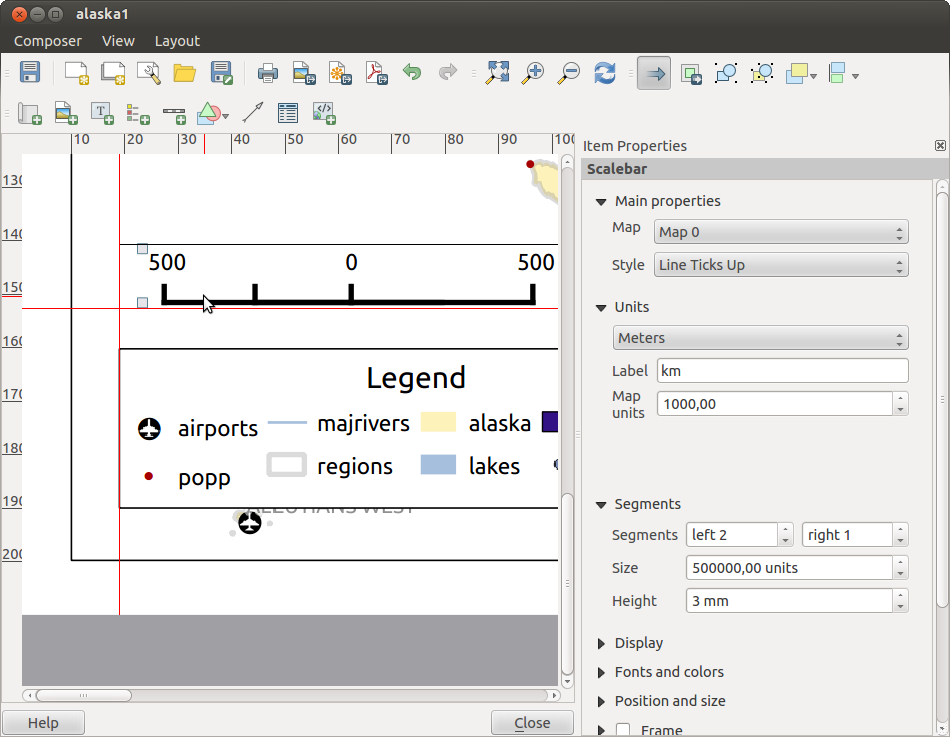
Adding a Scale Bar item to the Print Composer
Klik, om een schaalbalk toe te voegen, op het pictogram Nieuwe schaalbalk toevoegen, plaats het item met de linker muisknop op het kaartvenster van Printvormgeving en positioneer het en pas het uiterlijk aan op de tab Item-eigenschappen van de Schaalbalk.
The Item properties of a scale bar item tab provides the following
functionalities (see figure_composer_17):
Figure Composer 17:
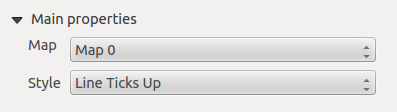
Algemene eigenschappen
The Main properties dialog of the scale bar Item Properties tab
provides the following functionalities (see figure_composer_18):
Figure Composer 18:
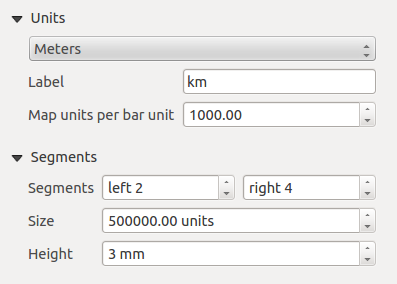
Eenheden en Segmenten
The Units and Segments dialogs of the scale bar Item Properties tab
provide the following functionalities (see figure_composer_19):
Figure Composer 19:
In deze twee dialoogvensters kunt u instellen hoe de schaalbalk zal worden weergegeven.
- Select the map units used. There are three possible choices: Map Units is the automated unit
selection; Meters or Feet force unit conversions.
Het veld Label definieert de gebruikte tekst om de eenheden van de schaalbalk te beschrijven.
Kaarteenheden per schaalbalkeenheid stelt u in staat de ratio aan te passen tussen een kaarteenheid en de weergave daravan in de schaalbalk.
U kunt definiëren hoeveel Segmenten zullen worden getekend aan de linker- en rechterkant van de schaalbalk en hoe lang elk segment zal zijn (veld Grootte). Hoogte kan ook worden gedefinieerd.
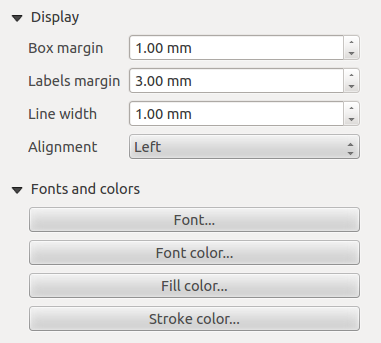
Display, Fonts and colors
The Display and Fonts and colors dialogs of the scale bar Item Properties tab provide the following functionalities (see figure_composer_20):
Figure Composer 20:
- You can define how the scale bar will be displayed in its frame. Adjust the Box margin between text and frame borders,
Labels margin between text and scale bar drawing and the Line width of the scale bar drawing.
- The Alignment in the Display dialog only applies to Numeric styled scale bars and puts text on the
left, middle or right side of the frame.
Adding a Basic shape or Arrow item to the Print Composer
It is possible to add basic shapes (ellipse, rectangle, triangle) and arrows
to the Print Composer canvas: Click the Add basic shape icon or the
Add Arrow icon, place the element with the left mouse button on the Print Composer canvas and position
and customize the appearance in the Item Properties tab.
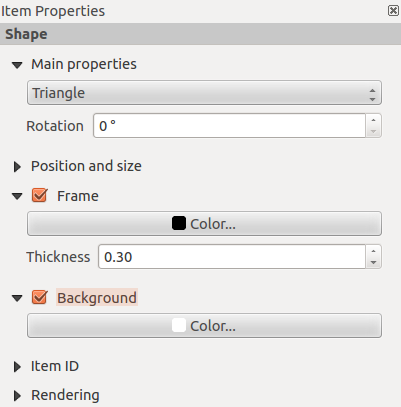
The Shape item properties tab allows you to draw an ellipse, rectangle, or triangle
in the Print Composer canvas. You can define its outline and fill color, the
outline width and a clockwise rotation. For the rectangle shape, you can change the value
of the corner radius.
Figure Composer 21:
The Arrow item properties tab allows you to draw an arrow in the Print Composer canvas.
You can define color, outline and arrow width, and it is possible to use a default
marker, no marker, or an SVG marker. For the SVG marker, you can additionally
add an SVG start and end marker from a directory on your computer.
Figure Composer 22:
Algemene eigenschappen
- For basic shapes, this dialog allows you to choose an Ellipse, Rectangle or Triangle shape and its rotation.
- Unlike the other items, line style, line color and background color of a basic shape are adjusted with the Frame and Background dialog.
No frame is drawn.
- For arrows, you can define here the line style: Color, Line width and Arrow head width.
- Arrows markers can be adjusted. If you want to set an SVG Start marker and/or End marker, browse to
your SVG file by clicking on the [...] button after selecting the SVG radio button.
Notitie
Unlike other items, the background color for a basic shape is the shape background and not the frame background.
Add attribute table values to the Print Composer
Het is mogelijk om delen van een vector-attributentabel toe te voegen aan het kaartvenster van Printvormgeving: Klik op het pictogram Attribuuttabel toevoegen, plaats het item met de linker muisknop op het kaartvenster van Printvormgeving en positioneer het en pas het uiterlijk aan op de tab Item-eigenschappen.
The Item properties of an attribute table item tab provides the following
functionalities (see figure_composer_23):
Figure Composer 23:
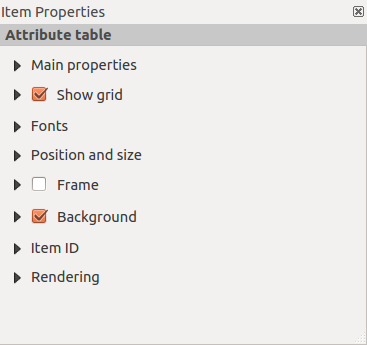
Main properties, Show grid and Fonts
The Main properties, Show grid and Fonts dialogs of the attribute table Item Properties tab
provide the following functionalities (see figure_composer_24):
Figure Composer 24:
Figure Composer 25:
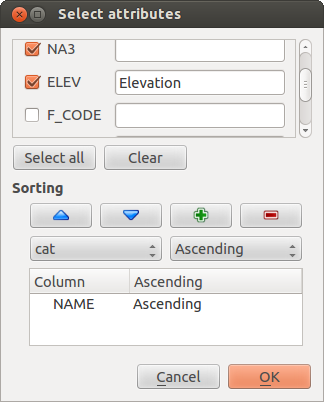
- The Table dialog allows you to select the vector layer and columns of the attribute table. Attribute columns can be sorted, and you
can specify whether to show values in ascending or descending order (see figure_composer_25).
- You can choose to display the attributes of only features visible on a map. Check Show only visible features and
select the corresponding Composer map to filter.
- You can define the Maximum number of rows to be displayed and the margin around text.
- Additionally, you can define the grid characteristics of the table (Stroke width and Color of the grid) and the
header and content font.
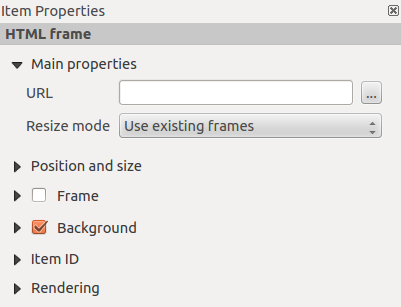
Add an HTML frame to the Print Composer
It is possible to add a clickable frame linked to a URL: Click the Add HTML frame icon, place the element with
the left mouse button on the Print Composer canvas and position and customize the appearance in the Item Properties tab.
Algemene eigenschappen
The Main properties dialog of the HTML frame Item Properties tab
provides the following functionalities (see figure_composer_26):
Figure Composer 26:
- Point the URL field to the URL or the HTML file you want to insert in the Composer.
- You can adjust the rendering of the page with the Resize mode.
- Use existing frames constrains the page inside its first frame or in the frame created with the next settings.
- Extent to next page will create as many frames (and corresponding pages) as necessary to render the height of the web page. Each frame can be
moved around on the layout. If you resize a frame, the webpage will be divided up between the other frames. The last frame will be trimmed to
fit the web page.
- Repeat on every page will repeat the upper left of the web page on every page in frames of the same size.
- Repeat until finished will also create as many frames as the Extend to next page option, except all frames will have the same
size.
Items beheren
Grootte en positie
Elk item binnen de Printvormgeving kan worden verplaatst/aangepast in grootte om een perfecte lay-out te maken. Voor beide bewerkingen is de eerste stap om het gereedschap Selecteer/Verplaats item te activeren en te klikken op het item; u kunt het dan verplaatsen met behulp van de muis terwijl u de linker muisknop ingedrukt houd. Als u de verplaatsingen wilt beperken tot de horizontale of de verticale as, houdt eenvoudigweg de toets Shift ingedrukt bij het verplaatsen van de muis. Als u een betere precisie nodig heeft,kunt u een geselecteerd item verplaatsen met behulp van de pijltoetsen op het toetsenbord; als de verplaatsing te traag gaat, kunt u die versnellen door Shift ingedrukt te houden.
A selected item will show squares on its boundaries; moving one of them with the mouse, will resize the item
in the corresponding direction.
While resizing, holding Shift will maintain the aspect ratio. Holding Ctrl will resize from
the item center.
The correct position for an item can be obtained using snapping to grid or smart guides. If you need to
disable the snap on the fly just hold Ctrl while moving the mouse.
U kunt meerdere items kiezen met de knop Selecteer/Verplaats item. Houdt eenvoudigweg de knop Shift ingedrukt en klik op alle items die u nodig heeft. U kunt dan deze groep wijzigen van grootte/verplaatsen alsof het één enkel item is.
Once you have found the correct position for an item, you can lock it by clicking with the
right mouse button. Press the same button another time to unlock it. You can also lock/unlock
items using the icons on the toolbar.
Klik eenvoudigweg op een item met de toets Shift ingedrukt om een item te deselecteren,
Binnen het menu vindt u acties om alle items te selecteren, alle selecties op te heffen of om de huidige selectie om te draaien.
Uitlijning
Raising or lowering functionalities for elements are inside the
Raise selected items pull-down menu. Choose an element on the Print Composer
canvas and select the matching functionality to raise or lower the selected
element compared to the other elements (see table_composer_1).
Figure Composer 27:
Er zijn verscheidene functionaliteiten voor uitlijning beschikbaar binnen het menu Geselecteerde items uitlijnen (zie table_composer_1). U selecteert eerst enkele items en klikt dan op het overeenkomende pictogram voor uitlijning om een functionaliteit voor uitlijning te gebruiken. Alle geselecteerde items zullen dan worden uitgelijnd binnen hun algemene kader. Bij het verplaatsen in het kaartvenster van Printvormgeving verschijnen hulplijnen voor uitlijning als randen, middelpunten of hoeken worden uitgelijnd.
Items kopiëren/knippen en plakken
De Printvormgeving bevat acties om de algemene functionaliteiten Kopiëren/Knippen/Plakken voor de items in de lay-out te gebruiken. Zoals gewoonlijk dient u eerst de items te selecteren met behulp van één van de opties die hierboven zijn weergegeven; op dit punt kunnen de acties worden gevonden in het menu . Bij het gebruiken van de actie Plakken zullen de items worden geplakt overeenkomstig de huidige positie van de muis.
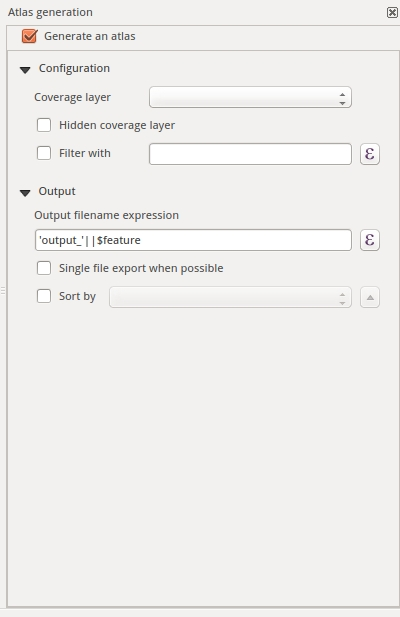
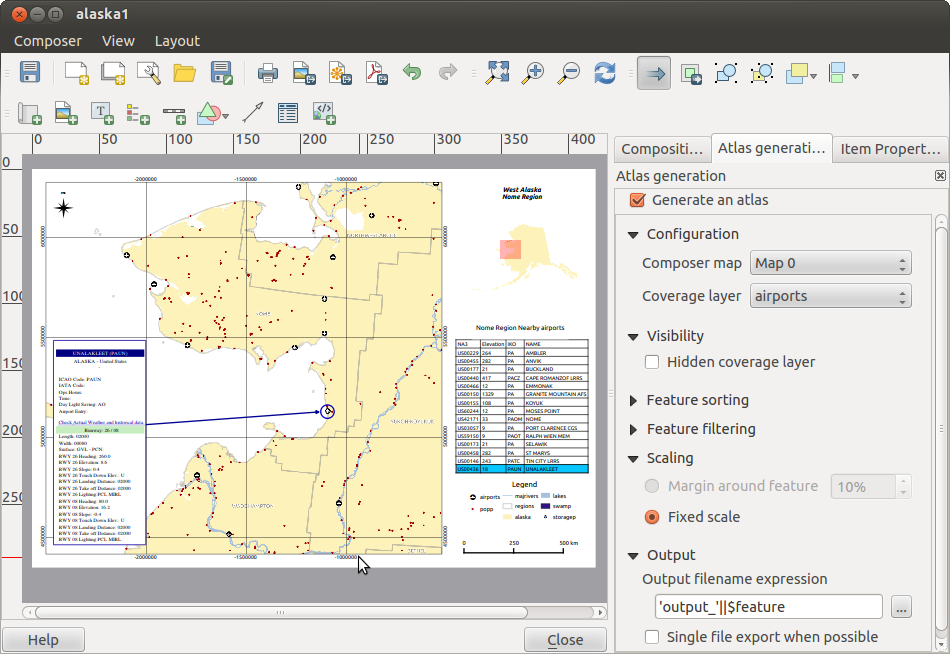
Atlas-generatie
De Printvormgeving bevat functies om te genereren die u in staat stellen boeken op een geautomatiseerde manier te maken. Het concept is om een bedekkingslaag te gebruiken, die geometrieën en velden bevat. Voor elke geometrie in de bedekkingslaag, zal een nieuwe uitvoer worden gegenereerd waarbij de inhoud van enkele kaartvensters zal worden verplaatst om de huidige geometrie te accentueren. Velden die zijn geassocieerd met deze geometrie kunnen worden gebruikt binnen tekstlabels.
Every page will be generated with each feature. To enable the generation
of an atlas and access generation parameters, refer to the Atlas generation
tab. This tab contains the following widgets (see Figure_composer_29):
Figure Composer 29:
Genereer een atlas, die het genereren van een atlas in- of uitschakelt.
Een combinatievak Bedekkingslaag  dat u in staat stelt de (vector)laag te kiezen die de geometrieën bevat om de iteratie op uit te voeren.
Een optioneel Verborgen bedekkingslaag dat, indien geselecteerd, de bedekkingslaag zal verbergen (maar niet de andere) gedurende de generatie.
Een optioneel tekstgebied Filter met dat u in staat stelt een expressie te bouwen voor het filteren van de objecten op de bedekkingslaag. Als de expressie niet leeg is, worden alleen objecten die evalueren naar True worden geselecteerd. De knop rechts laat u de expressie-bouwer weergeven.
Een tekstvak Expressie uitvoer bestandsnaam dat wordt gebruikt om een bestandsnaam te genereren voor elke geometrie, indien nodig. Het is gebaseerd op expressies. Dit veld is alleen van betekenis voor het renderen van meerdere bestanden.
Een Exporteren naar enkel bestand indien mogelijk dat u in staat stelt het genereren van één enkel bestand te forceren als dat mogelijk is met de gekozen indeling voor de uitvoer (PDF bijvoorbeeld). Als dit veld is geselecteerd is de waarde van het veld Expressie uitvoer bestandsnaam zonder betekenis.
Een optioneel Sorteren op dat, indien geselecteerd, u in staat stelt de objecten van de bedekkingslaag te sorteren. Het geassocieerde combinatievak stelt u in staat te kiezen welk veld als sorteersleutel moet worden gebruikt. De volgorde van sorteren (oplopend of aflopend) wordt ingesteld door een knop met twee statussen die een pijl naar boven of naar beneden weergeeft.
U kunt meerdere kaartitems gebruiken bij het genereren van een atlas; elke kaart zal worden gerenderd overeenkomstig de bedekkingsobjecten. U dient Beheerd door atlas onder de Item -eigenschappen van een kaartitem te selecteren om het genereren van een atlas voor een specifiek kaartitem in te schakelen. Eenmaal geselecteerd kunt u instellen:
Een invoervak Marge rond object dat u in staat stelt de hoeveelheid ruimte te selecteren die moet worden toegevoegd aan elke geometrie binnen de toegewezen kaart. De waarde is alleen van betekenis bij het gebruiken van de modus automatisch op schaal brengen.
Een Vaste schaal dat u in staat stelt te schakelen tussen de modi automatisch op schaal brengen en vaste schaal. In de modus vaste schaal zal de kaart alleen worden vertaald voor elke geometrie om te worden gecentreerd. In de modus Automatisch op schaal brengen worden de bereikeen van de kaart dusdanig berekend dat elke geometrie in zijn geheel zal verschijnen.
Labels
In order to adapt labels to the feature the atlas plugin iterates over, use a label with this special notation
[%expression using field_name%].
For example, for a city layer with fields CITY_NAME and ZIPCODE, you could insert this:
“[% ‘The area of ‘ || upper(CITY_NAME) || ‘,’ || ZIPCODE || ‘ is ‘ format_number($area/1000000,2) || ‘ km2’ %]“
That would result in the generated atlas as
“The area of PARIS,75001 is 1.94 km2”.
Voorvertoning
Als de instellingen voor de atlas zijn geconfigureerd en kaartitems zijn geselecteerd, kunt u een voorvertoning maken van alle pagina’s door te klikken op en de pijlen in hetzelfde menu gebruiken om door alle objecten te navigeren.
Genereren
Het genereren van een atlas kan op verschillende manieren worden gedaan. Bijvoorbeeld met kunt u hem direct afdrukken. U kunt ook een PDF maken met behulp van : De gebruiker zal worden gevraagd naar een map om alle gegenereerde PDF-bestanden op te slaan (behalve als Exporteren naar enkel bestand indien mogelijk is geselecteerd). Als u slechts één pagina van de atlas wilt afdrukken, start dan eenvoudigweg de functie Voorvertoning, selecteer de pagina die u nodig heeft en klik op (of maak een PDF).
Uitvoer aanmaken
Figure_composer_30 shows the Print Composer with an example print layout,
including each type of map element described in the sections above.
Figure Composer 30:
De Printvormgeving stelt u in staat verscheidene indelingen voor de uitvoer te maken en het is mogelijk om de resolutie (afdrukkwaliteit) en papiergrootte te definiëren:
Het pictogram Afdrukken stelt u in staat de lay-out af te drukken naar een verbonden printer of naar een bestand van PostScript, afhankelijk van de geïnstalleerd stuurprogramma’s voor de printer.
Het pictogram Opslaan als afbeelding exporteert het kaartvenster van Printvormgeving naar verschillende indelingen voor afbeeldingen, zoals PNG, BPM, TIF, JPG,...
Exporteren als PDF slaat het gedefinieerde kaartvenster van Printvormgeving direct op als PDF.
Het pictogram Exporteren naar SVG slaat het kaartvenster van Printvormgeving op als een SVG (Scalable Vector Graphic).
If you need to export your layout as a georeferenced image (i.e., to load back
inside QGIS), you need to enable this feature under the Composition tab. Check
World file on and choose the map item to use. With this option, the
‘Export as image’ action will create also a world file.
Notitie
Currently, the SVG output is very basic. This is not a QGIS problem, but a
problem with the underlying Qt library. This will hopefully be sorted out in
future versions.
Exporting big rasters can sometimes fail, even if there seems to be enough memory.
This is also a problem with the underlying Qt management of rasters.
Beheren van de Printvormgeving
With the Save as template and
Load from template icons, you can save the current state of a Print Composer
session as a .qpt template and load the template again in another session.
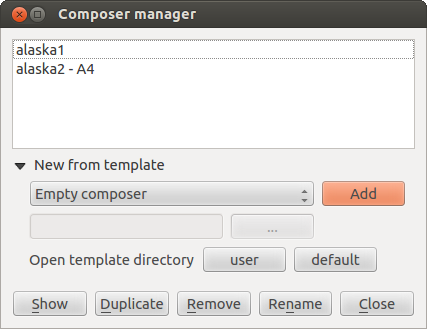
De knop Printvormgeving -manager in de werkbalk van QGIS en in stelt u in staat een nieuw sjabloon voor printvormgeving toe te voegen, een nieuwe lay-out te maken gebaseerd op een eerder opgeslagen sjabloon of reeds bestaande sjablonen te beheren.
Figure Composer 31:
Standaard zoekt de Printvormgeving-manager naar sjablonen van gebruikers in ~/.qgis2/composer_template.
De knoppen Nieuwe Printvormgeving en Dupliceer Printvormgeving in de werkbalk van QGIS en in en stellen u in staat een nieuw dialoogvenster te openen voor Printvormgeving, of om een bestaande lay-out te dupliceren uit een eerder gemaakte.
Tenslotte kunt u uw lay-out voor de afdruk opslaan met de knop Project opslaan. Dit is dezelfde mogelijkheid als in het hoofdvenster van QGIS. Alle wijzigingen zullen worden opgeslagen in een projectbestand van QGIS.