El elemento del mapa
Haga clic en el botón de la barra de herramientas  Añadir nuevo mapa en la barra de herramientas del Diseñador de impresión para agregar una vista del mapa de QGIS. Ahora, arrastre un rectángulo sobre el lienzo del Diseñador con el botón izquierdo del ratón para añadir el mapa. Para mostrar el mapa actual, se puede elegir entre tres modos diferentes en el mapa, la pestaña Propiedades del elemento:
Cache is the default preview mode for newly added Print Composer maps.
You can resize the map item by clicking on the  Select/Move item
button, selecting the element, and dragging one of the blue handles in the
corner of the map. This button also helps to move the map to another place.
Select the item and while holding the left mouse button, move to the new place
and release the mouse button. After you have found the right place for an item,
you can lock the item position within the Print Composer canvas. Select the
map item and use the toolbar
Select/Move item
button, selecting the element, and dragging one of the blue handles in the
corner of the map. This button also helps to move the map to another place.
Select the item and while holding the left mouse button, move to the new place
and release the mouse button. After you have found the right place for an item,
you can lock the item position within the Print Composer canvas. Select the
map item and use the toolbar  Lock Selected Items or the
tab to Lock the item. A locked item can only be selected
using the tab. Once selected you can use the
tab to unlock individual items. The
Lock Selected Items or the
tab to Lock the item. A locked item can only be selected
using the tab. Once selected you can use the
tab to unlock individual items. The  Unlock All Items icon will unlock all locked composer items. With the
map selected, you can now adapt more properties in the map
Item Properties tab.
Unlock All Items icon will unlock all locked composer items. With the
map selected, you can now adapt more properties in the map
Item Properties tab.
To move layers within the map element, select the map element, click the
 Move item content icon and move the layers within
the map item frame with the left mouse button.
Move item content icon and move the layers within
the map item frame with the left mouse button.
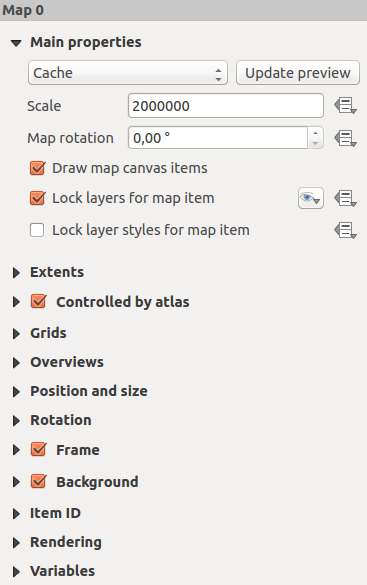
The Main properties dialog of the map Item Properties tab provides the
following functionalities (see figure_composer_map_1):
Figure Composer Map 1:
The Preview area allows you to define the preview modes ‘Rectangle’, ‘Cache’
and ‘Render’, as described above. If you change the view on the QGIS map canvas by changing
vector or raster properties, you can update the Print Composer view by selecting the
map element in the Print Composer and clicking the [Update preview] button.
El campo Escala  establece una escala manual
El campo Rotación le permite rotar el contenido del elemento del mapa hacia las manecillas del reloj en grados. La rotación de la vista del mapa puede ser imitado aquí. Tenga en cuenta que un marco de coordenadas correcta sólo se puede añadir con el valor predeterminado 0 y que una vez que defina una Rotación en ese momento no se puede cambiar.
 Draw map canvas items lets you show annotations that may be placed
on the map canvas in the main QGIS window.
Draw map canvas items lets you show annotations that may be placed
on the map canvas in the main QGIS window.
You can choose to lock the layers shown on a map item. Check
Lock layers for map item.
After this is checked, any layer that would be displayed or hidden in the main QGIS window
will not appear or be hidden in the map item of the Composer. But style and labels of a
locked layer are still refreshed according to the main QGIS interface.
You can prevent this by using Lock layer styles for map item.
The  button allows you to add quickly all the presets views you
have prepared in QGIS.
Clicking on the button you will see the list of all the preset views:
just select the preset you want to display.
The map canvas will automatically lock the preset layers by enabling the
Lock layers for map item: if you want to unselect the preset, just uncheck the
and press the
button allows you to add quickly all the presets views you
have prepared in QGIS.
Clicking on the button you will see the list of all the preset views:
just select the preset you want to display.
The map canvas will automatically lock the preset layers by enabling the
Lock layers for map item: if you want to unselect the preset, just uncheck the
and press the  button. See Panel de Capas to find out how to
create presets views.
button. See Panel de Capas to find out how to
create presets views.
Locked layers in the map can also be data-defined, using
the  icon beside the option. When used, this overrides the
selection set in the drop-down list. You need to pass a list of layers separated
by
icon beside the option. When used, this overrides the
selection set in the drop-down list. You need to pass a list of layers separated
by | character.
The following example locks the map item to use only layers layer 1 and
layer 2:
concat ('layer 1', '|', 'layer 2')
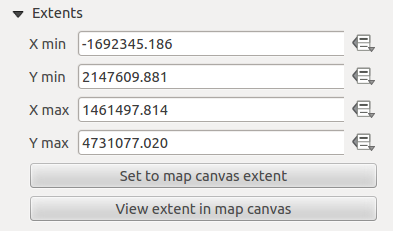
The Extents dialog of the map item tab provides the following
functionalities (see figure_composer_map_2):
Figure Composer Map 2:
- The Map extents area allows you to specify the map extent using X and Y min/max
values and by clicking the [Set to map canvas extent] button. This button sets
the map extent of the composer map item to the extent of the current map view in the
main QGIS application. The button [View extent in map canvas] does exactly the
opposite, it updates the extent of the map view in the QGIS application to the extent
of the composer map item.
Si se cambia la vista en la vista del mapa QGIS al cambiar al cambiar las propiedades vectoriales o ráster. se puede actualizar la vista del Diseñador de impresión seleccionando el elemento mapa en el Diseñador y al hacer clic en el botón **[Actualizar vista preliminar]**en la pestaña del mapa Propiedades del elemento (ver figure_composer_map_1).
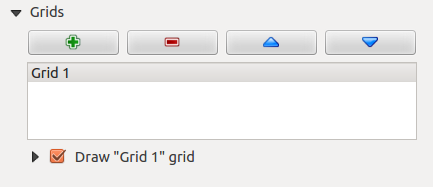
El diálogo Cuadrículas del mapa de la pestaña Propiedades del elemento provee la posibilidaad de añadir varias cuadrículas a un elemento mapa.
Al hacer doble clic sobre la rejilla seleccionada se le puede dar otro nombre.
Figure Composer Map 3:
Después de añadir una rejilla, se puede activar la casilla de verifificación Show grid para superponer una rejilla al elemento de mapa. Expande esta opción para obtener un montón de opciones de configuración, ver Figure_composer_map_4.
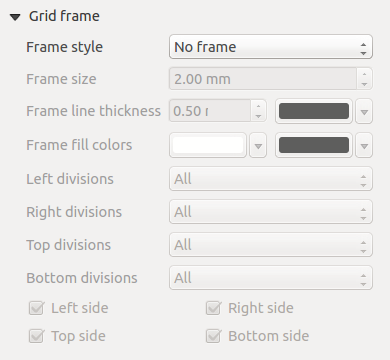
Figure Composer Map 4:
As grid type, you can specify to use a ‘Solid’, ‘Cross’, ‘Markers’ or ‘Frame and annotations only’.
‘Frame and annotations only’ is especially useful when working with rotated maps or reprojected
grids. In the divisions section of the Grid Frame Dialog mentioned below you then have a corresponding setting.
Symbology of the grid and its rendering mode can be chosen. See Modo de representación.
Furthermore, you can define an interval in the X and Y directions, an X and Y offset,
and the width used for the cross or line grid type.
Figure Composer Map 5:
Hay diferentes opciones para estilos del marco que sostiene el mapa. Las siguientes opciones están disponibles: Sin marco, Zebra, ticks interiores, ticks exteriores, Stick interior y exterior, línea de borde.
Con el ajuste ‘Mostrar latitud solo’ y ‘Mostrar longitud solo’ en la sección de divisiones tiene la posibilidad de evitar una mezcla de coordenadas latitud/y y longitud/x mostrados a un lado cuando trabaja con mapas rotados o cuadrículas reproyectadas.
- Advanced rendering mode is also available for grids.
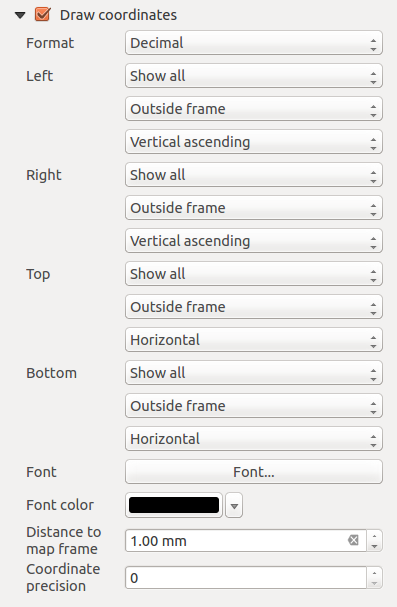
La casilla de verificación Dibujar coordenadas le permite añadir coordenadas al marco del mapa. Se puede elegir el formato numérico de anotación, el rango de opciones de decimal a grados, minutos y segundos, con o sin subfijo y alineados o no. Se puede elegir que anotación mostrar. Las opciones son: Mostrar todo, Mostrar latitud solo, Mostrar longitud solo o Deshabilitado. Esto es útil cuando el mapa esta rotado. La anotación se puede dibujar dentro o fuera del marco del mapa. La dirección de la anotación se puede definir como horizontal y vertical, ascendente vertical o descendente vertical. Finalmente, se puede definir el tipo de letra de la anotación, el color de la letra, la distancia del marco del mapa y la precisión de las coordenadas trazadas.
Figure Composer map 6:
El diálogo Vistas generales de la pestaña de Propiedades del elemento del mapa proporciona las siguientes funcionalidades:
Figure Composer Map 7:
You can choose to create an overview map, which shows the extents of the other map(s)
that are available in the composer. First you need to create the map(s) you want to
include in the overview map and the map you want to use as the overview
map, just like a normal map.
Then expand Overviews option and press the green plus icon-button to add an overview.
Initially this overview is named ‘Overview 1’ (see Figure_composer_map_7).
You can change the name when you double-click on the overview item in the list
named ‘Overview 1’ and change it to another name.
When you select the overview item in the list you can customize it.
- The Draw “<name_overview>” overview needs to be activated to
draw the extent of selected map frame.
- The Map frame combo list can be used to select the map item whose extents
will be drawn on the present map item.
- The Frame Style allows you to change the style of the overview frame.
- The Blending mode allows you to set different transparency blend modes.
La Invertir vista general crea una máscara al rededor de las extensiones cuando activa: las extensiones del mapa referenciado se muestran claramente, mientras que todo lo demás es mezclado con el color del marco.
El Centrar en vista general pone la extensión del marco de la vista general al centro de la vista general del mapa. Sólo se puede activar un elemento de vista general para centrar, cuando ha añadido varias vistas generales.