El elemento imagen
Para añadir una imagen, haga clic en el icono  Añadir imagen, ubique el elemento con el botón izquierdo del ratón en la vista del Diseñador y posicione y personalice su apariencia en la imagen en la pestaña Propiedades del elemento .
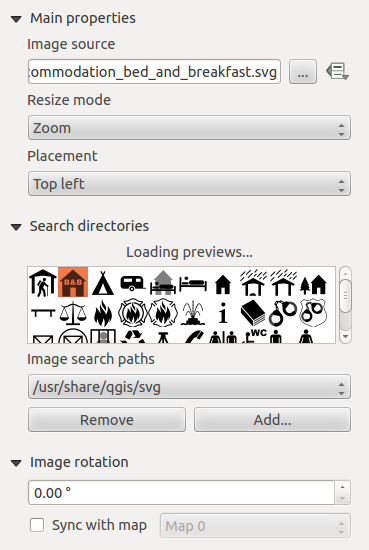
The image Item Properties tab provides the following functionalities (see figure_composer_image_1):
Figure Composer image 1:

Image Item properties Tab
You first have to select the image you want to display. There are several ways to set the image source in the Main properties area.
- Use the browse button
 of image source to select a file on your
computer using the browse dialog. The browser will start in the SVG-libraries provided with QGIS.
Besides
 SVG, you can also select other image formats like.pngor.jpg. - You can enter the source directly in the image source text field. You can even provide a remote URL-address to an image.
- From the Search directories area you can also select an image from loading previews ... to set the image source.
- Use the data defined button
 to set the image source from a record or using a
regular expression.
With the Resize mode option, you can set how the image is displayed when the frame is changed, or choose to resize the frame of the image item so it matches the original size of the image.
You can select one of the following modes:
Zum: Amplia la imagen al marco mientras se mantiene la relación del aspecto de la imagen.
Estirar: Estira la imagen para que quepa dentro del marco, ignorar la relación del aspecto.
Cortar: Utilice este modo sólo para imágenes ráster, se establece el tamaño de la imagen al tamaño de la imagen original sin escalar y el marco suele cortar la imagen, así sólo la parte de la imagen dentro del marco es visible.
El zum y el marco de redimensionado: Amplia la imagen para que se adapte al marco, entonces cambia el tamaño del marco para adaptarse a la imagen resultante.
- Resize frame to image size: Sets size of frame to match original size of image without scaling.
Modo de redimensionar seleccionado puede inhabilitar el elemento opciones ‘Ubicación’ y ‘Rotación de imagen’. La Rotación de imagen está activo para el modo de cambio de tamaño ‘Zum’ y ‘Cortar’.
With Placement you can select the position of the image inside it’s frame. The Search directories area allows you to add and remove directories with images in SVG format to the picture database. A preview of the pictures found in the selected directories is shown in a pane and can be used to select and set the image source.
It is possible to change SVG fill/outline color and outline width when using parameterized SVG files such as those included with QGIS. If you add a SVG file you should add the following tags in order to add support for transparency:
- fill-opacity=”param(fill-opacity)”
- stroke-opacity=”param(outline-opacity)”
You can read this blog post to see an example.
Images can be rotated with the Image rotation field.
Activating the  Sync with map checkbox synchronizes the
rotation of the image (i.e., a rotated north arrow) with the rotation applied to
the selected map item.
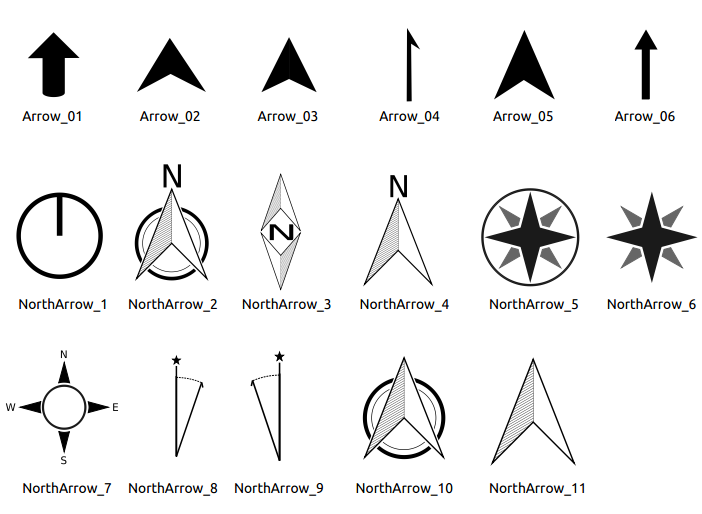
También es posible seleccionar una flecha de norte directamente. Si primero se selecciona una imagen flecha de norte desde Directorios de búsqueda y entonces utiliza el botón de explorar  del campo Origen de la imagen, ahora se puede seleccionar una de las flechas de norte desde la lista mostrada en figure_composer_image_2.
Nota
Muchas de las flechas del norte no tienen una ‘N’ añadida, esto se hace a propósito para los idiomas que no utilizan una ‘N’ para Norte, para que pueda utilizar otra letra.
Figure Composer Image 2:

Las flechas de norte disponibles para la selección en la biblioteca SVG proporcionada.