.
Trabajar con Proyecciones
QGIS allows users to define a global and project-wide CRS (coordinate reference system) for layers without a pre-defined CRS. It also allows the user to define custom coordinate reference systems and supports on-the-fly (OTF) projection of vector and raster layers. All of these features allow the user to display layers with different CRSs and have them overlay properly.
Vista general de la ayuda de proyección
QGIS has support for approximately 2,700 known CRSs. Definitions for each CRS are stored in a SQLite database that is installed with QGIS. Normally, you do not need to manipulate the database directly. In fact, doing so may cause projection support to fail. Custom CRSs are stored in a user database. See section Sistema de referencia de coordenadas personalizada for information on managing your custom coordinate reference systems.
The CRSs available in QGIS are based on those defined by the European Petroleum Search Group (EPSG) and the Institut Geographique National de France (IGNF) and are largely abstracted from the spatial reference tables used in GDAL. EPSG identifiers are present in the database and can be used to specify a CRS in QGIS.
In order to use OTF projection, either your data must contain information about its
coordinate reference system or you will need to define a global, layer or
project-wide CRS. For PostGIS layers, QGIS uses the spatial reference identifier
that was specified when the layer was created. For data supported by OGR, QGIS
relies on the presence of a recognized means of specifying the CRS. In the case
of shapefiles, this means a file containing the well-known text (WKT)
specification of the CRS. This projection file has the same base name as the
shapefile and a .prj extension. For example, a shapefile named
alaska.shp would have a corresponding projection file named
alaska.prj.
Whenever you select a new CRS, the layer units will automatically be
changed in the General tab of the  Project Properties dialog under the Project (Gnome,
OS X) or Settings (KDE, Windows) menu.
Project Properties dialog under the Project (Gnome,
OS X) or Settings (KDE, Windows) menu.
Especificar proyección global
QGIS starts each new project using the global default projection. The global
default CRS is EPSG:4326 - WGS 84 (proj=longlat +ellps=WGS84 +datum=WGS84 +no_defs),
and it comes predefined in QGIS. This default can be changed via the
[Select...] button in the first section, which is used to define the default
coordinate reference system for new projects, as shown in
figure_projection_1. This choice will be saved for use in subsequent QGIS
sessions.
Figure Projection 1:
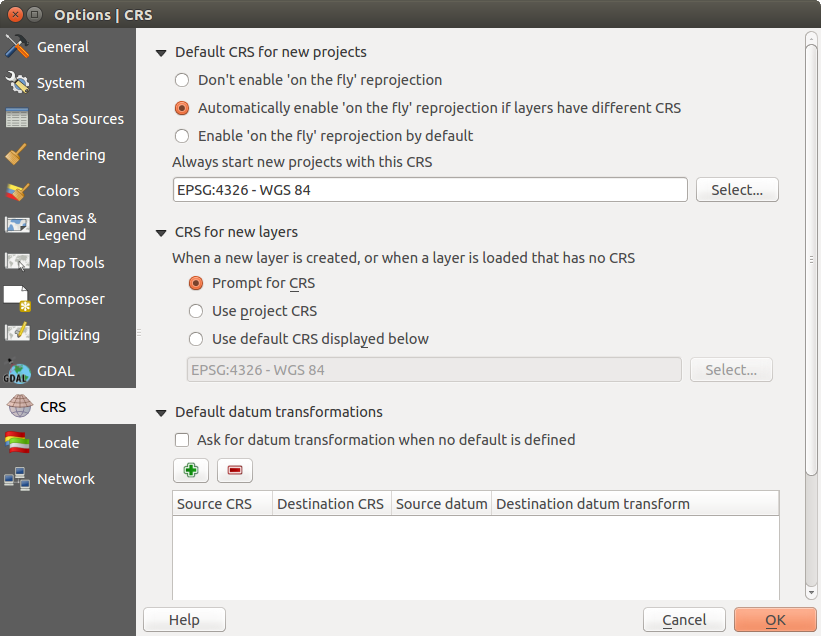
CRS tab in the QGIS Options Dialog 
When you use layers that do not have a CRS, you need to define how QGIS
responds to these layers. This can be done globally or project-wide in the
CRS tab under Settings ‣
Options.
Las opciones mostradas en figure_projection_1 son:
 Prompt for CRS
 Use project CRS
- Use default CRS displayed below
If you want to define the coordinate reference system for a certain layer without CRS information, you can also do that in the General tab of the raster and vector properties dialog (see General Menu for rasters and General Menu for vectors). If your layer already has a CRS defined, it will be displayed as shown in Vector Layer Properties Dialog .
Truco
SRC en la leyenda de mapa
Haga clic derecho sobre una capa en la leyenda del mapa (sección Map Legend) proporciona dos atajos. Establecer SRC de la capa te lleva directamente al diálogo del selección de Sistema de Referencia de Coordenadas (vea figure_projection_2). Establecer SRC del proyecto a partir de la capa redefine el SRC del proyecto mediante el SRC de la capa.
Definir reproyección al vuelo (OTF)
QGIS supports OTF reprojection for both raster and vector data. However, OTF is
not activated by default. To use OTF projection, you must activate the
 Enable on the fly CRS transformation checkbox in the
CRS tab of the
Enable on the fly CRS transformation checkbox in the
CRS tab of the  Project
Properties dialog.
Project
Properties dialog.
Hay tres maneras de hacer esto:
- Select Project Properties from the
Project (Gnome, OSX) or Settings (KDE,
Windows) menu.
Hacer clic en el icono
 SRC actual en la esquina inferior-derecha de la barra de estado.
Encender OTF por omisión en la pestaña :guilabel:’CRS’ del diálogo :guilabel:’Options’ seleccionando
Permitir la reproyección ‘on the fly’ por omisión o Permitir automáticamente ´on the fly´ si las capas tienen diferente CRS.
Si ya se ha cargado una capa y desea habilitar la proyección OTF, lo mejor es abrir la pestaña CRS del diálogo Propiedades del Proyecto, elegir un CRS, y activar el casillero Permitir la transformación ‘on the fly’ CRS. El ícono |geográfico| estado CRS no debe ser puesto en gris, y todas las capas serán proyectadas en OTF al CRS exhibido cerca del ícono.
Figure Projection 2:
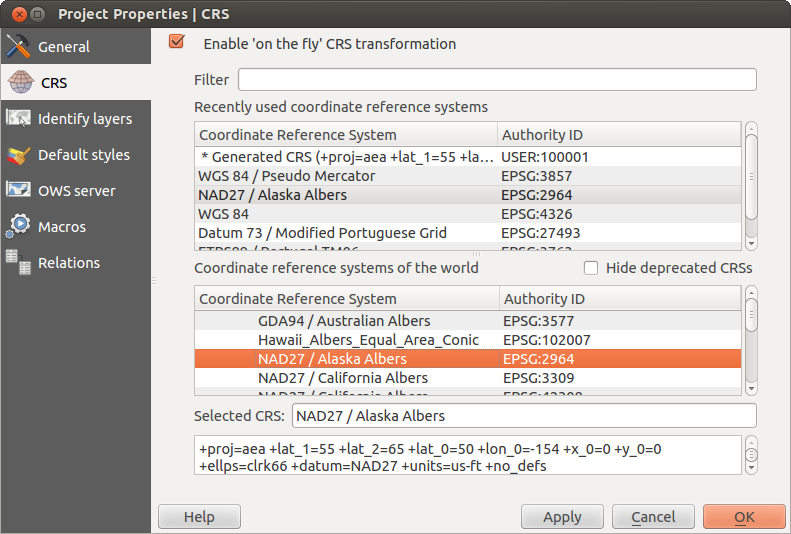
Project Properties Dialog
La pestaña CRS en el diálogo Propiedades del Proyecto contiene cinco componentes importantes, como se muestra en Figura_proyección_2_y descrita abajo:
Habilitar la transformación ‘on the fly’ CRS — Este casillero se usa para habilitar o deshabilitar la proyección OTF. Al estar apagado, cada capa es dibujada usando las coordenadas como se leen de la fuente de datos, y los componentes descritos abajo están inactivos. Al encender, las coordenadas en cada capa se proyectan al sistema de referencia de coordenadas definido por el mapa.
Filtro — Si conoce el código EPSG, el identificador, del nombre para un sistema de referencia por coordenadas, puede usar la facción de búsqueda para encontrarlo. Ingresar el código EPSG, el identificador o el nombre.
Sistemas de referencia por coordenadas usadas recientemente — Si tiene ciertos CRSs que ha usado frecuentemente en su trabajo GIS diario, estos se desplegarán en esta lista. Clic en una de estas opciones para seleccionar el CRS asociado.
- Coordinate reference systems of the world — This is a list of all CRSs supported by QGIS, including Geographic, Projected and Custom coordinate reference systems. To define a CRS, select it from the list by expanding the appropriate node and selecting the CRS. The active CRS is preselected.
** Texto PROJ.4** — Esta es la cadena CRS usada por la máquina de proyección PROJ.4. Este texto es solo de lectura y provisto para propósitos de información.
Truco
Diálogo de Propiedades del proyecto
Si se abre el diálogo propiedades del Proyecto del menú Proyecto, debe dar clic en la pestaña CRS para ver los ajustes CRS.
Abriendo el diálogo del ícono |geográfico| estado CRS traerá automáticamente al frente la pestaña CRS.
Sistema de referencia de coordenadas personalizada
If QGIS does not provide the coordinate reference system you need, you can
define a custom CRS. To define a CRS, select  Custom CRS... from the Settings menu. Custom CRSs
are stored in your QGIS user database. In addition to your custom CRSs, this
database also contains your spatial bookmarks and other custom data.
Custom CRS... from the Settings menu. Custom CRSs
are stored in your QGIS user database. In addition to your custom CRSs, this
database also contains your spatial bookmarks and other custom data.
Figure Projection 3:
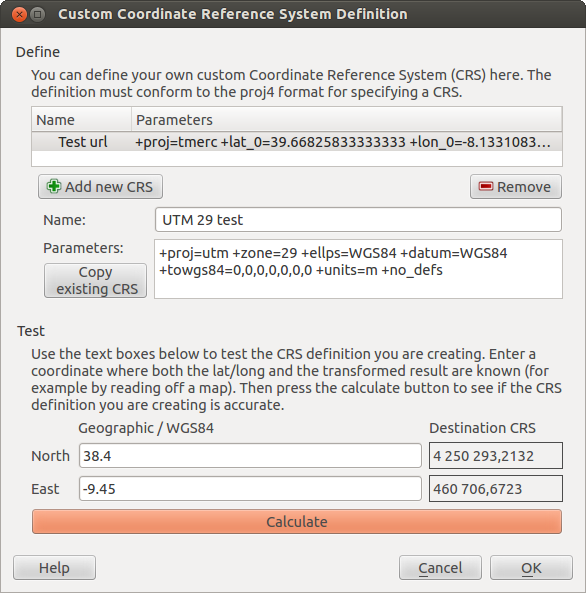
Custom CRS Dialog
Defining a custom CRS in QGIS requires a good understanding of the PROJ.4 projection library. To begin, refer to “Cartographic Projection Procedures for the UNIX Environment - A User’s Manual” by Gerald I. Evenden, U.S. Geological Survey Open-File Report 90-284, 1990 (available at ftp://ftp.remotesensing.org/proj/OF90-284.pdf).
This manual describes the use of the proj.4 and related command line
utilities. The cartographic parameters used with proj.4 are described in
the user manual and are the same as those used by QGIS.
El diálogo Definición del Sistema de Referencia de Coordenadas personalizada sólo necesita dos parámetros para definir un usuario de SRC:
Un nombre descriptivo
Los parámetros cartográficos en el formato PROJ.4
To create a new CRS, click the  Add new CRS button and enter a
descriptive name and the CRS parameters.
Add new CRS button and enter a
descriptive name and the CRS parameters.
Note que :guilaber:`Parámetros` debe empezar con un bloque “+proj=”, para repersentar el nuevo sistema de referencia por coordenadas.
Usted puede evaluar sus parámetros CRS para ver si dan resultados sensatos. Para hacer esto, ingresar valores de longitud y latitud conocidos WGS 84 en campos Norte :guilable:`Este`, respectivamente. Clic en [Calcular], y comparar los resultados con valores conocidos en su sistema de referencia por coordenadas.
Transformaciones de datos perdeterminadas
OTF depends on being able to transform data into a ‘default CRS’, and QGIS uses WGS84. For some CRS there are a number of transforms available. QGIS allows you to define the transformation used otherwise QGIS uses a default transformation.
In the CRS tab under Settings ‣
Options you can:
- set QGIS to ask you when it needs define a transformation using Ask for datum transformation when no default is defined
editar una lista de predeterminaciones de usuarios para transformaciones.
QGIS asks which transformation to use by opening a dialogue box
displaying PROJ.4 text describing the source and destination
transforms. Further information may be found by hovering over a
transform. User defaults can be saved by selecting
Remember selection.