.
Arbeiten mit Projektionen
QGIS allows users to define a global and project-wide CRS (coordinate reference system) for layers without a pre-defined CRS. It also allows the user to define custom coordinate reference systems and supports on-the-fly (OTF) projection of vector and raster layers. All of these features allow the user to display layers with different CRSs and have them overlay properly.
Überblick zur Projektionsunterstützung
QGIS has support for approximately 2,700 known CRSs. Definitions for each CRS are stored in a SQLite database that is installed with QGIS. Normally, you do not need to manipulate the database directly. In fact, doing so may cause projection support to fail. Custom CRSs are stored in a user database. See section Eigenes Koordinatenbezugssystem definieren for information on managing your custom coordinate reference systems.
The CRSs available in QGIS are based on those defined by the European Petroleum Search Group (EPSG) and the Institut Geographique National de France (IGNF) and are largely abstracted from the spatial reference tables used in GDAL. EPSG identifiers are present in the database and can be used to specify a CRS in QGIS.
In order to use OTF projection, either your data must contain information about its
coordinate reference system or you will need to define a global, layer or
project-wide CRS. For PostGIS layers, QGIS uses the spatial reference identifier
that was specified when the layer was created. For data supported by OGR, QGIS
relies on the presence of a recognized means of specifying the CRS. In the case
of shapefiles, this means a file containing the well-known text (WKT)
specification of the CRS. This projection file has the same base name as the
shapefile and a .prj extension. For example, a shapefile named
alaska.shp would have a corresponding projection file named
alaska.prj.
Whenever you select a new CRS, the layer units will automatically be
changed in the General tab of the  Project Properties dialog under the Project (Gnome,
OS X) or Settings (KDE, Windows) menu.
Project Properties dialog under the Project (Gnome,
OS X) or Settings (KDE, Windows) menu.
Bestimmung einer globalen Projektion
QGIS starts each new project using the global default projection. The global
default CRS is EPSG:4326 - WGS 84 (proj=longlat +ellps=WGS84 +datum=WGS84 +no_defs),
and it comes predefined in QGIS. This default can be changed via the
[Select...] button in the first section, which is used to define the default
coordinate reference system for new projects, as shown in
figure_projection_1. This choice will be saved for use in subsequent QGIS
sessions.
Figure Projection 1:
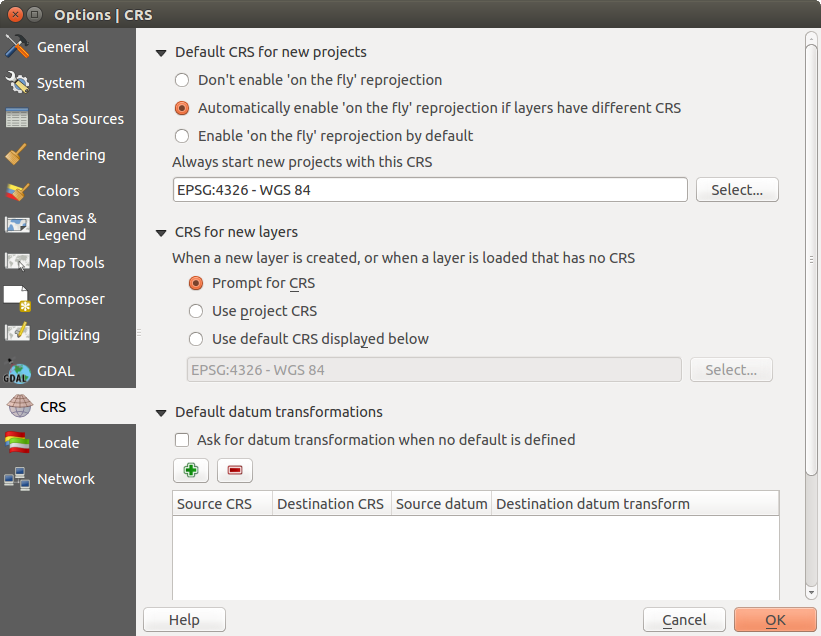
CRS tab in the QGIS Options Dialog 
When you use layers that do not have a CRS, you need to define how QGIS
responds to these layers. This can be done globally or project-wide in the
CRS tab under Settings ‣
Options.
Die Optionen aus figure_projection_1 sind:
 Prompt for CRS
 Use project CRS
- Use default CRS displayed below
If you want to define the coordinate reference system for a certain layer without CRS information, you can also do that in the General tab of the raster and vector properties dialog (see Menü Allgemein for rasters and Menü Allgemein for vectors). If your layer already has a CRS defined, it will be displayed as shown in Vector Layer Properties Dialog .
Tipp
KBS im Kontextmenü des Layers
Wenn Sie mit der rechten Maustaste auf den Layernamen im Legendenbereich klicken, öffnet sich das Kontextmenü des Layers (Kapitel Map Legend). Dort befinden sich zwei Möglichkeiten zur Einstellung des KBS KBS für Layer setzen öffnet den KBS Dialog (siehe Abbildung figure_projection_2). Layer-KBS dem Projekt zuweisen überschreibt das aktuelle Projekt-KBS mit dem KBS des Layers.
On-The-Fly (OTF) Projektion
QGIS supports OTF reprojection for both raster and vector data. However, OTF is
not activated by default. To use OTF projection, you must activate the
 Enable on the fly CRS transformation checkbox in the
CRS tab of the
Enable on the fly CRS transformation checkbox in the
CRS tab of the  Project
Properties dialog.
Project
Properties dialog.
Es gibt drei Möglichkeiten, um dies zu erreichen:
- Select Project Properties from the
Project (Gnome, OSX) or Settings (KDE,
Windows) menu.
Klicken Sie auf das
 KBS Status Icon in der rechten unteren Ecke der Statusleiste.
Aktivieren Sie OTF als Standardeinstellung, indem Sie das Menü KBS im Optionen Dialog öffnen und
‘On-The-Fly’-Reprojektion voreinstellen aktivieren wenn die Layer verschiedene KBS haben.
Wenn Sie bereits einen Layer geladen haben und nun die Unterstützung für Spontan-KBS-Projektion aktivieren wollen ist der beste Weg folgender:
Öffnen Sie das Menü KBS im Menü Projekteinstellungen ..., wählen Sie das passende KBS für den Layer aus und aktivieren Sie dann das Kontrollkästchen ‘On-The-Fly’-KBS-Transformation aktivieren. Das Icon KBS-Status ist nun nicht länger ausgegraut, und alle daraufhin geladenen Layer werden On-The-Fly auf das
ausgewählte KBS projiziert.
Figure Projection 2:

Project Properties Dialog
Das Menü KBS des Projekteigenschaften-Dialogs enthält 5 wichtige Optionen (siehe Figure_projection_2). Diese werden im Folgenden beschrieben.
Spontan-KBS-Transformation aktivieren – Dieses Kontrollkästchen wird dazu verwendet Spontan-KBS-Transformation ein- oder auszuschalten. Ist diese ausgeschaltet wird jeder Layer anhand der Koordinaten aus der Datenquelle gezeichnet und die unten beschriebenen Komponenten sind nicht aktiv. Ist diese eingeschaltet werden die Koordinaten in jedem Layer zu dem KBS, das für das Kartenfenster definiert wurde, projeziert.
Filter - wenn Sie den EPSG Code, die ID oder den Namen für ein Koordinatenbezugssystem kennen können Sie diese benutzen, um ihr Koordinatenbezugssystem zu finden. Geben Sie einfach einen EPSG Code, eine ID oder einen Namen ein.
Kürzlich benutzte Koordinatenbezugssysteme -Wenn Sie bestimmte Koordinatenbezugssysteme regelmäßig für ihre tägliche GIS Arbeit verwenden, werden diese für den ‘schnellen’ Zugriff unterhalb des Fensters mit den vorhandenen KBS angezeigt. Klicken Sie auf einen der Knöpfe, um das enstprechende KBS direkt auszuwählen.
- Coordinate reference systems of the world — This is a list of all CRSs supported by QGIS, including Geographic, Projected and Custom coordinate reference systems. To define a CRS, select it from the list by expanding the appropriate node and selecting the CRS. The active CRS is preselected.
Proj4Text - dies ist ein Ausdruck der von der PROJ4-Bibliothek genutzt wird. Er dient nur zu Information und kann nicht verändert werden.
Tipp
Dialog Projekteigenschaften
Wenn Sie den Projekteigenschaften Dialog von dem Projekt Menü öffnen müssen Sie auf das CRS Menü klicken um die KBS Einstellungen anzuzeigen.
Wenn man den Dialog anhand des KBS-Status Icons öffnet wird automatisch das KBS Menü in den Vordergrund gebracht.
Eigenes Koordinatenbezugssystem definieren
If QGIS does not provide the coordinate reference system you need, you can
define a custom CRS. To define a CRS, select  Custom CRS... from the Settings menu. Custom CRSs
are stored in your QGIS user database. In addition to your custom CRSs, this
database also contains your spatial bookmarks and other custom data.
Custom CRS... from the Settings menu. Custom CRSs
are stored in your QGIS user database. In addition to your custom CRSs, this
database also contains your spatial bookmarks and other custom data.
Figure Projection 3:
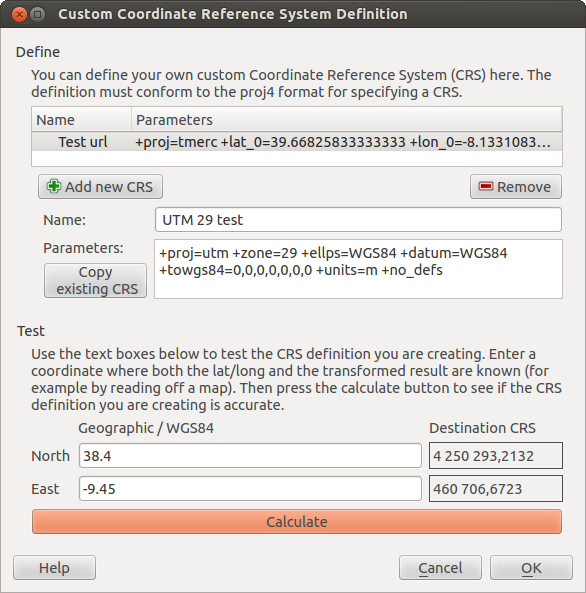
Custom CRS Dialog
Defining a custom CRS in QGIS requires a good understanding of the PROJ.4 projection library. To begin, refer to “Cartographic Projection Procedures for the UNIX Environment - A User’s Manual” by Gerald I. Evenden, U.S. Geological Survey Open-File Report 90-284, 1990 (available at ftp://ftp.remotesensing.org/proj/OF90-284.pdf).
This manual describes the use of the proj.4 and related command line
utilities. The cartographic parameters used with proj.4 are described in
the user manual and are the same as those used by QGIS.
Der Dialog Definition eines Benutzerkoordinatensystems braucht nur zwei Einträge, um eine eigene Projektion zu definieren:
Ein beschreibender Name
Die kartografischen Parameter im PROJ.4-Format
To create a new CRS, click the  Add new CRS button and enter a
descriptive name and the CRS parameters.
Add new CRS button and enter a
descriptive name and the CRS parameters.
Denken Sie daran, dass die kartographischen Parameter mit einem +proj=-Block beginnen müssen, um den Beginn eines neuen KBS anzuzeigen.
Sie können das neue KBS testen, um zu sehen, ob bei einer Konvertierung von bekannten WGS84 Lat-Lon Koordinaten in ihre Projektion ein sinnvolles Ergebnis herauskommt. Dazu kopieren Sie ihre kartographischen Parameter in das Fenster Parameter, geben ein paar bekannte WGS84 Lat-Lon Koordinaten an und klicken dann auf den Knopf [Berechnen]. Vergleichen Sie die Ergebnisse mit den Werten im Kartenfenster.
Standard Datumtransformationen
OTF depends on being able to transform data into a ‘default CRS’, and QGIS uses WGS84. For some CRS there are a number of transforms available. QGIS allows you to define the transformation used otherwise QGIS uses a default transformation.
In the CRS tab under Settings ‣
Options you can:
- set QGIS to ask you when it needs define a transformation using Ask for datum transformation when no default is defined
eine Liste von Benutzereinstellungen für Transformationen bearbeiten
QGIS asks which transformation to use by opening a dialogue box
displaying PROJ.4 text describing the source and destination
transforms. Further information may be found by hovering over a
transform. User defaults can be saved by selecting
Remember selection.