The Picture Item
The Picture item is a tool that helps decorate your map with
pictures, logos… It’s also the one that provides the in-built north arrows.
You can add a picture with the  Add Picture following
items creation instructions and manipulate it the
same way as exposed in Interacting with layout items.
Add Picture following
items creation instructions and manipulate it the
same way as exposed in Interacting with layout items.
By default, the picture item is a blank frame that you can customize using its Item Properties panel. Other than the items common properties, this feature has the following functionalities (see figure_layout_image):
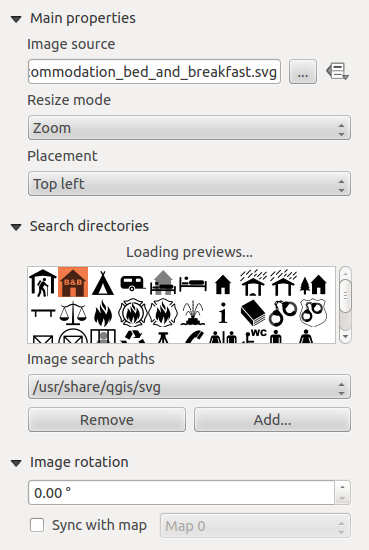
Picture Item Properties panel
You first have to select the image you want to display. There are several ways to set the Image source:
In the Main properties group, use the … Browse button of image source to select a file on your computer. The browser will start in the SVG-libraries provided with QGIS. Besides
SVG, you can also select other image formats like.pngor.jpg.You can enter the source directly in the Image source text field. You can even provide a remote URL-address to a picture.
From the Search directories area you can also select an image from the loaded previews to set the image source. These images are by default provided by folders set in .
Use the
 data defined override button to set the image
source from a feature attribute or using a regular expression.
data defined override button to set the image
source from a feature attribute or using a regular expression.
참고
In the Search directories group, you can use the Add and Remove buttons in the group to customize the list of folders to fetch and preview images from.
With the Resize mode option, you can set how the image is displayed when the frame is resized:
Zoom: enlarges/reduces the image to the frame while maintaining aspect ratio of picture;Stretch: stretches image to fit inside the frame, ignores aspect ratio;Clip: use this mode for raster images only, it sets the size of the image to original image size without scaling and the frame is used to clip the image, so only the part of the image inside the frame is visible;Zoom and resize frame: enlarges image to fit frame, then resizes frame to fit resultant image;Resize frame to image size: sets size of frame to match original size of image without scaling.
Depending on the selected Resize mode, the Placement and Image rotation options are disabled or not. With Placement you can select the position of the image inside its frame.
QGIS default provided .SVG files are customizable, meaning that you can
easily apply different Fill color, Stroke color
(including opacity) and Stroke width than the original, using their
corresponding feature in the SVG Parameters group. These properties
can as well be data-defined.
If you add a .SVG file that does not enable these properties, you may
need to add the following tags to the file in order to add support e.g. for
transparency:
fill-opacity="param(fill-opacity)"stroke-opacity="param(outline-opacity)"
You can read this blog post to see an example.
Images can be rotated with the Image rotation field.
Activating the  Sync with map checkbox synchronizes the
rotation of the image with the rotation applied to a selected map item; this
is a convenient feature for north arrows that you can align with either:
Sync with map checkbox synchronizes the
rotation of the image with the rotation applied to a selected map item; this
is a convenient feature for north arrows that you can align with either:
the Grid north: direction of a grid line which is parallel to the central meridian on the national/local grid;
or the True north: direction of a meridian of longitude which converges on the North Pole.
You can also apply a declination Offset to the picture rotation.
참고
방위표 대부분은 진북 방향에 N 표시가 없습니다. N 을 북쪽이라는 의미로 사용하지 않는 언어들이 많기 때문입니다. 이런 언어 사용자의 경우 북쪽을 의미하는 다른 문자를 추가할 수 있습니다.
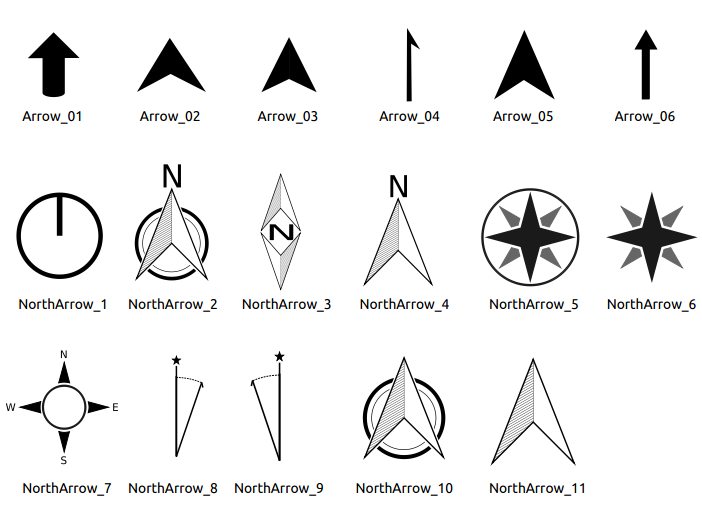
선택/사용할 수 있는 방위표들 (SVG 라이브러리 제공)