.
ジオレファレンサプラグイン
ジオリファレンサプラグインはラスタ用ワールドファイルを作成するためのツールです. これを使うと新しいGeoTiffファイルの作成またはワールドファイルを既存のイメージに追加することによってジオグラフィックまたは投影された座標システムをラスタが参照するようにすることができます. ラスタがジオリファレンスするための基本的な方法は座標を正確に特定できる点群をラスタ中に指定することです.
機能
アイコン |
目的 |
アイコン |
目的 |
|---|---|---|---|
 |
ラスタのオープン |
 |
ジオリファレンシングの開始 |
 |
GDALスクリプトの生成 |
 |
GCPポイントのロード |
 |
GCPポイントを名前をつけて保存 |
 |
変換の設定 |
 |
点の追加 |
 |
点の削除 |
 |
GCPポイントの移動 |
 |
パン |
 |
拡大 |
 |
ズームアウト |
 |
レイヤの領域にズーム |
 |
直前の領域にズーム |
 |
次の領域にズーム |
 |
Link Georeferencer to QGIS |
 |
Link QGIS to Georeferencer |  |
全体的なヒストグラムストレッチ |
 |
局所的なヒストグラムストレッチ |
ジオファレンサ表 1: ジオリファレンサツールズ
通常の手順
イメージ中の選択された点に依存するX と Y 座標 (DMS (dd mm ss.ss), DD (dd.dd) または投影された座標 (mmmm.mm) は2種類の異なる手法で指定することができます.
時々ラスタそのものがイメージ上に座標を”書いて”提供されることがあります. そのような場合座標を手作業で入力することができます.
- Using already georeferenced layers. This can be either vector or raster data that contain the same objects/features that you have on the image that you want to georeference and with the projection that you want for your image. In this case, you can enter the coordinates by clicking on the reference dataset loaded in the QGIS map canvas.
通常のイメージジオレファレンス手順ではラスタ上の複数の点の選択とそれらの座標指定が必要ですそして利用する変換タイプの選択が必要です.入力パラメータとデータに従ってプラグインはワールドファイルパラメータを計算します.さらに多くの座標を指定すると結果はより良いものになるでしょう.
The first step is to start QGIS, load the Georeferencer Plugin (see プラグインダイアログ) and click on Raster ‣ Georeferencer , which appears in the QGIS menu bar. The Georeferencer Plugin dialog appears as shown in figure_georeferencer_1.
例としてSDGSにあるSouth Dakotaの位置シートを使います.これは後でGRASSのspearfish60ロケーションで見ることができます.この位置シートは以下の場所からダウンロードできます: http://grass.osgeo.org/sampledata/spearfish_toposheet.tar.gz.
Figure Georeferencer 1:
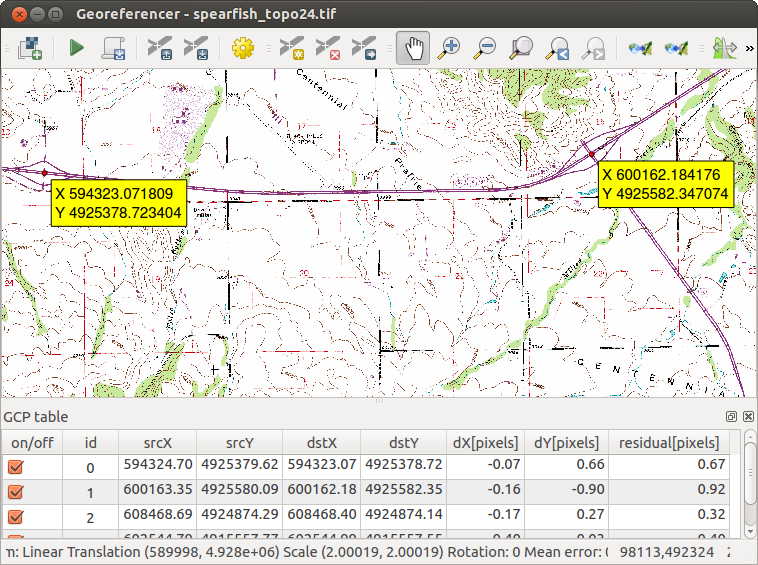
ジオリファレンサプラグインダイアログ 
グラウンドコントロールポイント(GCPs)の入力
- To start georeferencing an unreferenced raster, we must load it using the
button. The raster will show up in the main working
area of the dialog. Once the raster is loaded, we can start to enter reference
points.
- Using the Add Point button, add points to the
main working area and enter their coordinates (see Figure figure_georeferencer_2).
For this procedure you have three options:
ラスタイメージ内の点をクリックしてXとY座標を手動で入力して下さい.
- Click on a point in the raster image and choose the
 From map canvas button to add the X and Y coordinates with the help of a
georeferenced map already loaded in the QGIS map canvas.
From map canvas button to add the X and Y coordinates with the help of a
georeferenced map already loaded in the QGIS map canvas. - With the button, you can move the GCPs in both windows,
if they are at the wrong place.
ポイント入力を続けられます.最低4個のポイントの指定が必要です.さらに多くの座標を入力でき,そのほうがいい結果になるでしょう.プラグインダイアログにはGCPポイントを適切な場所に置くためのワーキングエリアのズームとパンのツールがあります.
Figure Georeferencer 2:

ラスタイメージへのポイントの追加
The points that are added to the map will be stored in a separate text file
([filename].points) usually together with the raster image. This allows
us to reopen the Georeferencer plugin at a later date and add new points or delete
existing ones to optimize the result. The points file contains values of the
form: mapX, mapY, pixelX, pixelY. You can use the
Load GCP points and Save GCP points as buttons to
manage the files.
利用可能な変換アルゴリズム
グランドコントロールポイントを何個設定したかによって異なる変換アルゴリズムを使ったほうがいいです.入力データの型と品質,変換結果に現れる地理的な歪みの量を勘案して変換アルゴリズムを選択して下さい.
現在以下の 変換タイプ が利用できます:
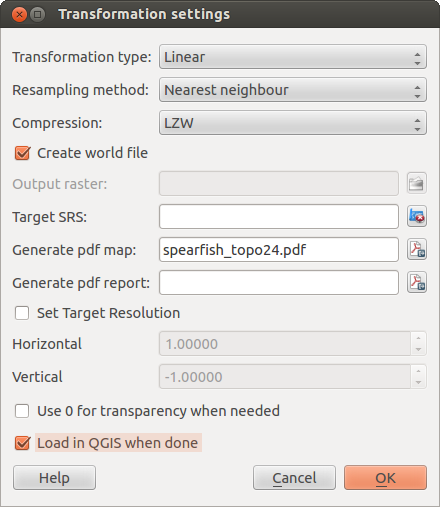
- The Linear algorithm is used to create a world file and is different from the other algorithms, as it does not actually transform the raster. This algorithm likely won’t be sufficient if you are dealing with scanned material.
- The Helmert transformation performs simple scaling and rotation transformations.
- The Polynomial algorithms 1-3 are among the most widely used algorithms introduced to match source and destination ground control points. The most widely used polynomial algorithm is the second-order polynomial transformation, which allows some curvature. First-order polynomial transformation (affine) preserves colliniarity and allows scaling, translation and rotation only.
- The Thin Plate Spline (TPS) algorithm is a more modern georeferencing method, which is able to introduce local deformations in the data. This algorithm is useful when very low quality originals are being georeferenced.
- The Projective transformation is a linear rotation and translation of coordinates.
リサンプリング方法の定義
リサンプリングの形式選択は入力データと最終実行結果の出来栄えによって選択して下さい.イメージの統計を変更したくない場合最近傍を選ぶといいと思います.それに対してキュービックリサンプルを選ぶとスムーズな結果が得られます.
5種類の異なるリサンプリング方法から選択することが可能です.
最近傍
線形
キュービック
キュービックスプライン
ランチョシュ
変換方法の定義
ジオリファレンスされたラスタ出力を行うために指定する必要があるオプションがたくさんあります.
- The
 Create world file checkbox is only available if you
decide to use the linear transformation type, because this means that the
raster image actually won’t be transformed. In this case, the
Output raster field is not activated, because only a new world file will
be created.
Create world file checkbox is only available if you
decide to use the linear transformation type, because this means that the
raster image actually won’t be transformed. In this case, the
Output raster field is not activated, because only a new world file will
be created. 他の変換タイプでは 出力ラスタ を指定しなければなりません. デフォルトで新しいファイルはオリジナルラスタファイルを同じフォルダに ([filename]_modified という名前で) 作成されます.
次のステップとしてジオリファレンスされたラスタのための ターゲット SRS (Spatial Reference System) を指定しなければいけません ( 投影法の利用方法 参照).
- If you like, you can generate a pdf map and also a pdf report. The report includes information about the used transformation parameters, an image of the residuals and a list with all GCPs and their RMS errors.
さらに
ターゲットの解像度を指定して下さい チェックボックスをアクティブにして出力ラスタの解像度を指定することができます. デフォルトの水平と垂直解像度は 1 です,0の値のピクセルが透明に表示されるべきな場合
必要に応じて透明に0を使用 をアクティブにできます. 例のトポシートの白いエリアは透明に表示されるべきです.- Finally, Load in QGIS when done loads the output raster
automatically into the QGIS map canvas when the transformation is done.
ラスタプロパティの表示と調整
Clicking on the Raster properties dialog in the Settings menu opens the raster properties of the layer that you want to georeference.
ジオリファレンサの構成
- You can define whether you want to show GCP coordiniates and/or IDs.
ピクセルと地図の残差の単位は選択できます.
- For the PDF report, a left and right margin can be defined and you can also set the paper size for the PDF map.
最後に
ジオレファレンサウィンドウを結合して表示する を有効化できます.
変換の実行
After all GCPs have been collected and all transformation settings are defined,
just press the Start georeferencing button to create
the new georeferenced raster.