Visão Geral do Compositor de Impressão
O Compositor de Impressão fornece recursos crescentes de layout e impressão. Ele permite que você adicione elementos como a tela do mapa do QGIS, rótulos de texto, imagens, legendas, barras de escala, formas básicas, setas, tabelas de atributos e quadros HTML. Você pode dimensionar, agrupar, alinhar, posicionar e girar cada elemento e ajustar suas propriedades para criar seu layout. O layout pode ser impresso ou exportado para formatos de imagem, PostScript, PDF ou para SVG (exportar para o SVG não está funcionando corretamente com algumas versões recentes do Qt4, você deve tentar verificar individualmente seu sistema). Você pode salvar o layout como um modelo e carregá-lo novamente em outra sessão. Finalmente, gerar vários mapas com base em um modelo pode ser feito através do gerador de atlas.
Before you start to work with the Print Composer, you need to load some raster
or vector layers in the QGIS map canvas and adapt their properties to suit your
own convenience. After everything is rendered and symbolized to your liking,
click the  New Print Composer icon in the toolbar or
choose . You will be prompted to
choose a title for the new Composer.
To demonstrate how to create a map please follow the next instructions.
- On the left side, select the
 Add new map toolbar button
and draw a rectangle on the canvas holding down the left mouse button.
Inside the drawn rectangle the QGIS map view to the canvas.
- Select the
 Add new scalebar toolbar button and click
with the left mouse button on the Print Composer canvas. A scalebar will be
added to the canvas.
- Select the
 Add new legend toolbar button and draw a
rectangle on the canvas holding down the left mouse button.
Inside the drawn rectangle the legend will be drawn.
- Select the
 Select/Move item icon to select the map on
the canvas and move it a bit.
- While the map item is still selected you can also change the size of the map item.
Click while holding down the left mouse button, in a white little rectangle in one
of the corners of the map item and drag it to a new location to change it’s size.
- Click the Item Properties tab on the left lower panel and find the setting
for the orientation. Change the value of the setting Map orientation to
‘15.00° ‘. You should see the orientation of the map item change.
- Now, you can print or export your print composition to image formats, PDF or to SVG
with the export tools in Composer menu.
- Finally, you can save your print composition within the project file with the
 Save Project button.
You can add multiple elements to the Composer. It is also possible to have more
than one map view or legend or scale bar in the Print Composer canvas, on one or
several pages. Each element has its own properties and, in the case of the map,
its own extent. If you want to remove any elements from the Composer canvas you
can do that with the Delete or the Backspace key.
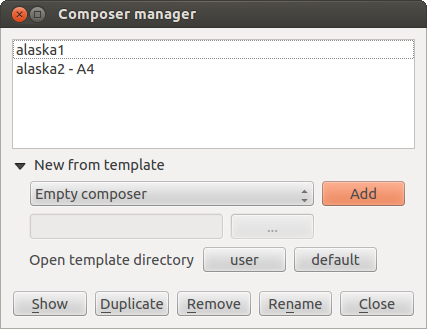
The Composer Manager is the main window to manage print composers in the project.
It helps you add new print composer, duplicate an existing one, rename or delete it.
To open the composer manager dialog, click on the  Composer Manager button in the toolbar or choose . It can also be reached from the main window of QGIS with
.
Figure Composer Manager:
The composer manager lists in its upper part all the available print composers in the project.
The bottom part shows tools that help to:
- show the selected composer(s): you can open multiple print composers in one-click
- duplicate the selected composer (available only if one print composer is selected):
it creates a new composer using the selected composer as template.
You’ll be prompted to choose a new title for the new composer
- rename the composer (also available only if one print composer is selected):
You’ll be prompted to choose a new title for the composer. Note that you can
also rename the composer by double-clicking on its title in the upper part
- remove the composer: the selected print composer(s) will be deleted from the project.
With the Composer Manager, it’s also possible to create new print composers as an
empty composer or from a saved template. By default, QGIS will look for templates
in user directory (~/.qgis2/composer_templates) or application’s one
(ApplicationFolder/composer_templates).
QGIS will retrieve all the available templates and propose them in the combobox.
The selected template will be used to create a new composer when clicking
Add button.
You can also save composer templates in another folder.
Choosing specific in the template list offers the ability to select such
template and use it to create a new print composer.
Opening the Print Composer provides you with a blank canvas that represents
the paper surface when using the print option. Initially you find buttons on
the left beside the canvas to add map composer items: the current QGIS map canvas,
text labels, images, legends, scale bars, basic shapes, arrows, attribute tables
and HTML frames. In this toolbar you also find toolbar buttons to navigate,
zoom in on an area and pan the view on the composer and toolbar buttons to
select a map composer item and to move the contents of the map item.
Figure_composer_overview shows the initial view of the Print Composer before
any elements are added.
Figure Composer Overview:
On the right beside the canvas you find two panels.
The upper panel holds the tabs Items and Command History
and the lower panel holds the tabs Composition, Item properties
and Atlas generation.
- The Items tab provides a list of all map composer items added to the canvas.
- The Command history tab displays a history of all changes applied
to the Print Composer layout. With a mouse click, it is possible to undo and
redo layout steps back and forth to a certain status.
- The Composition tab allows you to set paper size, orientation, the page
background, number of pages and print quality for the output file in dpi. Furthermore,
you can also activate the
 Print as raster checkbox. This means
all items will be converted to raster before printing or saving as PostScript or PDF.
In this tab, you can also customize settings for grid and smart guides.
- The Item Properties tab displays the properties for the selected
item. Click the
 Select/Move item icon to select
an item (e.g., legend, scale bar or label) on the canvas. Then click the
Item Properties tab and customize the settings for the selected
item.
- The Atlas generation tab allows you to enable the generation of an
atlas for the current Composer and gives access to its parameters.
In the bottom part of the Print Composer window, you can find a status bar with
mouse position, current page number, a combo box to set the zoom level,
the number of selected items if applicable and, in the case of atlas generation,
the number of features.
In the upper part of the Print composer window, you can find menus and other toolbars.
All Print Composer tools are available in menus and as icons in a toolbar.
See a list of tools in table_composer_1.
The toolbars and the tabs can be switched off and on using the right mouse button
over any toolbar or through or
.
In the Composition tab, you can define the global settings of the
current composition.
Figure Composition 1:
You can choose one of the Presets formats for your paper sheet,
or enter your custom width, height and units.
You can also choose the page Orientation to use.
Composition can be divided into several pages. For instance, a first page can show
a map canvas, and a second page can show the attribute table associated with a
layer, while a third one shows an HTML frame linking to your organization website.
Set the Number of pages to the desired value. you can also custom the
Page Background with the color or the symbol you want.
The Page size options apply to all the pages in the composition. However, you can
modify the values using the data defined override options (see Data Defined Override Buttons).
A custom page size can also be set, using the Resize page tool.
This creates an unique page composition, resizes the page to fit the current
contents of the composition (with optional margins).
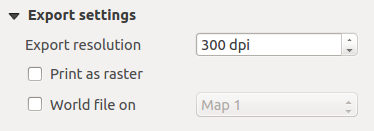
You can define a resolution to use for all exported maps in Export
resolution. This setting can however be overridden each time you are exporting a map.
When checked,  print as raster means all elements will be
rasterized before printing or saving as PostScript or PDF.
While exporting to an image file format, you can choose to generate a world file
by checking  World file on and select a map item.
The world file is created beside the exported map, has same name and contains
information to easily georeference it.
Figure Composition 2:
You can put some reference marks on your composition paper sheet to help you
place some items. These marks can be:
- simple lines (called Guides) put at the position you want. To do that,
ensure that Show Rulers and Show Guides in
menu are checked. Then, click and drag from within the ruler to the paper sheet.
A vertical or horizontal line is added to the paper and you can set its position
following the coordinates displayed at the left bottom of the composer dialog.
- or regular Grid.
Whether grids or guides should be shown is set in menu.
There, you can also decide if they might be used to snap composer items. The
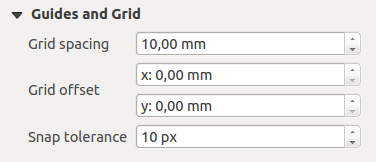
Grid and guides section lets you customize grid settings like
Grid spacing, Grid offset and Snap tolerance
to your need. The tolerance is the maximum distance below which an item is snapped
to a grid or a guide.
Figure Composition 3:
In the menu in QGIS main canvas, you can
also set the spacing, offset and snap tolerance of the grid as much as its style
and color. These options are applied by default to any new print composer.
During the layout process, it is possible to revert and restore changes.
This can be done with the revert and restore tools:
 Revert last change
 Restore last change
This can also be done by mouse click within the Command history tab
(see figure_composer_1). The History tab lists the last actions done within the composer.
Just select the point you want to revert to and once you do new action all
the actions done after the selected one will be removed.
Figure Composer 1:
The tab offers some options to manage selection and
visibility of items.
All the items added to the print composer canvas are shown in a list and
selecting an item makes the corresponding row selected in the list as well as
selecting a row does select the corresponding item in the print composer canvas.
This is thus a handy way to select an item placed behind another one.
Note that a selected row is shown as bold.
For any selected item, you can :
 set it visible or not,
 lock or unlock its position,
- order its Z position. You can move up and down each item in the list with a
click and drag. The upper item in the list will be brought to the foreground
in the print composer canvas.
By default, a newly created item is placed in the foreground.
- change the name by double-clicking the text.
Once you have found the correct position for an item, you can lock it by ticking
the box in  column. Locked items are not selectable on the canvas.
Locked items can be unlocked by selecting the item in the
tab and unchecking the tickbox or you can use the icons on the toolbar.
 New Print Composer icon in the toolbar or
choose File ‣ New Print Composer. You will be prompted to
choose a title for the new Composer.
 Add new map toolbar button
and draw a rectangle on the canvas holding down the left mouse button.
Inside the drawn rectangle the QGIS map view to the canvas.
 Add new scalebar toolbar button and click
with the left mouse button on the Print Composer canvas. A scalebar will be
added to the canvas.
 Add new legend toolbar button and draw a
rectangle on the canvas holding down the left mouse button.
Inside the drawn rectangle the legend will be drawn.
 Select/Move item icon to select the map on
the canvas and move it a bit.
 Save Project button.
 Composer Manager button in the toolbar or choose Composer
‣ Composer Manager. It can also be reached from the main window of QGIS with
Project ‣ Composer Manager.


