QGIS Configuration
QGIS is highly configurable through the Settings menu. Choose between Project Properties, Options and Customization.
Nota
QGIS follows desktop guidelines for the location of options and project properties item. Consequently related to the OS you are using, location of some of items described below could be in the Project or the Settings menu.
Propriedades do Projeto
In the properties window for the project under  Settings ‣ Project Properties (kde) or
 Project ‣ Project Properties (Gnome, OS X or Windows), you
can set project-specific options.
Project ‣ Project Properties (Gnome, OS X or Windows), you
can set project-specific options.
In the General menu, the general settings let you:
- give a title to the project beside the project file path
- choose the color to use for features when they are selected
- choose the background color: the color to use for the map canvas
- set whether the path to layers in the project should be saved as absolute (full) or as relative to the project file location. You may prefer relative path when both layers and project files can be moved or shared or if the project is accessed from computers on different platforms.
- choose to avoid artifacts when project is rendered as map tiles. Note that checking this option can lead to performance degradation.
Calculating areas and distances is a common need in GIS. However, these values are really tied to the underlying projection settings. The Measurements frame lets you control these parameters. You can indeed choose:
- the ellipsoid to use: it can be an existing one, a custom one (you’ll need to set values of the semi-major and semi-minor axis) or None/Planimetric.
- the units for distance measurements for length and perimeter and
the units for area measurements. These settings, which default
to the units set in QGIS options but then overrides it for the current project,
are used in:
- Attribute table field update bar
- Field calculator calculations
- Identify tool derived length, perimeter and area values
- Default unit shown in measure dialog
The Coordinate display allows you to choose and customize the format of units to use to display the mouse coordinate in the status bar and the derived coordinates shown via the identify tool.
Finally, you can define a project scale list, which overrides the global predefined scales.

General tab of Project Properties dialog
O menu SRC permite que escolha o Sistema de Coordenadas Referência para o projeto, e para ativar a reprojeção on-the-fly das camadas matricias e vetoriais na exibição de camadas de diferentes SRC.
- With the Identify layers menu, you set (or disable) which layers will respond to the identify tool. By default, layers are set queryable.
- The Default Styles menu lets you control how new layers will be
drawn when they do not have an existing
.qmlstyle defined. You can also set the default transparency level for new layers and whether symbols should have random colors assigned to them. There is also an additional section where you can define specific colors for the running project. You can find the added colors in the drop down menu of the color dialog window present in each renderer. - The tab OWS Server allows you to define information about the QGIS Server WMS and WFS capabilities, extent and CRS restrictions.
O menu Macros é para editar macros Python para os projetos. Atualmente, apenas estão disponíveis três macros:
openProject(),saveProject()ecloseProject().

Macro settings in QGIS
O menu Relations é usado para definir relações 1:n. As relações são definidas no diálogo das propriedades do projeto. Quando existirem relações para uma camada, um novo elemento de interface do utilizador na vista de formulário (p. ex. quando identificar um elemento e abrir o seu formulário) irá listar os elementos relacionados. Isto fornece uma maneira poderosa para expressar p. ex. o histórico de inspeção ao longo de um segmento de tubagem ou estrada. Poderá encontrar mais informação sobre suporte de relações 1:n na Seção Creating one to many relations.
Opções
 Some basic options for QGIS can be selected using the
Options dialog. Select the menu option Settings ‣
Options. The tabs where you can customize your
options are described below.
Some basic options for QGIS can be selected using the
Options dialog. Select the menu option Settings ‣
Options. The tabs where you can customize your
options are described below.
Menu Geral
Aplicação
- Select the Style (QGIS restart required)
 and choose
between ‘Oxygen’,’Windows’,’Motif’,’CDE’, ‘Plastique’ and ‘Cleanlooks’ ().
and choose
between ‘Oxygen’,’Windows’,’Motif’,’CDE’, ‘Plastique’ and ‘Cleanlooks’ (). - Define the Icon theme . Currently only ‘default’ is
possible.
- Define the Icon size .
- Define the Font. Choose between
 Qt default and a user-defined font.
 - Change the Timeout for timed messages or dialogs .
 Não exibir a janela inicial
- Mostrar dicas ao iniciar
- Títulos da caixa de grupos a negrito
- QGIS-estilo das caixas de grupo
- Use o diálogo nativo de escolha de cores
- Usar auto-atualizar nas caixas de diálogo de seletor de cores
- Estilo da barra lateral personalizado
- Suporte de rotação de tela experimental (é necessário reiniciar)
Arquivos de projeto
- Open project on launch (choose between ‘New’,
‘Most recent’ and ‘Specific’). When choosing ‘Specific’ use the
 to define a project.
 - Criar um novo projeto como projeto padrão. Tem a possibilidade de carregar em Usar projeto atual com padrão ou em Resetar padrão. Pode navegar através dos seus arquivos e definir um diretório onde encontra os modelos de projeto definidos pelo usuário. Isto será adicionado a Projeto ‣ Novo do modelo. Primeiro ative Criar novo projeto como projeto padrão e a seguir salve o projeto dentro da pasta de modelos de projeto.
- Avisar para salvar projeto e alterações de fontes de dados quando necessário
- Solicitar confirmação quando uma camada for ser removida
- Avisar quando abrir um projeto salvado com uma versão antiga do |qg|
- Enable macros . This option was created to handle
macros that are written to perform an action on project events. You can
choose between ‘Never’, ‘Ask’, ‘For this session only’ and
‘Always (not recommended)’.
Menu Sistema
Ambiente
Variáveis de ambiente do sistema podem ser vistas agora, e muitas configuradas, no grupo Environment (ver figure_environment_variables). Isto é útil para plataformas, tais como Mac, onde um aplicativo GUI não herda necessariamente o ambiente do utilizador da linha de comandos. Também é útil para configuração e visualização de variáveis de ambiente para os conjuntos de ferramentas externas controlados pela caixa de ferramentas de Processamento (p. ex., SAGA, GRASS), e para ativar a saída de depuração (“debugging”) para seções específicas do código-fonte.
- Utilize variáveis personalizadas (Reinício necessário - incluem separadores). Você pode [Adicionar] e [remover] variáveis. Variáveis de ambiente já definidas são exibidos em variáveis de ambiente atual, e é possível filtrá-las ativando Mostrar somente variáveis específicas-QGIS.
Figure System Environment:
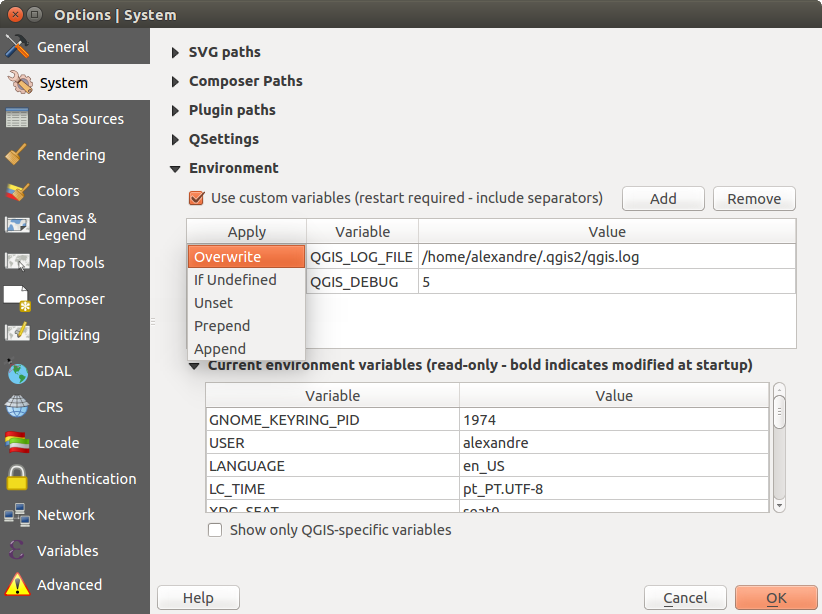
System environment variables in QGIS
Diretórios dos complementos
[Adicionar] ou [Remover] Caminho(s) para pesquisar bibliotecas de complementos C++ adicionais
Menu Fonte de Dados
Atributos dos elementos e tabela
- Abre a tabela de atributos na janela principal (Necessário reiniciar o QGIS)
- Copy geometry in WKT representation from attribute
table. When using
 Copy selected rows to
clipboard from the Attribute table dialog, this has the
result that the coordinates of points or vertices are also copied to the
clipboard.
Copy selected rows to
clipboard from the Attribute table dialog, this has the
result that the coordinates of points or vertices are also copied to the
clipboard. - Attribute table behavior . There are three
possibilities: ‘Show all features’, ‘Show selected features’ and ‘Show
features visible on map’.
- Attribute table row cache
 . This row cache makes
it possible to save the last loaded N attribute rows so that working with the
attribute table will be quicker. The cache will be deleted when closing the
attribute table.
. This row cache makes
it possible to save the last loaded N attribute rows so that working with the
attribute table will be quicker. The cache will be deleted when closing the
attribute table. Representação para valores NULL. Aqui, pode definir um valor para os campos de dados que contêm valores NULL.
Manipulação das fontes de dados
- Scan for valid items in the browser dock . You can
choose between ‘Check extension’ and ‘Check file contents’.
- Scan for contents of compressed files (.zip) in browser dock
. ‘No’, ‘Basic scan’ and ‘Full scan’ are possible.
Solicitar subcamadas raster ao abrir. Alguns rasters suportam subcamadas — elas são chamadas de subdatasets no GDAL. Um exemplo são os arquivos netCDF — se há muitas variáveis netCDF, GDAL verá cada variável como um subdataset. A opção permite que você controle como lidar com subcamadas quando um arquivo é aberto com subcamadas. Você tem as seguintes opções:
‘Sempre’: Perguntar sempre (se existem subcamadas)
‘Se necessário’: Perguntar se a camada não tem bandas, mas tem subcamadas
‘Nunca’: Nunca pede, não irá carregar nada
‘Carregar tudo’: Nunca pede, mas carrega todas as subcamadas
- Ignore shapefile encoding declaration. If a shapefile
has encoding information, this will be ignored by QGIS.
- Adicionar camadas PostGIS com duplo clique e seleciona no modo estendido
- Adicione camadas Oracle com duplo clique e selecione em modo extendido
- Execute expressions on server-side if possible
- create transaction groups automatically whenever possible
(Experimental). When this mode is turned on, all
(postgres) layers from the same database are synchronised in their edit state,
i.e. when one layer is put into edit state, all are, when one layer is committed
or one layer is rolled back, so are the others. Also, instead of buffering edit
changes locally, they are directly sent to a transaction in the database which
gets committed when the user clicks save layer.
Hidden Browser Path
This widget lists all the folder you chose to hide from the Browser panel. Removing a folder from the list will make it available in the Browser panel.
Menu de Renderização
Rendering behavior
- Por padrão novas camadas adicionadas ao mapa devem ser exibidas
- Use tornar cache sempre que possível para acelerar redesenhos
- Representação de camadas em paralelo utilizando muitos núcleos CPU
- Máximo de núcleos para utilizar
Intervalo de atualização do mapa (por padrão 250 ms)
- Enable feature simplification by default for newly added layers
Simplificação de limiar
- Simplifique no provedor ao lado se possível
Escala máxima a que a camada deve simplificar
Qualidade de renderização
- Faz com que as linhas apareçam menos irregulares, em detrimento de algum desempenho do desenho
Matriciais
Com a Seleção de banda RGB pode definir o número para a banda Vermelha, Verde e Azul.
Melhora de contraste
- Single band gray . A single band gray can have
‘No stretch’, ‘Stretch to MinMax’, ‘Stretch and Clip to MinMax’ and also
‘Clip to MinMax’.
- Multi band color (byte/band) . Options are ‘No stretch’,
‘Stretch to MinMax’, ‘Stretch and Clip to MinMax’ and ‘Clip to MinMax’.
- Multi band color (>byte/band) . Options are ‘No stretch’,
‘Stretch to MinMax’, ‘Stretch and Clip to MinMax’ and ‘Clip to MinMax’.
- Limits (minimum/maximum) . Options are
‘Cumulative pixel count cut’, ‘Minimum/Maximum’, ‘Mean +/- standard deviation’.
Limites de contagem cumulativa de pixeis de corte
Multiplicador do desvio-padrão
Corrigindo Erros
- Atualiza o mapa da tela
Menu de Janela e Legenda
Aparência padrão do mapa (reescrita pelas propriedades do projeto)
Define a Cor da seleção e a Cor de fundo.
Legenda da camada
- Double click action in legend . You can either
‘Open layer properties’ or ‘Open attribute table’ with the double click.
As seguintes Estilos de itens de legenda são possíveis:
- Tornar maiúsculo os nomes da camada
- Tornar negrito os nomes da camada
- Tornar negrito os nomes dos grupos
- Mostrar nomes de atributos de classificação
- Criar ícones matriciais (pode ser lento)
Menu Ferramentas de Mapa
This menu offers some options regarding the behavior of the Identify tool.
Raio de busca para identificar e visualizar avisos no mapa é um fator de tolerância expressada como uma percentagem do eixo do mapa. Isto significa que a ferramenta de identificação representara os resultados sempre e quando clicar dentro desta tolerância.
Cor de realce lhe permite eleger com que cor devem ser identificados os objetos espaciais que estão destacados.
- Buffer determines a buffer distance to be rendered from the outline of the identify highlight.
- Minimum width determines how thick should the outline of a highlighted object be.
Ferramenta de medida
Define Cor do elástico para as ferramentas de medida
Define Casas decimais
- Keep base unit to not automatically convert large numbers
(e.g., meters to kilometers)
- Preferred distance units (‘Meters’, ‘Feet’,
‘Nautical Miles’, ‘Degrees’ or ‘Map Units’ )
- Preferred area units (‘Square meters’, ‘Square feet’,
‘Square yards’, ‘Hectares’, ‘Map Units’ ...)
- Preferred angle units (‘Degrees’, ‘Radians’, ‘Gon/gradians’,
‘Minutes of arc’ ...)
Movendo e ampliando
- Define Mouse wheel action (‘Zoom’, ‘Zoom and recenter’,
‘Zoom to mouse cursor’, ‘Nothing’)
Define o factor de aproximação/ afastamento para a roda do mouse
Escalas pré-definidas
Here, you find a list of predefined scales. With the  and
and  buttons you can add or remove your personal scales.
You can also import or export scales from/to a
buttons you can add or remove your personal scales.
You can also import or export scales from/to a .XML file. Note that you still have
the possibility to remove your changes and reset to the predefined list.
Menu do Compositor
Composição padrão
Você pode definir a Fonte padrão aqui.
Aparência do Gride
- Define the Grid style (‘Solid’, ‘Dots’, ‘Crosses’)
Define a Cor da grade
Configurações de guia e grade
- Define the Grid spacing
- Define the Grid offset for x and y
- Define the Snap tolerance
Menu Digitalizar
Criação de elementos
- Suprimir atributos de janelas pop-up depois de cada elemento criado
- Reutilizar últimos valores de atributos inseridos
- Validate geometries. Editing complex lines and polygons with many nodes can result in very slow rendering. This is because the default validation procedures in QGIS can take a lot of time. To speed up rendering, it is possible to select GEOS geometry validation (starting from GEOS 3.3) or to switch it off. GEOS geometry validation is much faster, but the disadvantage is that only the first geometry problem will be reported.
Elástico
Define a Borracha Espessura da linha e Cor da linha
Ajuste
- Abrir opções de atração na janela principal (necessário reiniciar o QGIS)
- Define Default snap mode (‘To vertex’, ‘To segment’,
‘To vertex and segment’, ‘Off’)
Define Tolerância de atração pré-definida em unidades de mapa ou pixeis
Define o Raio de pesquisa para editar vértices em unidades de mapa ou pixeis
Marcadores de Vértices
- Mostrar marcadores apenas para elementos selecionados
- Define vertex Marker style (‘Cross’ (default), ‘Semi
transparent circle’ or ‘None’)
Definir o vértice Tamanho do Marcador
Ferramenta de curva de afastamento
The next 3 options refer to the  Offset Curve tool
in Digitalização Avançada. Through the various settings, it is possible to
influence the shape of the line offset. These options are possible starting from GEOS 3.3.
Offset Curve tool
in Digitalização Avançada. Through the various settings, it is possible to
influence the shape of the line offset. These options are possible starting from GEOS 3.3.
Juntar estilo
Quadrante do Segmento
Limite quadrante
Menu SRC
SRC padrão para novos projetos
 Don’t enable ‘on the fly’ reprojection
- Automatically enable ‘on the fly’ reprojection if
layers have different CRS
- Enable ‘on the fly’ reprojection by default
Selecione um SRC em Iniciar sempre um novo projeto com este SRC
SRC para novas camadas
Esta área permite que você defina a ação a ser tomada quando uma nova camada é criada, ou quando uma camada sem SRC é carregada.
- Prompt for CRS
- Use project CRS
- Use default CRS
Transformação de datum padrão
- Pergunte pela transformação do datum quando nenhum padrão for definido
Se você trabalhou com a transformação SRC ‘on-the-fly’ você pode ver o resultado da transformação na janela abaixo. Você pode encontrar informações sobre ‘Fonte da SRC’ e ‘Destino do SRC’, bem como ‘Transformação de Datum Fonte’ e ‘Transformação de Datum de Destino’.
Menu local
- Sobrepor idioma do sistema e Idioma a utilizar em alternativa
Informação sobre a região do sistema ativo local
Authentication
In the Authentication tab you can set authentication configurations and manage PKI certificates. See Sistema de Autenticação for more details.
Menu rede
Geral
Define Pesquisa de endereço WMS, padrão como
http://geopole.org/wms/search?search=\%1\&type=rssDefine Tempo esgotado para pedidos de rede (ms) - o padrão é 60000
Define Período padrão de validade para a quadrícula WMSC/WMTS (horas) - o padrão é 24
Define Máxima repetição no caso de erros na requisição de mosaico
Define Usuário-Agente
Figure Network Tab:

Proxy-settings in QGIS
Configurações de cache
Define a Pasta e Tamanho para o cache.
- Usar proxy para acessar à web e define ‘Máquina’, ‘Porta’, ‘Usuário’, e ‘Palavra-chave’.
- Set the Proxy type according to your needs.
Default Proxy: Proxy é determinado baseando-se na definição do proxy da aplicação em uso
Socks5Proxy: Proxy genérico para qualquer tipo de ligação. Suporta TCP, UDP, unindo a uma porta (ligações de entrada) e autenticação.
HttpProxy: Implementado usando o comando “LIGAR” , apenas suporta ligações TCP de saída; suporta autenticação.
HttpCachingProxy: Implementado usando comandos HTTP normais, é útil apenas em pedidos no contexto do HTTP.
FtpCachingProxy: Implementado usando um proxy FTP, é útil no contexto de pedidos FTP.
Alguns URLs excluídos podem ser adicionados na caixa de texto debaixo das configurações de proxy (veja Figure_Network_Tab).
Se você precisar de informações mais detalhadas sobre as diferentes configurações de proxy, consulte o manual da documentação da biblioteca QT subjacente a http://doc.trolltech.com/4.5/qnetworkproxy.html#ProxyType-enum.
Dica
Usando Proxies
Usando proxies, por vezes, pode ser complicado. É útil proceder por “tentativa e erro”, com os tipos de proxy acima, verifique para ver se eles conseguem no seu caso.
You can modify the options according to your needs. Some of the changes may require a restart of QGIS before they will be effective.
- A configuração é salva em arquivo de texto:
$HOME/.config/QGIS/QGIS2.conf - pode encontrar as configurações em:
$HOME/Library/Preferences/org.qgis.qgis.plist As configurações
são armazenadas no registo em: HKEY\CURRENT_USER\Software\QGIS\qgis
Personalização
The customization dialog lets you (de)activate almost every element in the QGIS user interface. This can be very useful if you want to provide your end-users with a ‘light’ version of QGIS, containing only the icons, menus or panels they need.
Nota
Before your changes are applied, you need to restart QGIS.
Figure Customization 1:
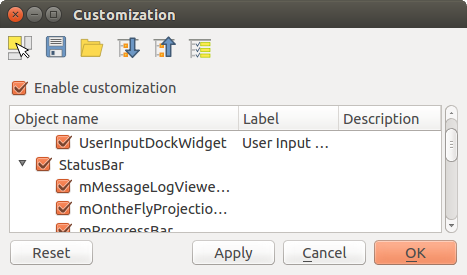
The Customization dialog
Ticking the Enable customization checkbox is the first step
on the way to QGIS customization. This enables the toolbar and the widget
panel from which you can uncheck and thus disable some GUI items.
The configurable item can be:
- a Menu or some of its sub-menus from the Barra de Menu
- a whole Panel (see Panels and Toolbars)
- the Status bar described in Barra de Status or some of its items
- a Toolbar: the whole bar or some of its icons
- or any widget from any dialog in QGIS: label, button, combobox...
With  Switch to catching widgets in main application, you
can click on an item in QGIS interface that you want to be hidden and
QGIS automatically unchecks the corresponding entry in the Customization dialog.
Switch to catching widgets in main application, you
can click on an item in QGIS interface that you want to be hidden and
QGIS automatically unchecks the corresponding entry in the Customization dialog.
Once you setup your configuration, click [Apply] or [Ok] to validate your changes. This configuration becomes the one used by default by QGIS at the next startup.
The modifications can also be saved in a .ini file using  Save To File button. This is a handy way to share a common QGIS
interface among multiple users. Just click on
Save To File button. This is a handy way to share a common QGIS
interface among multiple users. Just click on  Load from File
from the destination computer in order to import the
Load from File
from the destination computer in order to import the .ini file.
You can also run command line tools and save various
setups for different use cases as well.
Dica
Easily restore predefined QGIS
The initial QGIS GUI configuration can be restored by one of the methods below:
- unchecking Enable customization option in the
Customization dialog or click the
 Check All button
 - pressing the [Reset] button in the QSettings frame under Settings ‣ Options menu, System tab
- launching QGIS at a command prompt with the following command line
qgis --nocustomization - setting to
falsethe value of UI ‣ Customization ‣ Enabled variable under Settings ‣ Options menu, Advanced tab.
In most cases, you need to restart QGIS in order to have the change applied.