.
Formatele de Date Acceptate
QGIS uses the OGR library to read and write vector data formats, including ESRI shapefiles, MapInfo and MicroStation file formats, AutoCAD DXF, PostGIS, SpatiaLite, Oracle Spatial and MSSQL Spatial databases, and many more. GRASS vector and PostgreSQL support is supplied by native QGIS data provider plugins. Vector data can also be loaded in read mode from zip and gzip archives into QGIS. As of the date of this document, 69 vector formats are supported by the OGR library (see OGR-SOFTWARE-SUITE in Literatură și Referințe Web). The complete list is available at http://www.gdal.org/ogr/ogr_formats.html.
Note
Not all of the listed formats may work in QGIS for various reasons. For
example, some require external commercial libraries, or the GDAL/OGR
installation of your OS may not have been built to support the format you
want to use. Only those formats that have been well tested will appear in
the list of file types when loading a vector into QGIS. Other untested
formats can be loaded by selecting *.*.
Lucrul cu datele vectoriale GRASS este descris în Secțiunea Integrarea GRASS GIS.
This section describes how to work with several common formats: ESRI shapefiles, PostGIS layers, SpatiaLite layers, OpenStreetMap vectors, and Comma Separated data (CSV). Many of the features available in QGIS work the same, regardless of the vector data source. This is by design, and it includes the identify, select, labeling and attributes functions.
Fișierele shape ESRI
The standard vector file format used in QGIS is the ESRI shapefile. Support is provided by the OGR Simple Feature Library (http://www.gdal.org/ogr/).
Un shapefile constă de fapt din mai multe fișiere. Următoarele trei sunt necesare:
fișierul
.shpcare conține geometriile entitățiifișierul
.dbfcare conține atributele în format dBasefișierul index
.shx
Shapefiles also can include a file with a .prj suffix, which contains
the projection information. While it is very useful to have a projection file,
it is not mandatory. A shapefile dataset can contain additional files. For
further details, see the ESRI technical specification at
http://www.esri.com/library/whitepapers/pdfs/shapefile.pdf.
Loading a Shapefile
To load a shapefile, start QGIS and click on the  Add Vector Layer toolbar button, or simply press
 Ctrl+Shift+V.
This will bring up a new window (see figure_vector_1).
Figure Vector 1:
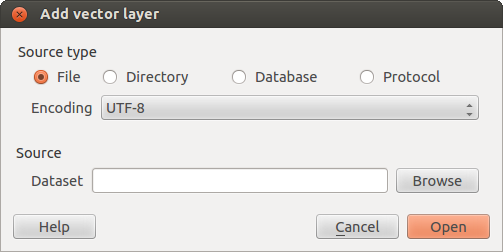
Add Vector Layer Dialog 
From the available options check  File. Click on
[Browse]. That will bring up a standard open file dialog
(see figure_vector_2), which allows you to navigate the file system and load a
shapefile or other supported data source. The selection box Filter
File. Click on
[Browse]. That will bring up a standard open file dialog
(see figure_vector_2), which allows you to navigate the file system and load a
shapefile or other supported data source. The selection box Filter
 allows you to preselect some OGR-supported file formats.
You can also select the encoding for the shapefile if desired.
Figure Vector 2:

Open an OGR Supported Vector Layer Dialog
Selecting a shapefile from the list and clicking [Open] loads it into QGIS.
Figure_vector_3 shows QGIS after loading the alaska.shp file.
Figure Vector 3:
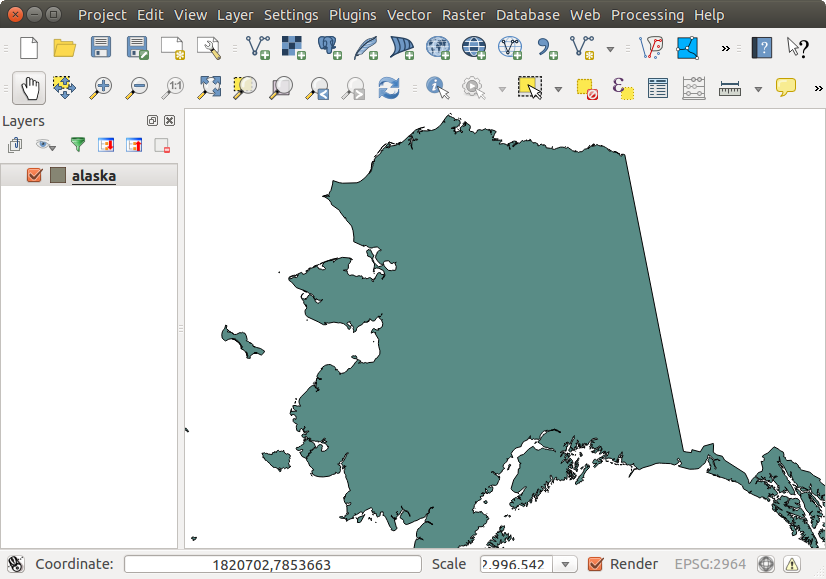
QGIS with Shapefile of Alaska loaded
Tip
Culorile Stratului
Când adăugați un strat de hartă, acestuia i se atribuie o culoare aleatorie. La adăugarea mai multor straturi, fiecăruia i se atribuie culori diferite.
Once a shapefile is loaded, you can zoom around it using the map navigation tools. To change the style of a layer, open the Layer Properties dialog by double clicking on the layer name or by right-clicking on the name in the legend and choosing Properties from the context menu. See section Meniul Stilului for more information on setting symbology of vector layers.
Tip
Încărcați stratul și proiectul din unitățile externe, montate pe OS X
On OS X, portable drives that are mounted beside the primary hard drive
do not show up as expected under File ‣ Open Project.
We are working on a more OSX-native open/save dialog to fix this.
As a workaround, you can type /Volumes in the File name box
and press Enter. Then you can navigate to external drives and network
mounts.
Improving Performance for Shapefiles
To improve the performance of drawing a shapefile, you can create a spatial
index. A spatial index will improve the speed of both zooming and panning.
Spatial indexes used by QGIS have a .qix extension.
Folosiți acești pași pentru a crea indexul:
- Load a shapefile by clicking on the Add Vector Layer
toolbar button or pressing
Ctrl+Shift+V. - Open the Layer Properties dialog by double-clicking on the shapefile name in the legend or by right-clicking and choosing Properties from the context menu.
În fila General, faceți clic pe butonul [Create Spatial Index].
Problem loading a shape .prj file
If you load a shapefile with a .prj file and QGIS is not able to read the
coordinate reference system from that file, you will need to define the proper
projection manually within the General tab of the
Layer Properties dialog of the layer by clicking the
[Specify...] button. This is due to the fact that .prj files
often do not provide the complete projection parameters as used in QGIS and
listed in the CRS dialog.
For the same reason, if you create a new shapefile with QGIS, two different
projection files are created: a .prj file with limited projection
parameters, compatible with ESRI software, and a .qpj file, providing
the complete parameters of the used CRS. Whenever QGIS finds a .qpj
file, it will be used instead of the .prj.
Loading a MapInfo Layer
To load a MapInfo layer, click on the
Add Vector Layer toolbar button; or type Ctrl+Shift+V, change the
file type filter Files of type : to
‘Mapinfo File [OGR] (*.mif *.tab *.MIF *.TAB)’ and select the MapInfo layer you
want to load.
Loading an ArcInfo Binary Coverage
To load an ArcInfo Binary Coverage, click on the
Add Vector Layer toolbar button or press
Ctrl+Shift+V to open the Add Vector Layer dialog. Select
Directory as Source type. Change the
file type filter Files of type to
‘Arc/Info Binary Coverage’. Navigate to the directory that contains the
coverage file, and select it.
Similarly, you can load directory-based vector files in the UK National Transfer Format, as well as the raw TIGER Format of the US Census Bureau.
Fișiere cu Text Delimitat
Tabular data is a very common and widely used format because of its simplicity and readability – data can be viewed and edited even in a plain text editor. A delimited text file is an attribute table with each column separated by a defined character and each row separated by a line break. The first row usually contains the column names. A common type of delimited text file is a CSV (Comma Separated Values), with each column separated by a comma.
Astfel de fișiere de date pot conține, de asemenea, informații poziționale, în două forme principale:
Ca și coordonate ale punctelor din coloane separate
Ca și reprezentare Well-Known Text (WKT) a unei geometrii
QGIS allows you to load a delimited text file as a layer or ordinal table. But first check that the file meets the following requirements:
Fișierul trebuie să aibă un rând antet delimitat, de nume de câmpuri. Aceasta trebuie să fie prima linie din fișierul text.
Rândul antet trebuie să conțină câmp(urile) cu definiția geometriei. Aceste câmp(uri) pot avea orice nume.
Coordonatele X și Y (dacă geometria este definită prin coordonate) trebuie să fie specificate ca numere. Sistemul de coordonate nu este important.
As an example of a valid text file, we import the elevation point data file
elevp.csv that comes with the QGIS sample dataset (see section
Date eșantion):
X;Y;ELEV
-300120;7689960;13
-654360;7562040;52
1640;7512840;3
[...]
Unele elemente de reținut despre fișierul text:
Exemplul de fișier text folosește
;(punct și virgulă) ca delimitator. Orice caracter poate fi folosit pentru a delimita câmpurile.Primul rând constituie antetul. Acesta conține câmpurile
X,YșiELEV.Nu se folosesc ghilimele (
") pentru delimitarea câmpurilor de text.Coordonatele X sunt conținute în câmpul
X.Coordonatele Y sunt conținute în câmpul
Y.
Încărcarea unui fișier cu texte delimitate
Click the toolbar icon  Add Delimited Text Layer in the
Manage layers toolbar to open the Create a Layer from a
Delimited Text File dialog, as shown in figure_delimited_text_1.
Add Delimited Text Layer in the
Manage layers toolbar to open the Create a Layer from a
Delimited Text File dialog, as shown in figure_delimited_text_1.
Figure Delimited Text 1:
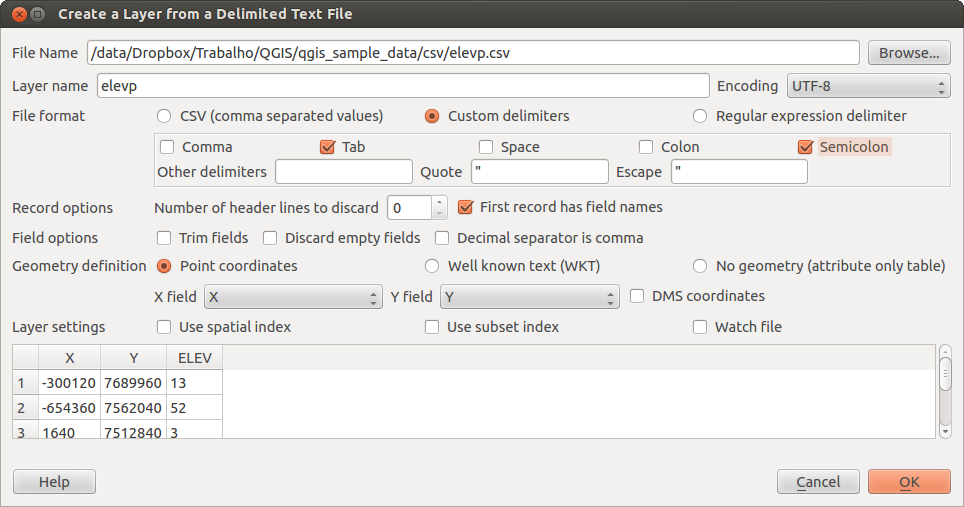
Delimited Text Dialog
First, select the file to import (e.g., qgis_sample_data/csv/elevp.csv)
by clicking on the [Browse] button. Once the file is selected, QGIS
attempts to parse the file with the most recently used delimiter. To enable QGIS to properly parse the
file, it is important to select the correct delimiter. You can specify a
delimiter by activating Custom delimiters, or by activating
Regular expression delimiter and entering
text into the Expression field. For example, to
change the delimiter to tab, use \t (this is a regular expression for the
tab character).
Once the file is parsed, set Geometry definition to
Point coordinates and choose the X and Y
fields from the dropdown lists. If the coordinates are defined as
degrees/minutes/seconds, activate the  DMS coordinates
checkbox.
DMS coordinates
checkbox.
Finally, enter a layer name (e.g., elevp), as shown in
figure_delimited_text_1. To add the layer to the map, click [OK]. The
delimited text file now behaves as any other map layer in QGIS.
There is also a helper option that allows you to trim leading and trailing
spaces from fields — Trim fields. Also, it is possible
to Discard empty fields. If necessary, you can force a comma
to be the decimal separator by activating Decimal separator is
comma.
If spatial information is represented by WKT, activate the
Well Known Text option and select the field with the WKT definition for
point, line or polygon objects. If the file contains non-spatial data, activate
No geometry (attribute only table) and it will be
loaded as an ordinal table.
Additionaly, you can enable:
- Se folosește un index spațial pentru a îmbunătăți performanța afișării și pentru selectarea spațială a entităților.
- Folosește indexul subsetului.
- Watch file to watch for changes to the file by other
applications while QGIS is running.
Date OpenStreetMap
In recent years, the OpenStreetMap project has gained popularity because in many countries no free geodata such as digital road maps are available. The objective of the OSM project is to create a free editable map of the world from GPS data, aerial photography or local knowledge. To support this objective, QGIS provides suppport for OSM data.
Încărcarea Vectorilor OpenStreetMap
QGIS integrates OpenStreetMap import as a core functionality.
- To connect to the OSM server and download data, open the menu
Vector ‣ Openstreetmap ‣ Load data. You can skip this
step if you already obtained an
.osmXML file using JOSM, Overpass API or any other source. - The menu Vector ‣ Openstreetmap ‣ Import topology from
an XML file will convert your
.osmfile into a SpatiaLite database and create a corresponding database connection. - The menu Vector ‣ Openstreetmap ‣ Export topology to
SpatiaLite then allows you to open the database connection, select the type
of data you want (points, lines, or polygons) and choose tags to import.
This creates a SpatiaLite geometry layer that you can add to your
project by clicking on the
 Add SpatiaLite Layer toolbar button or by selecting the
Add SpatiaLite Layer... option
from the Layer menu (see section Straturile SpatiaLite).
Add SpatiaLite Layer toolbar button or by selecting the
Add SpatiaLite Layer... option
from the Layer menu (see section Straturile SpatiaLite).
Straturi PostGIS
PostGIS layers are stored in a PostgreSQL database. The advantages of PostGIS are the spatial indexing, filtering and query capabilities it provides. Using PostGIS, vector functions such as select and identify work more accurately than they do with OGR layers in QGIS.
Crearea unei conexiuni stocate
 The first time you use a PostGIS data source, you must
create a connection to the PostgreSQL database that contains the data. Begin by
clicking on the Add PostGIS Layer toolbar
button, selecting the Add PostGIS Layer...
option from the Layer menu, or typing
The first time you use a PostGIS data source, you must
create a connection to the PostgreSQL database that contains the data. Begin by
clicking on the Add PostGIS Layer toolbar
button, selecting the Add PostGIS Layer...
option from the Layer menu, or typing Ctrl+Shift+D. You
can also open the Add Vector Layer dialog and select
Database. The Add PostGIS Table(s)
dialog will be displayed. To access the connection manager, click on the
[New] button to display the Create a New PostGIS Connection
dialog. The parameters required for a connection are:
Name: Un nume pentru această conexiune. Acesta poate fi identic cu cel al Bazei de Date.
- Service: Service parameter to be used alternatively to hostname/port (and
potentially database). This can be defined in
pg_service.conf. - Host: Name of the database host. This must be a resolvable host name such as would be used to open a telnet connection or ping the host. If the database is on the same computer as QGIS, simply enter ‘localhost’ here.
Port: Numărul portului pe care îl ascultă serverul bazei de date PostgreSQL. Portul implicit este 5432.
Database: Numele bazei de date.
- SSL mode: How the SSL connection will be negotiated with the server. Note
that massive speedups in PostGIS layer rendering can be achieved by disabling
SSL in the connection editor. The following options are available:
Disable: Se încearcă doar o conexiune SSL necriptată.
Allow: Se încearcă o conexiune SSL. Dacă aceasta nu reușește, se încearcă o conexiune non-SSL.
Prefer (implicit): Se încearcă o conexiune SSL. Dacă aceasta nu reușește, se încearcă o conexiune non-SSL.
Require: Se încearcă doar o conexiune SSL.
Username: Numele utilizatorului care va fi utilizat pentru conectarea la o bază de date.
Password: Parola utilizată împreună cu Numele de utilizator pentru conectarea la baza de date.
Opțional, puteți activa următoarele casete:
- Salvare Nume de utilizator
- Salvare Parolă
- Căutare numai în coloanele_de_geometrie ale tabelului
- Nu se rezolvă tipul coloanelor nerestricționate (GEOMETRY)
- Căutare numai în schema ‘public’
- De asemenea, se listează tabelele fără geometrie
- Folosește metadatele tabelei de estimare
După ce s-au setat toți parametrii și toate opțiunile, puteți testa conexiunea, făcând clic pe butonul [Test Connect].
Încărcarea unui strat PostGIS
Once you have one or more connections defined, you can
load layers from the PostgreSQL database. Of course, this requires having data in
PostgreSQL. See section Importarea Datelor în PostgreSQL for a discussion on
importing data into the database.
Pentru a încărca un strat PostGIS, efectuați următorii pași:
- If the Add PostGIS layers dialog is not already open,
selecting the Add PostGIS Layer...
option from the Layer menu or typing
Ctrl+Shift+Dopens the dialog. Alegeți conexiunea din lista verticală și faceți clic pe [Connect].
Selectați sau deselectați
De asemenea, se listează tabelele fără geometrie.- Optionally, use some Search Options to define
which features to load from the layer, or use the [Build query] button
to start the Query builder dialog.
Găsiți strat(urile) pe care doriți să le adăugați în lista de straturi disponibile.
- Select it by clicking on it. You can select multiple layers by holding
down the
Shiftkey while clicking. See section Constructorul de Interogări for information on using the PostgreSQL Query Builder to further define the layer. Clic pe butonul [Add] pentru a adăuga stratul la hartă.
Tip
Straturi PostGIS
Normally, a PostGIS layer is defined by an entry in the geometry_columns table. From version 0.9.0 on, QGIS can load layers that do not have an entry in the geometry_columns table. This includes both tables and views. Defining a spatial view provides a powerful means to visualize your data. Refer to your PostgreSQL manual for information on creating views.
Unele detalii despre straturile PostgreSQL
This section contains some details on how QGIS accesses PostgreSQL layers. Most of the time, QGIS should simply provide you with a list of database tables that can be loaded, and it will load them on request. However, if you have trouble loading a PostgreSQL table into QGIS, the information below may help you understand any QGIS messages and give you direction on changing the PostgreSQL table or view definition to allow QGIS to load it.
QGIS requires that PostgreSQL layers contain a column that can be used as a unique key for the layer. For tables, this usually means that the table needs a primary key, or a column with a unique constraint on it. In QGIS, this column needs to be of type int4 (an integer of size 4 bytes). Alternatively, the ctid column can be used as primary key. If a table lacks these items, the oid column will be used instead. Performance will be improved if the column is indexed (note that primary keys are automatically indexed in PostgreSQL).
If the PostgreSQL layer is a view, the same requirement exists, but views do not have primary keys or columns with unique constraints on them. You have to define a primary key field (has to be integer) in the QGIS dialog before you can load the view. If a suitable column does not exist in the view, QGIS will not load the layer. If this occurs, the solution is to alter the view so that it does include a suitable column (a type of integer and either a primary key or with a unique constraint, preferably indexed).
QGIS offers a checkbox Select at id that is activated by default. This option gets the ids without the attributes which is faster in most cases. It can make sense to disable this option when you use expensive views.
Tip
Se copiază baza de date PostGIS, care conține straturile salvate de QGIS
If you want to make a backup of your PostGIS database using the pg_dump and
pg_restore commands the default layer styles as saved by QGIS are failing to
restore afterwards. You need to set the XML option to DOCUMENT and the
restore will work.
Importarea Datelor în PostgreSQL
Data can be imported into PostgreSQL/PostGIS using several tools, including the SPIT plugin and the command line tools shp2pgsql and ogr2ogr.
DB Manager
QGIS comes with a core plugin named  DB Manager. It can
be used to load shapefiles and other data formats, and it includes support for
schemas. See section Plugin-ul DB Manager for more information.
DB Manager. It can
be used to load shapefiles and other data formats, and it includes support for
schemas. See section Plugin-ul DB Manager for more information.
shp2pgsql
PostGIS includes an utility called shp2pgsql that can be used to import
shapefiles into a PostGIS-enabled database. For example, to import a
shapefile named lakes.shp into a PostgreSQL database named
gis_data, use the following command:
shp2pgsql -s 2964 lakes.shp lakes_new | psql gis_data
This creates a new layer named lakes_new in the gis_data database.
The new layer will have a spatial reference identifier (SRID) of 2964.
See section Lucrul cu Proiecții for more information on spatial
reference systems and projections.
Tip
Exportarea seturilor de date din PostGIS
Like the import tool shp2pgsql, there is also a tool to export PostGIS datasets as shapefiles: pgsql2shp. This is shipped within your PostGIS distribution.
ogr2ogr
Besides shp2pgsql and DB Manager, there is another tool for feeding geodata in PostGIS: ogr2ogr. This is part of your GDAL installation.
Pentru a importa un strat în PostGIS, efectuați următorii pași:
ogr2ogr -f "PostgreSQL" PG:"dbname=postgis host=myhost.de user=postgres
password=topsecret" alaska.shp
This will import the shapefile alaska.shp into the PostGIS database
postgis using the user postgres with the password topsecret on host
server myhost.de.
Note that OGR must be built with PostgreSQL to support PostGIS.
You can verify this by typing (in )
ogrinfo --formats | grep -i post
If you prefer to use PostgreSQL’s COPY command instead of the default
INSERT INTO method, you can export the following environment variable
(at least available on and  ):
):
export PG_USE_COPY=YES
ogr2ogr does not create spatial indexes like shp2pgsl does. You need to create them manually, using the normal SQL command CREATE INDEX afterwards as an extra step (as described in the next section Îmbunătățirea Performanței).
Îmbunătățirea Performanței
Retrieving features from a PostgreSQL database can be time-consuming, especially over a network. You can improve the drawing performance of PostgreSQL layers by ensuring that a PostGIS spatial index exists on each layer in the database. PostGIS supports creation of a GiST (Generalized Search Tree) index to speed up spatial searches of the data (GiST index information is taken from the PostGIS documentation available at http://postgis.refractions.net).
Sintaxa pentru crearea unui index GIST este:
CREATE INDEX [indexname] ON [tablename]
  USING GIST ( [geometryfield] GIST_GEOMETRY_OPS );
Note that for large tables, creating the index can take a long time. Once the
index is created, you should perform a VACUUM ANALYZE. See the PostGIS
documentation (POSTGIS-PROJECT Literatură și Referințe Web) for more information.
Următorul este un exemplu de creare a unui index GIST:
gsherman@madison:~/current$ psql gis_data
Welcome to psql 8.3.0, the PostgreSQL interactive terminal.

Type:  \copyright for distribution terms
       \h for help with SQL commands
       \? for help with psql commands
       \g or terminate with semicolon to execute query
       \q to quit

gis_data=# CREATE INDEX sidx_alaska_lakes ON alaska_lakes
gis_data-# USING GIST (the_geom GIST_GEOMETRY_OPS);
CREATE INDEX
gis_data=# VACUUM ANALYZE alaska_lakes;
VACUUM
gis_data=# \q
gsherman@madison:~/current$
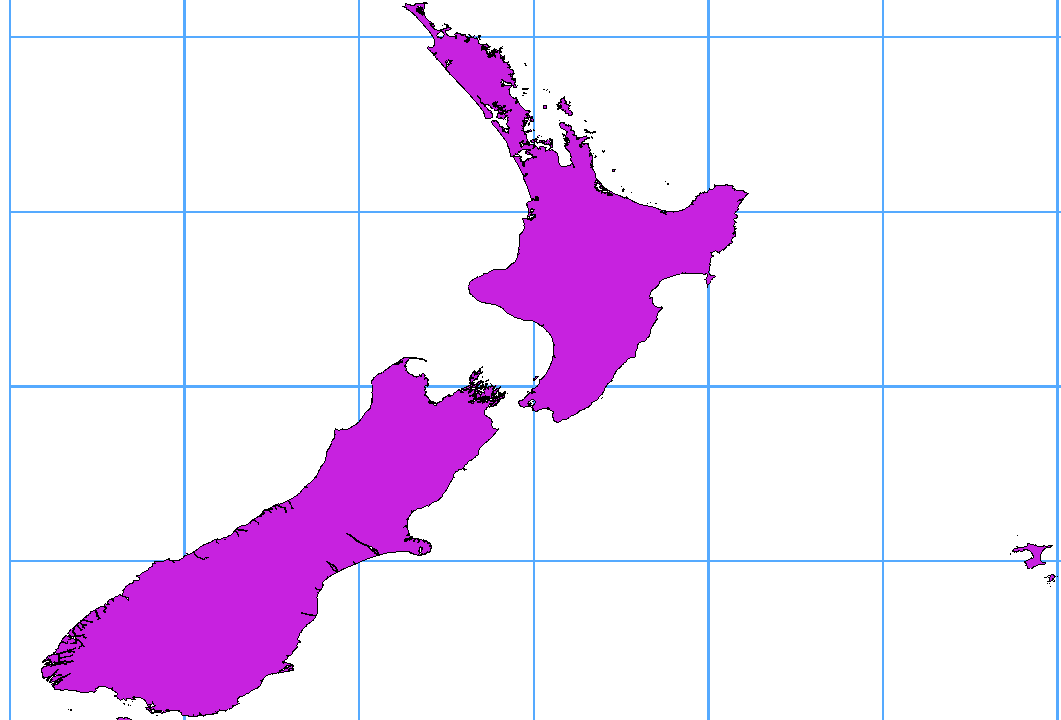
Straturile vectoriale traversează 180 |grade| longitudine
Many GIS packages don’t wrap vector maps with a geographic reference system (lat/lon) crossing the 180 degrees longitude line (http://postgis.refractions.net/documentation/manual-2.0/ST_Shift_Longitude.html). As result, if we open such a map in QGIS, we will see two far, distinct locations, that should appear near each other. In Figure_vector_4, the tiny point on the far left of the map canvas (Chatham Islands) should be within the grid, to the right of the New Zealand main islands.
Figure Vector 4:

Map in lat/lon crossing the 180° longitude line
A work-around is to transform the longitude values using PostGIS and the ST_Shift_Longitude function. This function reads every point/vertex in every component of every feature in a geometry, and if the longitude coordinate is < 0°, it adds 360° to it. The result is a 0° - 360° version of the data to be plotted in a 180°-centric map.
Figure Vector 5:
În cazul trecerii peste 180 |grade| longitudine se aplică funcția ST_Shift_Longitude
Utilizare
Importați datele în PostGIS (Importarea Datelor în PostgreSQL) folosind, de exemplu, plugin-ul DB Manager.
- Use the PostGIS command line interface to issue the following command
(in this example, “TABLE” is the actual name of your PostGIS table):
gis_data=# update TABLE set the_geom=ST_Shift_Longitude(the_geom); - If everything went well, you should receive a confirmation about the number of features that were updated. Then you’ll be able to load the map and see the difference (Figure_vector_5).
Straturile SpatiaLite
The first time you load data from a SpatiaLite
database, begin by clicking on the
Add SpatiaLite Layer toolbar button, or by selecting the
Add SpatiaLite Layer... option
from the Layer menu, or by typing Ctrl+Shift+L.
This will bring up a window that will allow you either to connect to a
SpatiaLite database already known to QGIS, which you can choose from the
drop-down menu, or to define a new connection to a new database. To define a
new connection, click on [New] and use the file browser to point to
your SpatiaLite database, which is a file with a .sqlite extension.
If you want to save a vector layer to SpatiaLite format, you can do this by
right clicking the layer in the legend. Then, click on Save as..,
define the name of the output file, and select ‘SpatiaLite’ as format and the CRS.
Also, you can select ‘SQLite’ as format and then add SPATIALITE=YES in the
OGR data source creation option field. This tells OGR to create a SpatiaLite
database. See also http://www.gdal.org/ogr/drv_sqlite.html.
QGIS also supports editable views in SpatiaLite.
Crearea unui nou strat SpatiaLite
Dacă doriți să creați un nou strat SpatiaLite, vă rugăm să consultați secțiunea Crearea unui nou strat SpatiaLite.
Tip
Plugin-urile de gestionare a datelor SpatiaLite
For SpatiaLite data management, you can also use several Python plugins: QSpatiaLite, SpatiaLite Manager or DB Manager (core plugin, recommended). If necessary, they can be downloaded and installed with the Plugin Installer.
Straturile MSSQL Spatial
 QGIS also provides native MS SQL 2008 support. The first
time you load MSSQL Spatial data, begin by clicking on the
Add MSSQL Spatial Layer toolbar button or by
selecting the Add MSSQL Spatial Layer...
option from the Layer menu, or by typing
QGIS also provides native MS SQL 2008 support. The first
time you load MSSQL Spatial data, begin by clicking on the
Add MSSQL Spatial Layer toolbar button or by
selecting the Add MSSQL Spatial Layer...
option from the Layer menu, or by typing Ctrl+Shift+M.
Straturile Oracle Spatial
The spatial features in Oracle Spatial aid users in managing geographic and location data in a native type within an Oracle database. QGIS now has support for such layers.
Crearea unei conexiuni stocate
 The first time you use an Oracle Spatial data source,
you must create a connection to the database that contains the data. Begin by
clicking on the Add Orcale Spatial Layer toolbar
button, selecting the Add Orcale
Spatial Layer... option from the Layer menu, or typing
The first time you use an Oracle Spatial data source,
you must create a connection to the database that contains the data. Begin by
clicking on the Add Orcale Spatial Layer toolbar
button, selecting the Add Orcale
Spatial Layer... option from the Layer menu, or typing
Ctrl+Shift+O. To access the connection manager, click on the [New]
button to display the Create a New Oracle Spatial Connection dialog.
The parameters required for a connection are:
Name: Un nume pentru această conexiune. Poate fi identic cu cel al Bazei de Date.
Database: SID-ul sau SERVICE_NAME-ul instanței Oracle.
- Host: Name of the database host. This must be a resolvable host name such as would be used to open a telnet connection or ping the host. If the database is on the same computer as QGIS, simply enter ‘localhost’ here.
Port: Numărul portului pe care îl monitorizează serverul bazei de date Oracle. Portul implicit este 1521.
Username: Numele utilizatorului care va fi utilizat pentru conectarea la baza de date.
Password: Parola utilizată împreună cu Numele de utilizator pentru conectarea la baza de date.
Opțional, puteți activa următoarele casete:
- Save Username Indicates whether to save the database
username in the connection configuration.
- Save Password Indicates whether to save the database
password in the connection settings.
- Only look in meta data table Restricts the displayed
tables to those that are in the all_sdo_geom_metadata view. This can speed
up the initial display of spatial tables.
- Only look for user’s tables When searching for spatial
tables, restrict the search to tables that are owned by the user.
- De asemenea, se listează tabelele fără geometrie Indică faptul că, de asemenea, tabelele fără geometrie ar trebui să fie enumerate în mod implicit.
- Use estimated table statistics for the layer metadata
When the layer is set up, various metadata are required for the Oracle table.
This includes information such as the table row count, geometry type and
spatial extents of the data in the geometry column. If the table contains a
large number of rows, determining this metadata can be time-consuming. By
activating this option, the following fast table metadata operations are
done: Row count is determined from
all_tables.num_rows. Table extents are always determined with the SDO_TUNE.EXTENTS_OF function, even if a layer filter is applied. Table geometry is determined from the first 100 non-null geometry rows in the table. - Listează doar tipurile de geometrie existente Va lista doar tipurile de geometrie existente și nu propune adăugarea altora.
După ce s-au setat toți parametrii și toate opțiunile, puteți testa conexiunea, făcând clic pe butonul [Test Connect].
Tip
Securitatea și Setările Utilizatorilor QGIS
Depending on your computing environment, storing passwords in your QGIS settings may be a security risk. Passwords are saved in clear text in the system configuration and in the project files! Your customized settings for QGIS are stored based on the operating system:
- Setările sunt stocate în directorul de casă din
~/.qgis2.  Setările sunt stocate în registru.
Încărcarea Stratului Oracle Spatial
Once you have one or more connections defined, you can
load layers from the Oracle database. Of course, this requires having data in
Oracle.
Pentru a încărca un strat Oracle Spatial, efectuați următorii pași:
- If the Add Oracle Spatial layers dialog is not already open,
click on the Add Oracle Spatial Layer toolbar
button.
Alegeți conexiunea din lista verticală și faceți clic pe [Connect].
Selectați sau deselectați
De asemenea, se listează tabelele fără geometrie.- Optionally, use some Search Options to define
which features to load from the layer or use the [Build query] button
to start the Query builder dialog.
Găsiți strat(urile) pe care doriți să le adăugați în lista de straturi disponibile.
- Select it by clicking on it. You can select multiple layers by holding
down the
Shiftkey while clicking. See section Constructorul de Interogări for information on using the Oracle Query Builder to further define the layer. Clic pe butonul [Add] pentru a adăuga stratul la hartă.
Tip
Straturile Oracle Spatial
În mod normal, un strat Oracle Spatial este definit printr-o intrare în tabela USER_SDO_METADATA.