.
Praca z układami współrzędnych
QGIS allows users to define a global and project-wide CRS (coordinate reference system) for layers without a pre-defined CRS. It also allows the user to define custom coordinate reference systems and supports on-the-fly (OTF) projection of vector and raster layers. All of these features allow the user to display layers with different CRSs and have them overlay properly.
Ogólne wiadomości o obsłudze układów współrzędnych
QGIS has support for approximately 2,700 known CRSs. Definitions for each CRS are stored in a SQLite database that is installed with QGIS. Normally, you do not need to manipulate the database directly. In fact, doing so may cause projection support to fail. Custom CRSs are stored in a user database. See section Układ współrzędnych użytkownika for information on managing your custom coordinate reference systems.
The CRSs available in QGIS are based on those defined by the European Petroleum Search Group (EPSG) and the Institut Geographique National de France (IGNF) and are largely abstracted from the spatial reference tables used in GDAL. EPSG identifiers are present in the database and can be used to specify a CRS in QGIS.
In order to use OTF projection, either your data must contain information about its
coordinate reference system or you will need to define a global, layer or
project-wide CRS. For PostGIS layers, QGIS uses the spatial reference identifier
that was specified when the layer was created. For data supported by OGR, QGIS
relies on the presence of a recognized means of specifying the CRS. In the case
of shapefiles, this means a file containing the well-known text (WKT)
specification of the CRS. This projection file has the same base name as the
shapefile and a .prj extension. For example, a shapefile named
alaska.shp would have a corresponding projection file named
alaska.prj.
Whenever you select a new CRS, the layer units will automatically be
changed in the General tab of the  Project Properties dialog under the Project (Gnome,
OS X) or Settings (KDE, Windows) menu.
Specyfikacja odwzorowań globalnych
QGIS starts each new project using the global default projection. The global
default CRS is EPSG:4326 - WGS 84 (proj=longlat +ellps=WGS84 +datum=WGS84 +no_defs),
and it comes predefined in QGIS. This default can be changed via the
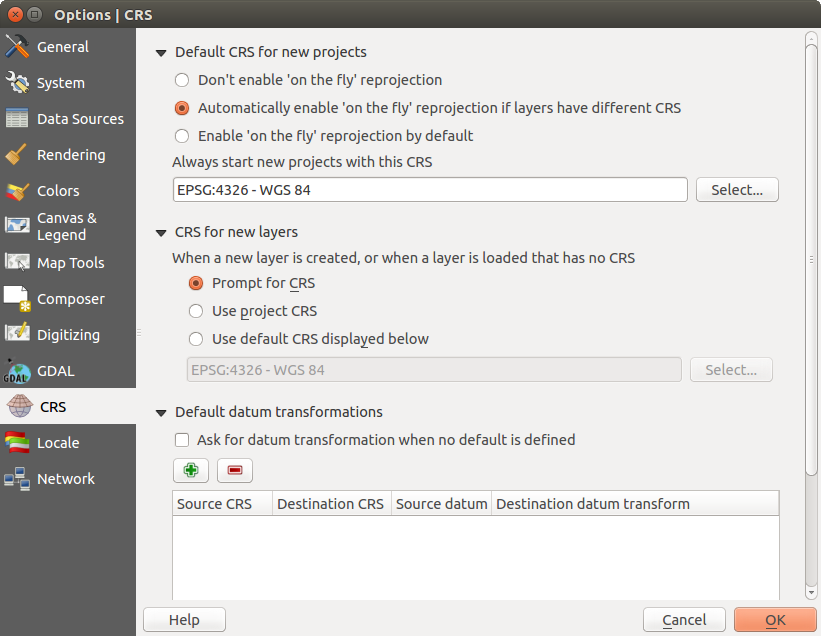
[Select...] button in the first section, which is used to define the default
coordinate reference system for new projects, as shown in
figure_projection_1. This choice will be saved for use in subsequent QGIS
sessions.
Figure Projection 1:
When you use layers that do not have a CRS, you need to define how QGIS
responds to these layers. This can be done globally or project-wide in the
CRS tab under Settings ‣  Options.
Opcje pokazane na figure_projection_1 to:
 Prompt for CRS
 Use project CRS
 Use default CRS displayed below
If you want to define the coordinate reference system for a certain layer without CRS information, you can also do that in the General tab of the raster and vector properties dialog (see General Menu for rasters and General Menu for vectors). If your layer already has a CRS defined, it will be displayed as shown in Vector Layer Properties Dialog .
Wskazówka
Układy współrzędnych w legendzie mapy
Klikając prawym przyciskiem myszy na legendzie mapy (rozdz. Map Legend) uzyskujemy dostęp do dwóch skrótów do układu współrzędnych. Ustaw układ współrzędnych warstwy wyświetla bezpośrednio okno wyboru układu współrzędnych warstwy (zob. figure_projection_2). Ustaw wsp. projektu z warstwy powoduje, że układem projektu staje się układ warstwy.
Włączanie reprojekcji w locie
QGIS supports OTF reprojection for both raster and vector data. However, OTF is
not activated by default. To use OTF projection, you must activate the
 Enable on the fly CRS transformation checkbox in the
CRS tab of the
  Project
Properties dialog.
Można to zrobić na trzy sposoby:
- Select
 Project Properties from the
Project (Gnome, OSX) or Settings (KDE,
Windows) menu.
 Kliknij na ikonie
 Stan CRS z prawej strony paska stanu u dołu ekranu.
Włącz reprojekcję w locie w zakładce Układ współrzędnych okna Opcji i zaznacz pole wyboru
 Domyślnie włącz reprojekcję w locie lub Włącz reprojekcję w locie, jeśli warstwy mają różne układy współrzędnych.
Jeśli już załadowałeś warstwę i chcesz włączyć reprojekcję w locie, najlepiej będzie otworzyć zakładkę Układ współrzędnych w oknie Właściwości Projektu, wybrać jakiś układ, a następnie zaznaczyć pole  Reprojekcja w locie. Od tej chwili ikona
  Stan CRS nie jest już wyszarzona, a wszystkie warstwy są przeliczane do układu wskazanego obok ikony.
Figure Projection 2:
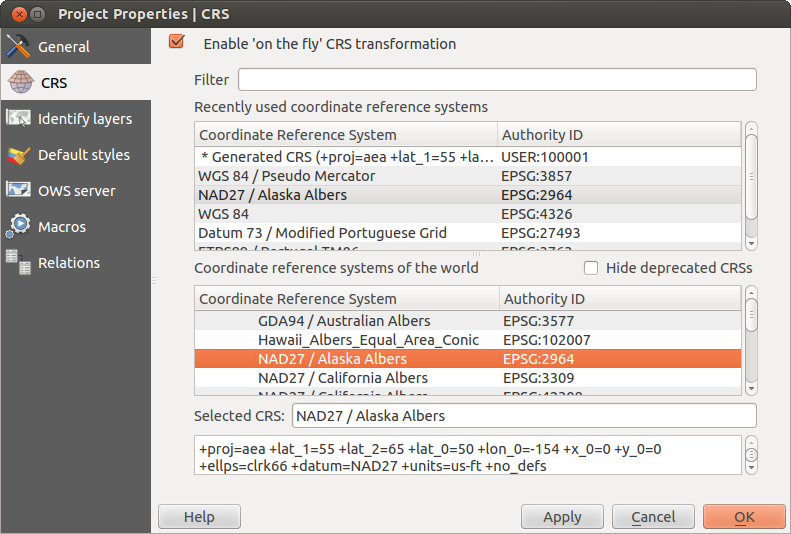
Zakładka Układ współrzędnych okna Właściwości projektu zawiera pięć istotnych składników, jak pokazano na rysunku Figure_projection_2 i opisano poniżej:
Reprojekcja w locie — to pole służy do włączania reprojekcji w locie. Gdy nie jest zaznaczone, każda warstwa rysowana jest przy użyciu układu współrzędnych wczytanego razem z warstwą, a składniki opisane poniżej są nieaktywne. Gdy pole jest zaznaczone, każda warstwa jest przeliczana do układu przypisanego obszarowi mapy.
Filtr — jeśli znasz kod EPSG, identyfikator lub nazwę układu współrzędnych, możesz odnaleźć układ korzystając z wyszukiwarki. Wpisz kod EPSG, identyfikator lub nazwę.
Ostatnio używane układy współrzędnych — jeśli regularnie używasz w swojej pracy pewnych układów współrzędnych, będą one wyświetlone w tabeli. Aby wybrać jakiś układ, kliknij go.
- Coordinate reference systems of the world — This is a list of all CRSs supported by QGIS, including Geographic, Projected and Custom coordinate reference systems. To define a CRS, select it from the list by expanding the appropriate node and selecting the CRS. The active CRS is preselected.
PROJ4 text — jest to ciąg znaków opisujący układ współrzędnych używany przez PROJ4, silnik obsługujący układy. Tekst ten jest tylko do odczytu i jest podany do informacji.
Wskazówka
Okno właściwości projektu
Jeśli otworzyłeś okno Właściwości projektu`z menu :menuselection:`Projekt, żeby zobaczyć ustawienia układu wybierz zakładkę Układ współrzędnych.
Otwarcie okna właściwości za pomocą przycisku  Stan CRS automatycznie wyświetli zakładkę Układ współrzędnych.
Układ współrzędnych użytkownika
If QGIS does not provide the coordinate reference system you need, you can
define a custom CRS. To define a CRS, select  Custom CRS... from the Settings menu. Custom CRSs
are stored in your QGIS user database. In addition to your custom CRSs, this
database also contains your spatial bookmarks and other custom data.
Figure Projection 3:
Defining a custom CRS in QGIS requires a good understanding of the PROJ.4 projection library. To begin, refer to “Cartographic Projection Procedures for the UNIX Environment - A User’s Manual” by Gerald I. Evenden, U.S. Geological Survey Open-File Report 90-284, 1990 (available at ftp://ftp.remotesensing.org/proj/OF90-284.pdf).
This manual describes the use of the proj.4 and related command line
utilities. The cartographic parameters used with proj.4 are described in
the user manual and are the same as those used by QGIS.
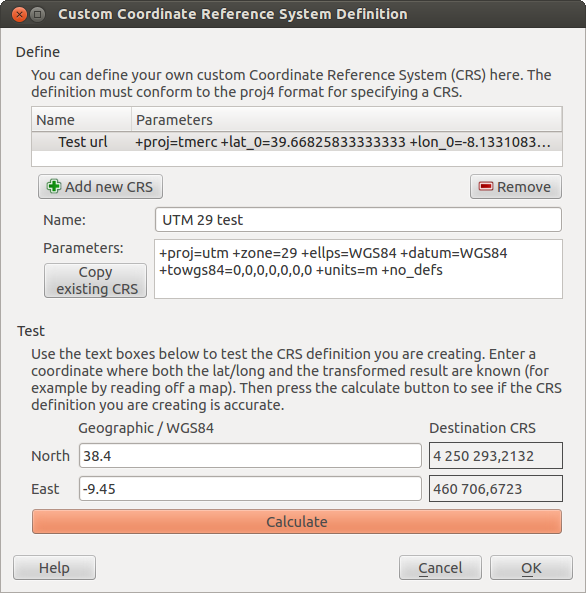
Aby zdefiniować układ użytkownika w oknie Definicji układu współrzędnych użytkownika należy podać jedynie dwa parametry:
nazwę układu
parametry kartograficzne w formacie PROJ.4
To create a new CRS, click the ![]() Add new CRS button and enter a
descriptive name and the CRS parameters.
Add new CRS button and enter a
descriptive name and the CRS parameters.
Zwróć uwagę na to, że aby Parametry właściwie opisywały nowy układ współrzędnych, powinny zaczynać się od bloku +proj=.
Możesz przetestować twój układ i sprawdzić, czy dają rozsądne wyniki. W tym celu wpisz jakieś znane wartości długości i szerokości geograficznej w pola Północ and Wschód. Kliknij [Przelicz] i sprawdź czy otrzymałeś spodziewane wyniki w swoim układzie współrzędnych.
Domyślne transformacje układów odniesienia
OTF depends on being able to transform data into a ‘default CRS’, and QGIS uses WGS84. For some CRS there are a number of transforms available. QGIS allows you to define the transformation used otherwise QGIS uses a default transformation.
In the CRS tab under Settings ‣  Options you can:
- set QGIS to ask you when it needs define a transformation using
 Ask for datum transformation when no default is defined
 zmieniać listę domyślnych transformacji
QGIS asks which transformation to use by opening a dialogue box
displaying PROJ.4 text describing the source and destination
transforms. Further information may be found by hovering over a
transform. User defaults can be saved by selecting
 Remember selection.


