.
投影法の利用方法
QGIS allows users to define a global and project-wide CRS (coordinate reference system) for layers without a pre-defined CRS. It also allows the user to define custom coordinate reference systems and supports on-the-fly (OTF) projection of vector and raster layers. All of these features allow the user to display layers with different CRSs and have them overlay properly.
投影法サポート概要
QGIS has support for approximately 2,700 known CRSs. Definitions for each CRS are stored in a SQLite database that is installed with QGIS. Normally, you do not need to manipulate the database directly. In fact, doing so may cause projection support to fail. Custom CRSs are stored in a user database. See section カスタム空間参照システム for information on managing your custom coordinate reference systems.
The CRSs available in QGIS are based on those defined by the European Petroleum Search Group (EPSG) and the Institut Geographique National de France (IGNF) and are largely abstracted from the spatial reference tables used in GDAL. EPSG identifiers are present in the database and can be used to specify a CRS in QGIS.
In order to use OTF projection, either your data must contain information about its coordinate reference system or you will need to define a global, layer or project-wide CRS. For PostGIS layers, QGIS uses the spatial reference identifier that was specified when the layer was created. For data supported by OGR, QGIS relies on the presence of a recognized means of specifying the CRS. In the case of shapefiles, this means a file containing the well-known text (WKT) specification of the CRS. This projection file has the same base name as the shapefile and a .prj extension. For example, a shapefile named alaska.shp would have a corresponding projection file named alaska.prj.
Whenever you select a new CRS, the layer units will automatically be
changed in the General tab of the  Project Properties dialog under the Project (Gnome,
OS X) or Settings (KDE, Windows) menu.
Project Properties dialog under the Project (Gnome,
OS X) or Settings (KDE, Windows) menu.
グローバル投影法指定
QGIS starts each new project using the global default projection. The global default CRS is EPSG:4326 - WGS 84 (proj=longlat +ellps=WGS84 +datum=WGS84 +no_defs), and it comes predefined in QGIS. This default can be changed via the [Select...] button in the first section, which is used to define the default coordinate reference system for new projects, as shown in figure_projection_1. This choice will be saved for use in subsequent QGIS sessions.
Figure Projection 1:
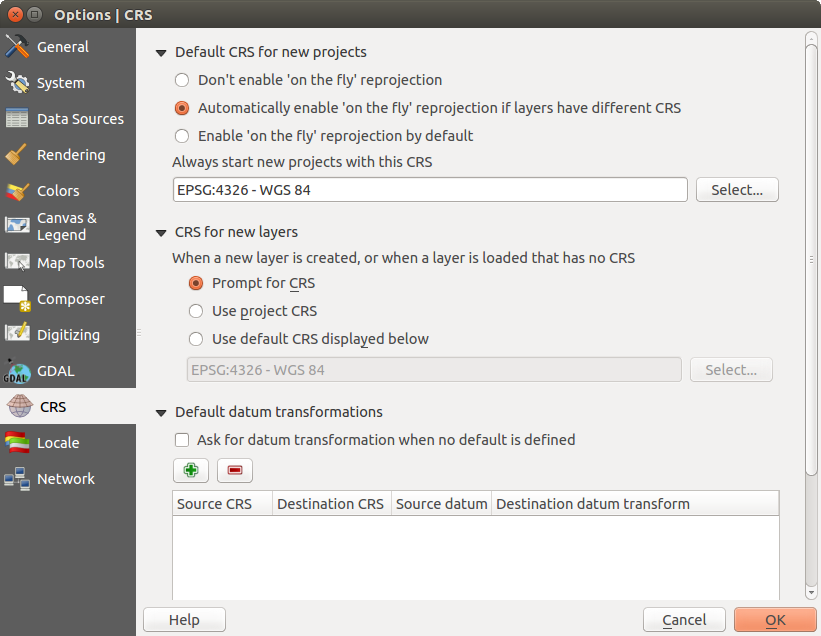
CRS tab in the QGIS Options Dialog 
When you use layers that do not have a CRS, you need to define how QGIS
responds to these layers. This can be done globally or project-wide in the
CRS tab under Settings ‣
Options.
オプションは figure_projection_1 にしめされています:
 Prompt for CRS
 Use project CRS
- Use default CRS displayed below
If you want to define the coordinate reference system for a certain layer without CRS information, you can also do that in the General tab of the raster and vector properties dialog (see 一般情報メニュー for rasters and 一般メニュー for vectors). If your layer already has a CRS defined, it will be displayed as shown in Vector Layer Properties Dialog .
ちなみに
マップ凡例のCRS
地図凡例 (Section Map Legend) でレイヤ名を右ボタンでクリックすると2個のCRSショートカットが表示されます Set layer CRS を選択すると空間参照システム選択ダイアログ ( figure_projection_2 参照) が表示されます. Set project CRS from Layer を選択するとレイヤのCRSを使ってプロジェクトのCRSを再定義します
オンザフライ再投影 (OTF) を定義する
QGIS supports OTF reprojection for both raster and vector data. However, OTF is
not activated by default. To use OTF projection, you must activate the
 Enable on the fly CRS transformation checkbox in the
CRS tab of the
Enable on the fly CRS transformation checkbox in the
CRS tab of the  Project
Properties dialog.
Project
Properties dialog.
これを実行する方法は3つあります:
- Select Project Properties from the
Project (Gnome, OSX) or Settings (KDE,
Windows) menu.
ステータスバーの右下角にある
 CRS ステータス アイコンをクリックして下さい.
Options ダイアログの CRS タブにてOTFをデフォルトに変更するには、
デフォルトで’オンザフライ’再投影を可能にする または もしレイヤが異なるCRSをもつ場合、自動で’オンザフライ’投影変換を有効にする を選択します。
もしレイヤをすでにロードしていてOTFプロジェクションを有効にしたい場合,最良の方法は Project Properties メニューの Coordinate Reference System ダイアログを開いて, CRSを選択して, Enable on the fly CRS transformation チェックボックスをアクティブにすることです. そうすると CRS status アイコンはグレイアウトしていなくて すべてのレイヤがアイコンの隣にあるCRSに OTF 投影されます.
Figure Projection 2:
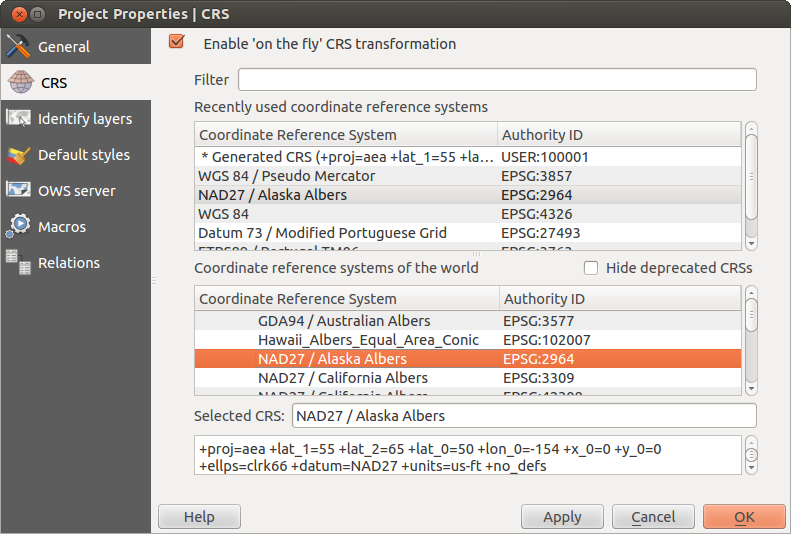
Project Properties Dialog
The CRS tab of the Project Properties dialog contains five important components, as shown in Figure_projection_2 and described below:
オンザフライCRS変換を有効にする — このチェックボックスは OTF プロジェクションの有効,無効を設定できます. オフの場合それぞれのレイヤはデータソースから読み込まれた座標で描画され以下のコンポーネントは無効になります. オンの場合それぞれのレイヤの座標はマップキャンバス用に定義された空間参照システムに投影されます.
フィルター — もしあなたが 利用したい空間参照システムのEPSG コードの識別子または名前を知っている場合, 検索機能を使ってそれを見つけることができます EPSG コードの識別子,または名前を入力して下さい.
最近利用した座標参照系 — 日常のGISでの作業でよく使うCRSがあるなら,このリストに表示されます.これらのひとつをクリックすると,CRSを選択できます。
- Coordinate reference systems of the world — This is a list of all CRSs supported by QGIS, including Geographic, Projected and Custom coordinate reference systems. To define a CRS, select it from the list by expanding the appropriate node and selecting the CRS. The active CRS is preselected.
PROJ.4 text — 投影変換エンジンであるPROJ.4で使われるCRS文字列です.この文字列は読み取り専用で,情報提供のために提供されます.
ちなみに
プロジェクトプロパティダイアログ
Project メニューの Project Properties ダイアログを開いて CRS タブをクリックすると CRS の設定を見ることができます.
CRS ステータス アイコンからダイアログを開くと自動的に 座標参照系 タブが前面に表示されます。
カスタム空間参照システム
If QGIS does not provide the coordinate reference system you need, you can
define a custom CRS. To define a CRS, select  Custom CRS... from the Settings menu. Custom CRSs
are stored in your QGIS user database. In addition to your custom CRSs, this
database also contains your spatial bookmarks and other custom data.
Custom CRS... from the Settings menu. Custom CRSs
are stored in your QGIS user database. In addition to your custom CRSs, this
database also contains your spatial bookmarks and other custom data.
Figure Projection 3:

Custom CRS Dialog
Defining a custom CRS in QGIS requires a good understanding of the PROJ.4 projection library. To begin, refer to “Cartographic Projection Procedures for the UNIX Environment - A User’s Manual” by Gerald I. Evenden, U.S. Geological Survey Open-File Report 90-284, 1990 (available at ftp://ftp.remotesensing.org/proj/OF90-284.pdf).
This manual describes the use of the proj.4 and related command line utilities. The cartographic parameters used with proj.4 are described in the user manual and are the same as those used by QGIS.
The Custom Coordinate Reference System Definition dialog requires only two parameters to define a user CRS:
記述可能な名称
PROJ.4書式による地図作成パラメータ.
To create a new CRS, click the  Add new CRS button and enter a
descriptive name and the CRS parameters.
Add new CRS button and enter a
descriptive name and the CRS parameters.
注 新しいCRSを表現するには、 パラメータは +proj= -ブロックで開始されていなければいけません。
まともな結果が得られるかを見ることで、CRSパラメータをテストできます。これを行うには、知っているWGS84緯度経度の値を North 、 East フィールドにそれぞれ入力します。 [計算 ] をクリックして、出てきた結果と、定義したCRSでの知っている値とを比較します。
デフォルト datum 変換
OTF depends on being able to transform data into a ‘default CRS’, and QGIS uses WGS84. For some CRS there are a number of transforms available. QGIS allows you to define the transformation used otherwise QGIS uses a default transformation.
In the CRS tab under Settings ‣
Options you can:
- set QGIS to ask you when it needs define a transformation using Ask for datum transformation when no default is defined
変換のユーザーデフォルトリストの編集.
QGIS asks which transformation to use by opening a dialogue box
displaying PROJ.4 text describing the source and destination
transforms. Further information may be found by hovering over a
transform. User defaults can be saved by selecting
Remember selection.