.
QGIS Configuration
QGIS is highly configurable through the Settings menu. Choose between Panels, Toolbars, Project Properties, Options and Customization.
ノート
QGIS follows desktop guidelines for the location of options and project properties item. Consequently related to the OS you are using, location of some of items described above could be located in the View menu (Panels and Toolbars) or in Project for Options.
Panels and Toolbars
In the Panels‣ menu, you can switch on and off QGIS widgets. The Toolbars‣ menu provides the possibility to switch on and off icon groups in the QGIS toolbar (see figure_panels_toolbars).
Figure Panels and Toolbars:
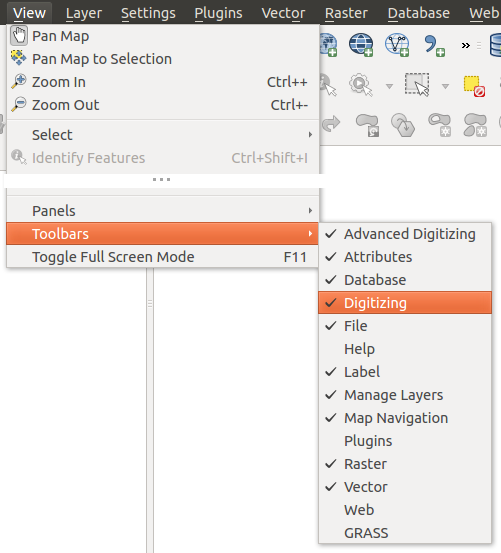
The Panels and Toolbars menu 
ちなみに
Activating the QGIS Overview
In QGIS, you can use an overview panel that provides a full extent view of
layers added to it. It can be selected under the menu Settings ‣ Panels or
 View ‣ Panels. Within the view is a rectangle showing the
current map extent. This allows you to quickly determine which area of the
map you are currently viewing. Note that labels are not rendered to the map
overview even if the layers in the map overview have been set up for
labeling. If you click and drag the red rectangle in the overview that shows
your current extent, the main map view will update accordingly.
View ‣ Panels. Within the view is a rectangle showing the
current map extent. This allows you to quickly determine which area of the
map you are currently viewing. Note that labels are not rendered to the map
overview even if the layers in the map overview have been set up for
labeling. If you click and drag the red rectangle in the overview that shows
your current extent, the main map view will update accordingly.
ちなみに
Show Log Messages
It’s possible to track the QGIS messages. You can activate
 Log Messages in the menu
Settings ‣ Panels or
View ‣ Panels and follow the messages
that appear in the different tabs during loading and operation.
Log Messages in the menu
Settings ‣ Panels or
View ‣ Panels and follow the messages
that appear in the different tabs during loading and operation.
プロジェクトのプロパティ
In the properties window for the project under
Settings ‣ Project Properties (kde) or
Project ‣ Project Properties (Gnome), you can set
project-specific options. These include:
- In the General menu, the project title, selection and background color, layer units, precision, and the option to save relative paths to layers can be defined. If the CRS transformation is on, you can choose an ellipsoid for distance calculations. You can define the canvas units (only used when CRS transformation is disabled) and the precision of decimal places to use. You can also define a project scale list, which overrides the global predefined scales.
- The CRS menu enables you to choose the Coordinate Reference System for this project, and to enable on-the-fly re-projection of raster and vector layers when displaying layers from a different CRS.
- With the third Identify layers menu, you set (or disable) which layers will respond to the identify tool (see the “Map tools” paragraph from the オプション section to enable identifying of multiple layers).
- The Default Styles menu lets you control how new layers will be drawn when they do not have an existing .qml style defined. You can also set the default transparency level for new layers and whether symbols should have random colours assigned to them. There is also an additional section where you can define specific colors for the running project. You can find the added colors in the drop down menu of the color dialog window present in each renderer.
- The tab OWS Server allows you to define information about the QGIS Server WMS and WFS capabilities, extent and CRS restrictions.
マクロ メニューはPythonマクロの編集のために使います. 現時点では: openProject(), saveProject() そして closeProject() の3つのマクロのみ使用可能です.

Macro settings in QGIS
- The Relations menu is used to define 1:n relations. The relations are defined in the project properties dialog. Once relations exist for a layer, a new user interface element in the form view (e.g. when identifying a feature and opening its form) will list the related entities. This provides a powerful way to express e.g. the inspection history on a length of pipeline or road segment. You can find out more about 1:n relations support in Section Creating one to many relations.
オプション
 Some basic options for QGIS can be selected using the
Options dialog. Select the menu option Settings ‣
Options. The tabs where you can customize your
options are described below.
Some basic options for QGIS can be selected using the
Options dialog. Select the menu option Settings ‣
Options. The tabs where you can customize your
options are described below.
一般情報メニュー
アプリケーション
- Select the Style (QGIS restart required)
 and choose
between ‘Oxygen’,’Windows’,’Motif’,’CDE’, ‘Plastique’ and ‘Cleanlooks’ ().
and choose
between ‘Oxygen’,’Windows’,’Motif’,’CDE’, ‘Plastique’ and ‘Cleanlooks’ (). - Define the Icon theme . Currently only ‘default’ is
possible.
- Define the Icon size .
- Define the Font. Choose between
 Qt default and a user-defined font.
 - Change the Timeout for timed messages or dialogs .
- 起動時のスプラッシュスクリーンを隠す
- 起動時にチップスを表示する
- グループボックスのタイトルを太字にする
- QGISスタイルのグループボックス
- Use native color chooser dialogs
- Use live-updating color chooser dialogs
- Custom side bar style
- Experimental canvas rotation support (restart required)
プロジェクトファイル
- Open project on launch (choose between ‘New’,
‘Most recent’ and ‘Specific’). When choosing ‘Specific’ use the
 to define a project.
 - 既定のプロジェクトから新プロジェクトを作成する. 現在のプロジェクトを既定プロジェクトとして指定する または 既定を解除 ボタンをクリックすることができます. またユーザが作成したプロジェクトテンプレートをファイルやディレクトリを指定するとブラウズすることができます. プロジェクト ‣ テンプレートをもとに新規作成 というエントリでそれができます.プロジェクトテンプレートを保存したい場合は最初に 既定のプロジェクトから新プロジェクトを作成する をアクティブにしてプロジェクトテンプレートフォルダーにプロジェクトを保存してください.
- 必要に応じプロジェクトとデータソースの変更の保存を促す
- Prompt for confirmation when a layer is to be removed
- QGISの旧バージョンで保存したプロジェクトファイルを開く際に警告する
- Enable macros . This option was created to handle
macros that are written to perform an action on project events. You can
choose between ‘Never’, ‘Ask’, ‘For this session only’ and
‘Always (not recommended)’.
システムメニュー
環境
System environment variables can now be viewed, and many configured, in the Environment group (see figure_environment_variables). This is useful for platforms, such as Mac, where a GUI application does not necessarily inherit the user’s shell environment. It’s also useful for setting and viewing environment variables for the external tool sets controlled by the Processing toolbox (e.g., SAGA, GRASS), and for turning on debugging output for specific sections of the source code.
- Use custom variables (restart required - include separators).
You can [Add] and [Remove] variables. Already-defined environment
variables are displayed in Current environment variables, and it’s
possible to filter them by activating
Show only QGIS-specific variables.
Figure System Environment:

System environment variables in QGIS
プラグインパス
[Add] or [Remove] Path(s) to search for additional C++ plugin libraries
データソースメニュー
地物属性とテーブル
- ドックウィンドウで属性テーブルを開く(QGISの再起動が必要)‘
- Copy geometry in WKT representation from attribute
table. When using
 Copy selected rows to
clipboard from the Attribute table dialog, this has the
result that the coordinates of points or vertices are also copied to the
clipboard.
Copy selected rows to
clipboard from the Attribute table dialog, this has the
result that the coordinates of points or vertices are also copied to the
clipboard. - Attribute table behaviour . There are three
possibilities: ‘Show all features’, ‘Show selected features’ and ‘Show
features visible on map’.
- Attribute table row cache
 . This row cache makes
it possible to save the last loaded N attribute rows so that working with the
attribute table will be quicker. The cache will be deleted when closing the
attribute table.
. This row cache makes
it possible to save the last loaded N attribute rows so that working with the
attribute table will be quicker. The cache will be deleted when closing the
attribute table. - Representation for NULL values. Here, you can define a value for data fields containing a NULL value.
データソースの操作
- Scan for valid items in the browser dock . You can
choose between ‘Check extension’ and ‘Check file contents’.
- Scan for contents of compressed files (.zip) in browser dock
. ‘No’, ‘Basic scan’ and ‘Full scan’ are possible.
- Prompt for raster sublayers when opening. Some rasters support
sublayers — they are called subdatasets in GDAL. An example is netCDF files
— if there are many netCDF variables, GDAL sees every variable as a
subdataset. The option allows you to control how to deal with sublayers when a file
with sublayers is opened. You have the following choices:
‘常に’:毎回確認 (サブレイヤが存在する場合)
‘必要な場合’:バンドがなくサブレイヤをもつかを尋ねます
‘利用しない’:確認せず何もロードしません
‘‘すべてをロード’:確認せず,すべてのサブレイヤをロードします
- Ignore shapefile encoding declaration. If a shapefile
has encoding information, this will be ignored by QGIS.
- Add PostGIS layers with double click and select in
extended mode
- ダブルクリックでOracleレイヤを追加する.拡張選択モードを利用する
レンダリングメニュー
Rendering behaviour
- 地図に新しくレイヤを追加した際にそのレイヤが表示されることをデフォルトにする
- 再描画の速度を上げられる場合にレンダのキャッシュを利用します
- Render layers in parallel using many CPU cores
- Max cores to use
- Map update interval (default to 250 ms)
- Enable feature simplication by default for newly added layers
- Simplification threshold
- 可能であればプロバイダ側で簡素化
- Maximum scale at which the layer should be simplified
描画品質
- 線のジャギーを目立たなくします(描画パフォーマンスが低下します)
ラスタ
- With RGB band selection, you can define the number for the Red, Green and Blue band.
Contrast enhancement
- Single band gray . A single band gray can have
‘No stretch’, ‘Stretch to MinMax’, ‘Stretch and Clip to MinMax’ and also
‘Clip to MinMax’.
- Multi band color (byte/band) . Options are ‘No stretch’,
‘Stretch to MinMax’, ‘Stretch and Clip to MinMax’ and ‘Clip to MinMax’.
- Multi band color (>byte/band) . Options are ‘No stretch’,
‘Stretch to MinMax’, ‘Stretch and Clip to MinMax’ and ‘Clip to MinMax’.
- Limits (minimum/maximum) . Options are
‘Cumulative pixel count cut’, ‘Minimum/Maximum’, ‘Mean +/- standard deviation’.
累積ピクセル数のカット制限
標準偏差の乗数
デバッグ
- マップキャンバスリフレッシュ
キャンバスと凡例のメニュー
デフォルトのマップ外観(プロジェクトプロパティを上書きします)
- Define a Selection color and a Background color.
レイヤの凡例
- Double click action in legend . You can either
‘Open layer properties’ or ‘Open attribute table’ with the double click.
以下の 凡例アイテムスタイル は利用可能です
- レイヤ名の最初を大文字にする
- レイヤ名を太字にする
- グループ名を太字にする
- 分類の属性名称を表示する
- ラスタアイコンの作成(多分遅い)
マップツールズメニュー
This menu offers some options regarding the behaviour of the Identify tool.
- Search radius for identifying and displaying map tips is a tolerance factor expressed as a percentage of the map width. This means the identify tool will depict results as long as you click within this tolerance.
- Highlight color allows you to choose with which color should features being identified are to be highlighted.
- Buffer expressed as a percentage of the map width, determines a buffer distance to be rendered from the outline of the identify highlight.
- Minimum width expressed as a percentage of the map width, determines how thick should the outline of a highlighted object be.
計測ツール
計測ツールの ラバーバンド色 を定義します。
Define 小数位
- Keep base unit
- Preferred measurements units (‘Meters’, ‘Feet’, ‘Nautical Miles’ or ‘Degrees’)`
- Preferred angle units (‘Degrees’, ‘Radians’ or ‘Gon’)
パンとズーム
- Define Mouse wheel action (‘Zoom’, ‘Zoom and recenter’,
‘Zoom to mouse cursor’, ‘Nothing’)
ホイールマウスの ズーム倍率 の定義
定義済み縮尺
Here, you find a list of predefined scales. With the [+] and [-] buttons you can add or remove your individual scales.
コンポーザメニュー
コンポジションデフォルト
You can define the Default font here.
グリッドの外観
- Define the Grid style (‘Solid’, ‘Dots’, ‘Crosses’)
- Define the Grid color
Grid and guide defaults
- Define the Grid spacing
- Define the Grid offset for x and y
- Define the Snap tolerance
デジタイズメニュー
地物の作成
- 地物作成後のポップアップ属性入力を行わない
- 最後に入力した値を再利用する
- Validate geometries. Editing complex lines and polygons with many nodes can result in very slow rendering. This is because the default validation procedures in QGIS can take a lot of time. To speed up rendering, it is possible to select GEOS geometry validation (starting from GEOS 3.3) or to switch it off. GEOS geometry validation is much faster, but the disadvantage is that only the first geometry problem will be reported.
ラバーバンド
ラバーバンドの 線幅 と 線色 を指定して下さい
スナップ
- ドックウィンドウ内でスナップオプションを開く (QGIS の再起動が必要)
- Define Default snap mode (‘To vertex’, ‘To segment’,
‘To vertex and segment’, ‘Off’)
- Define Default snapping tolerance in map units or pixels
- Define the Search radius for vertex edits in map units or pixels
頂点マーカー
- 選択された地物のみマーカーを表示する
- Define vertex Marker style (‘Cross’ (default), ‘Semi
transparent circle’ or ‘None’)
頂点の マーカーの大きさ を指定して下さい
カーブオフセットツール
The next 3 options refer to the  Offset Curve tool
in 高度なデジタイジング. Through the various settings, it is possible to
influence the shape of the line offset. These options are possible starting from GEOS 3.3.
Offset Curve tool
in 高度なデジタイジング. Through the various settings, it is possible to
influence the shape of the line offset. These options are possible starting from GEOS 3.3.
結合スタイル
- Quadrant segments
継ぎ目制限
CRSメニュー
新プロジェクトの既定の投影座標系
 Don’t enable ‘on the fly’ reprojection
- Automatically enable ‘on the fly’ reprojection if
layers have different CRS
- Enable ‘on the fly’ reprojection by default
CRS の選択と 新しいプロジェクトは常にこの CRSで開始する
新しいレイヤの投影座標系
このエリアでは新しいレイヤが作成された場合、またはCRSのないレイヤが読み込まれた場合に、実行するアクションを定義することができます。
- Prompt for CRS
- Use project CRS
- Use default CRS
デフォルト datum 変換
- デフォルトが定義されていないときにデータム変換をするかどうか問いかける
- If you have worked with the ‘on-the-fly’ CRS transformation you can see the result of the transformation in the window below. You can find information about ‘Source CRS’ and ‘Destination CRS’ as well as ‘Source datum transform’ and ‘Destination datum transform’.
ロケールメニュー
- システムロケールを上書きする と 代わりに利用するロケール
有効なシステムロケールについての情報
ネットワークメニュー
一般情報
- Define WMS search address, default is http://geopole.org/wms/search?search=\%1\&type=rss
- Define Timeout for network requests (ms) - default is 60000
Default expiration period for WMSC/WMTS tiles (hours) を定義して下さい- デフォルトは 24です
- Define Max retry in case of tile request errors
- Define User-Agent
Figure Network Tab:
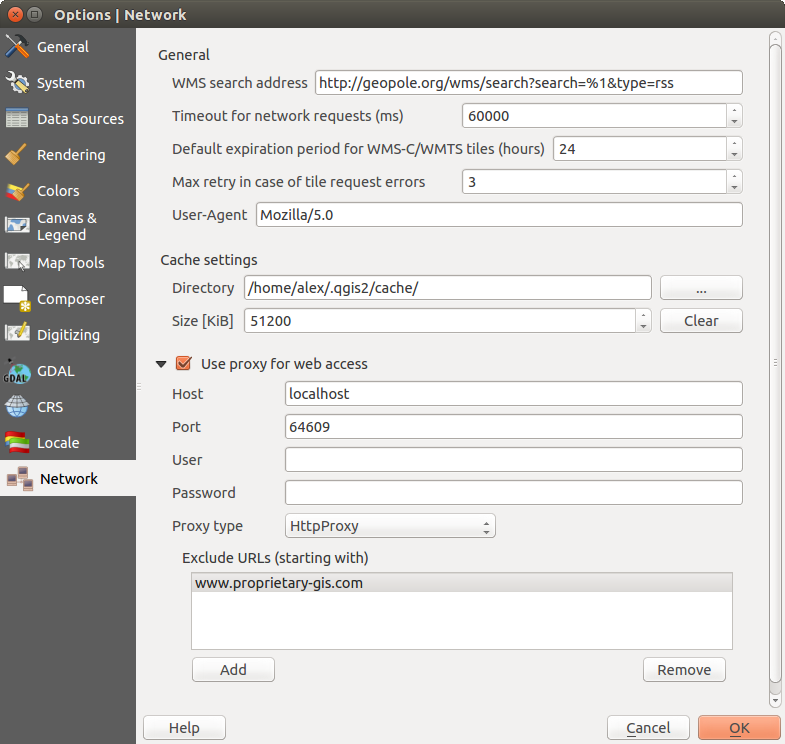
Proxy-settings in QGIS
キャッシュ設定
キャッシュのための ディレクトリ と サイズ の指定.
- Web接続にプロキシを使用する と ‘ホスト’, ‘ポート’, ‘ユーザ’, と ‘パスワード’ の指定.
- Set the Proxy type according to your needs.
Default Proxy: プロキシはアプリケーションのプロキシ設定によって決まります
Socks5Proxy: あらゆる種類の接続に対応した一般的なプロキシ. TCP, UDP, ポートへのバインディング (入力コネクション) と認証をサポートします.
HttpProxy: “CONNECT” コマンドを実装しています, 外向きの TCP コネクションのみサポートしています; 認証をサポートしています.
- HttpCachingProxy: Implemented using normal HTTP commands, it is useful only in the context of HTTP requests.
- FtpCachingProxy: Implemented using an FTP proxy, it is useful only in the context of FTP requests.
プロキシ設定の下のテキストボックスに除外するいくつかのURLを追加できます( Figure_Network_Tab 参照).
If you need more detailed information about the different proxy settings, please refer to the manual of the underlying QT library documentation at http://doc.trolltech.com/4.5/qnetworkproxy.html#ProxyType-enum.
ちなみに
プロキシの利用
Using proxies can sometimes be tricky. It is useful to proceed by ‘trial and error’ with the above proxy types, to check to see if they succeed in your case.
You can modify the options according to your needs. Some of the changes may require a restart of QGIS before they will be effective.
- Settings are saved in a text file: $HOME/.config/QGIS/QGIS2.conf
 $HOME/Library/Preferences/org.qgis.qgis.plist で設定を見つけることができます。
- 設定は以下のレジストリに保存されます: HKEY\CURRENT_USER\Software\QGIS\qgis
カスタマイゼーション
The customization tool lets you (de)activate almost every element in the QGIS user interface. This can be very useful if you have a lot of plugins installed that you never use and that are filling your screen.
Figure Customization 1:
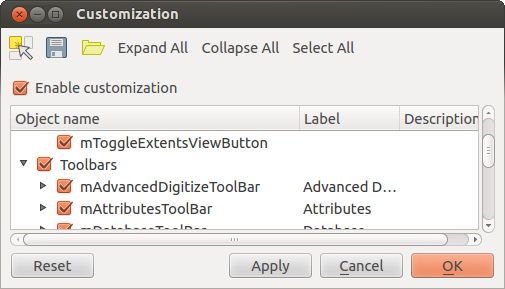
The Customization dialog
QGIS Customization is divided into five groups. In Menus,
you can hide entries in the Menu bar. In Panels, you
find the panel windows. Panel windows are applications that can be started and
used as a floating, top-level window or embedded to the QGIS main window as a
docked widget (see also Panels and Toolbars). In the
Status Bar, features like the coordinate information can be
deactivated. In Toolbars, you can (de)activate the
toolbar icons of QGIS, and in Widgets, you can (de)activate
dialogs as well as their buttons.
With  Switch to catching widgets in main application, you
can click on elements in QGIS that you want to be hidden and find the corresponding
entry in Customization (see figure_customization). You can also save your
various setups for different use cases as well. Before your changes
are applied, you need to restart QGIS.
Switch to catching widgets in main application, you
can click on elements in QGIS that you want to be hidden and find the corresponding
entry in Customization (see figure_customization). You can also save your
various setups for different use cases as well. Before your changes
are applied, you need to restart QGIS.