번역 지침
This manual is aiming to help the translator. First the general process of how technically a translation is done is explained. Later the translation is explained from an actual English rst document that is translated to Dutch. Finally a summary of Rules of translation is given.
참고
이 지침들이 QGIS 문서에 중점을 두고 있긴 하지만, 다음 절부터 설명하는 방법 및 규칙은 QGIS 응용 프로그램이나 웹사이트 번역에도 적용할 수 있습니다.
번역 과정
QGIS Documentation is written in English with .rst files.
In order to provide translations:
A prebuild script creates translation files named
.pofiles for the English language in the folder/QGIS-Documentation/i18n/en.These 《originals》 are then copied by the script to the
i18nfolders for other languages.The sentences in the
.pofiles are pushed to the Transifex web platform, and made available for translators who can begin to translate from English to their language with the editor.At the end of the day, a script pulls back all validated translations
At the next build of the documentation (which occurs at least once a day), a script reuses the sentences to create translated output
When afterwards an
.rstdocument is updated a new.pofile is created in the English part. The contents of this new file will be merged with already existing.pofiles for each language. This means that when a new line is added to an.rstdocument that was already translated, only the new/updated sentences are added in the translated.pofile and needs to be translated. The amount of work for updating translations for next release should be relatively small.
참고
The process above is the same followed to translate QGIS website, QGIS
Desktop and QGIS Server. The difference with the applications is that instead
of .po files, all the translatable strings in the .py,
.cpp, .yaml and others… files that shape the application are
pushed to and pulled from transifex as a single .ts file.
현재 QGIS를 번역하는 데 쓰이는 도구는 두 가지입니다.
The Transifex web platform, the easiest and recommended way to translate QGIS, transparently does the process described above and pulls all the translatable texts in one place for the translator. Just pick the files you want and translate. Translated files are stored in the platform until another release is pushed.
Qt Linguist, a Qt development tool, requires the translator to pull locally the
.po(or.ts) files from the source code, translate and then push back.
어떤 도구를 선택하든, 번역 규칙은 동일하다는 사실을 명심하십시오.
파일 번역
어떻게 번역 작업을 해야 하는지 설명하기 위해, 열지도 플러그인을 예시로 이용하겠습니다. 이 예시를 영어에서 네덜란드 어로 번약할 텐데, 모든 언어의 다른 문서를 번역할 때도 실질적으로 동일합니다.
문서의 소스를 다음 위치에서 찾을 수 있습니다.
QGIS-Documentation/source/docs/user_manual/plugins/plugins_heatmap.rst
어째서 이 문서를 예시로 선택했을까요?
It includes images, captions, headers, references and replacements.
내가 직접 작성했으니 번역하기도 쉽기 때문이지요 ;-)
The build process has created the English .po file which can be found here:
QGIS-Documentation/i18n/en/LC_MESSAGES/docs/user_manual/plugins/plugins_heatmap.po
The equivalent Dutch .po file (basically a copy) can be found here:
QGIS-Documentation/i18n/nl/LC_MESSAGES/docs/user_manual/plugins/plugins_heatmap.po
Along this file you will see a tiny .mo file which indicates that it
does not hold any translations yet.
Transifex로 번역
In order to translate using Transifex, you need to:
Once you are part of a language team, click on the corresponding project (in this case
QGIS Documentation). A list of available languages with their ratio of translation is displayed.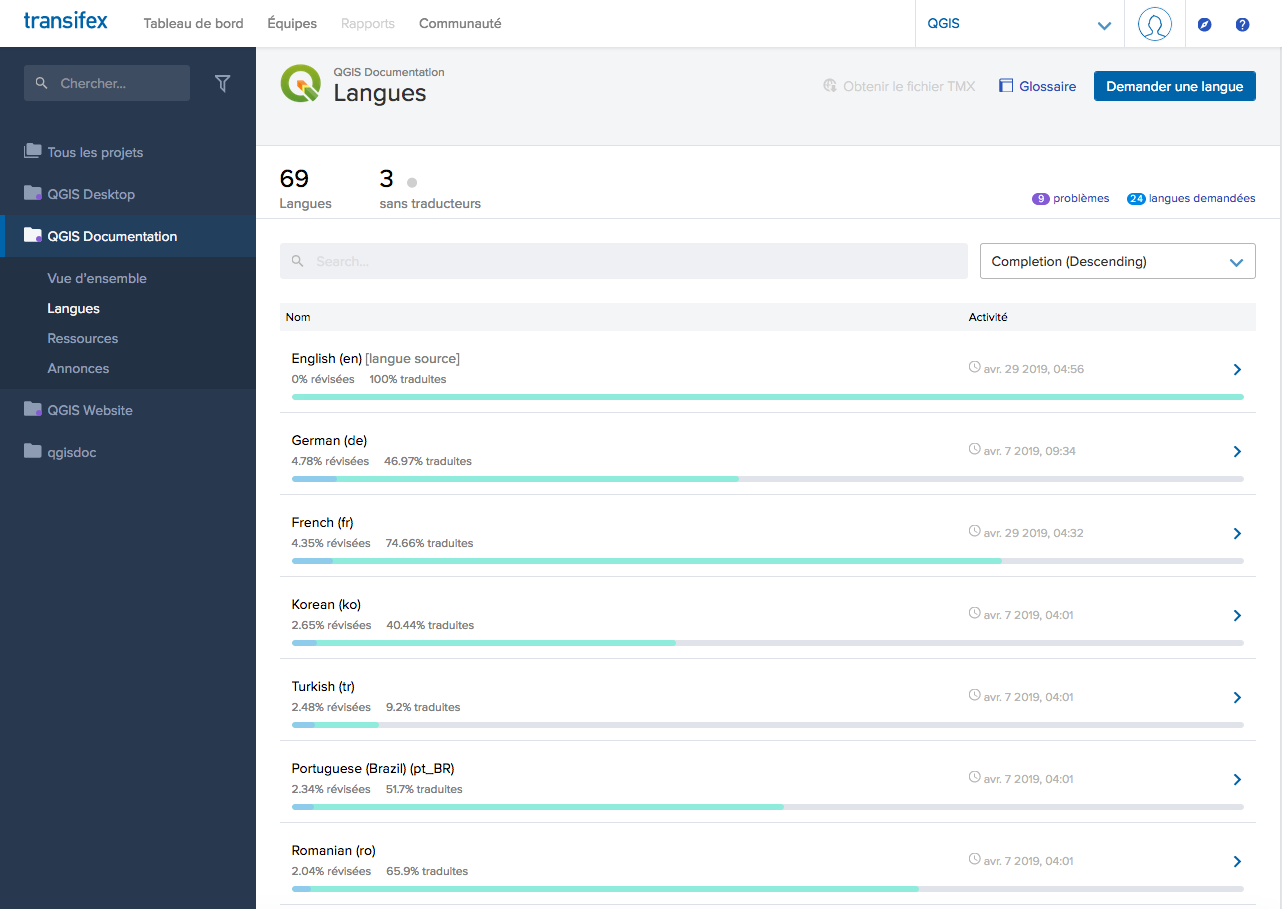
Select language for translation in the Transifex menu
Hover over your language and click either:
View resources: translatable
.pofiles with their ratio of translation, number of strings and some more metadata are now displayed.or Translate: opens the interface of translation with all the available
.pofiles
Identify the file you’d like to translate (in our case we are looking for the
docs_user-manual_plugins_plugins-heatmap, the heatmap plugin file) or any unfinished file and click on it: strings in the files are loaded and you can use the interface to filter, translate, suggest translation…팁
For the documentation or the website, clicking the
Fix melink in the footer of a page brings you directly to its corresponding translation page in Transifex.All you need to do is select each text and translate following the guidelines.
For further information on the use of Transifex Web Editor, see https://docs.transifex.com/translation/translating-with-the-web-editor.
Qt Linguist로 번역
With Qt Linguist, you need to:
manually grab the
.poor.tsfile(s). This can be achieved by downloading the file(s) either from Transifex platform or from thei18n/$languagefolder of the source repository (in GitHub),proceed to the translation locally
upload the modified files to their sources (Transifex or GitHub).
While downloading and uploading translatable files can be done with Transifex, it’s not advised to use this process. Since there’s no versioning system on Transifex, the file you upload will simply replace the existing one and potentially overwrite any modification made by others on the platform in the meantime.
When you open the file in Qt Linguist for the first time you will see the following dialog:
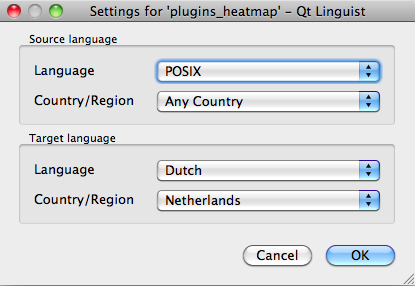
Select language for translation in linguist menu
목표 언어를 정확하게 선택해야 합니다. 소스 언어는 언어 POSIX, 국가/지역 Any Country를 그대로 놔두어도 상관없습니다.
When you press the OK button Qt Linguist is filled with sentences and you can start translating, see Figure_translation_menu.
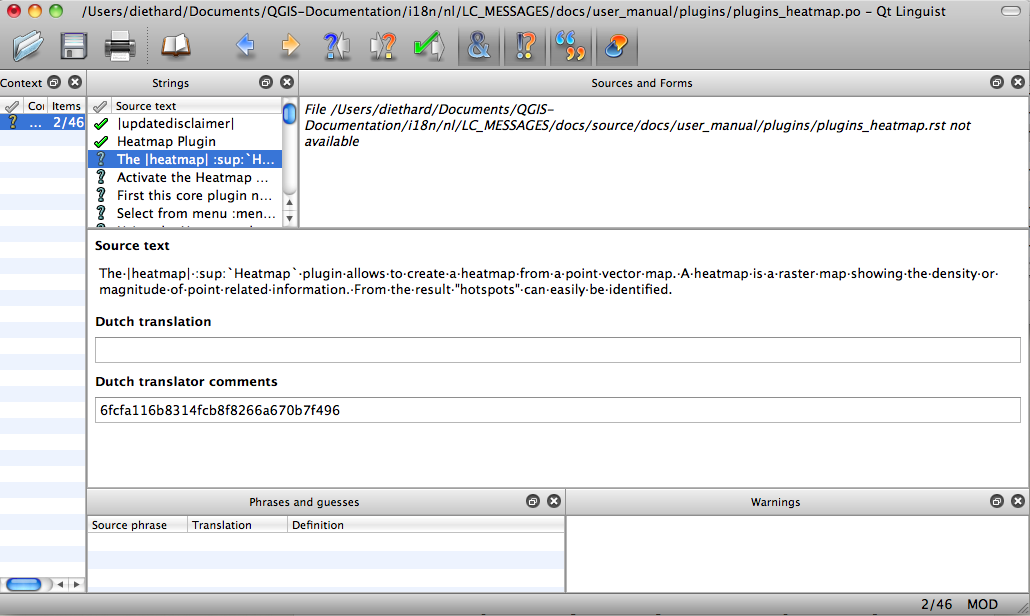
Qt Linguist 메뉴를 사용해 번역하기
메뉴에 사용하기에 편리한 다음 버튼들이 있습니다.
 번역 완료 다음(Translation Done Next) 버튼은 가장 중요한 버튼입니다. 어떤 항목을 번역해야 할 경우, 텍스트 영역에 번역을 입력한 다음 이 버튼을 클릭하십시오. 번역해야 할 항목이 아니라면 번역 텍스트 영역을 비워놓은 채 역시 이 버튼을 클릭하십시오. 항목 번역을 완료했고 다음 항목을 이어서 번역하겠다는 의미입니다.
 이전 항목(Goto Previous) 버튼은 이전에 번역한 항목으로 가는 데 쓰입니다.
 다음 항목(Goto Next) 버튼은 다음에 번역할 항목으로 가는 데 쓰입니다.
 다음 할 일(Next Todo) 버튼은 번역해야 할 다음 첫 번째 항목으로 넘어갑니다. 원본 문서가 변경돼 새로운/업데이트된 문장들만 번역해야 할 경우 유용합니다.
 이전 할 일(Previous Todo) 버튼은 이전 방향으로 검색해서 번역해야 할 첫 번째 항목으로 넘어갑니다.
For further information on the use of Qt Linguist, see https://doc-snapshots.qt.io/qt5-5.12/linguist-translators.html
경고
If you want to download content to translate from the source
repository, never do this in the master branch. For translations
there are always translation branches available, once a document is fully
updated in English for a certain version. As an example, to translate
the manual of QGIS 2.8, you have to use the manual_en_v2.8 branch.
사용자 설명서 번역
이제 열지도 플러그인 설명서를 번역해봅시다!
대부분의 문장은 번역하는 데 복잡하지 않을 겁니다. 이 번역 과정에서는 어떤 부분(reST 표현)에 특별한 번역이 필요한지 짚어보겠습니다.
다음에 번역할 문단이 흥미로워 보이는군요.
The |heatmap| :sup:`Heatmap` plugin allows to create a heatmap from a
point vector map. A heatmap is a raster map showing the density or
magnitude of point related information. From the result "hotspots" can
easily be identified.
이 문단은 reST 표현을 두 개 담고 있습니다.
|heatmap|:|사이에 있는 단어들은 별명으로, 이 단어들을 번역해서는 안 됩니다! 이 표현은 열지도 플러그인 아이콘으로 교체될 겁니다!:sup:`Heatmap`::sup:표현은 중첩 선언으로 그 다음에 오는 텍스트를 좀 더 높게 표시합니다. 이 표현은 마우스 커서를 툴바 항목 위에 올렸을 때 나타나는 팝업 텍스트를 보여주기 위해 쓰입니다. QGIS 응용 프로그램에서 실제로 번역된 경우 이 텍스트도 번역해야 할 수도 있습니다만, 이번 네덜란드 어 예시에선 번역하지 않습니다!
이 문단의 다른 모든 평문들은 번역할 수 있습니다!
다음 번역 항목은 :ref: 표현을 담고 있는데, 설명서 안 또다른 위치를 참조하는 데 흔히 쓰이곤 하죠! :ref: 표현 뒤에 나오는 텍스트는 유일 식별자이기 때문에 번역해선 안 됩니다!
First this core plugin needs to be activated using the Plugin Manager
(see Section :ref:`load_core_plugin`). After activation the heatmap icon
|heatmap| can be found in the Raster Toolbar.
In this case load_core_plugin is a unique reference identifier placed before
an rst item that has a caption. The ref statement will be replaced with the text
of the header and turned into a hyperlink. When the header this reference is
referring to is translated, all references to this header will be automatically
translated as well.
다음 항목엔 QGIS 응용 프로그램의 메뉴에 실제로 표시되는 텍스트를 담고 있는 reST 태그 :menuselection: 이 있는데, 응용 프로그램이 번역된 경우 당연히 이 메뉴 텍스트도 번역해야겠죠.
Select from menu :menuselection:`View --> Toolbars --> Raster` to activate
the Raster Toolbar when it is not yet activated.
이 항목에서 실제로 《View –>》를 《Beeld –>》로 번역했는데, 네덜란드 어로 현지화된 QGIS 응용 프로그램에 쓰인 번역이기 때문입니다.
조금 더 가면 다음과 같은 까다로운 번역 항목을 보게 됩니다.
The |heatmap| :sup:`Heatmap` tool button starts the Dialog of the Heatmap
plugin (see figure_heatmap_settings_).
It holds a reference to a figure figure_heatmap_settings_, and like a reference
to a section this reference should not be changed!! The reference definition
from the rst-document is not included in the .po file and can therefore
not be changed. This means the reference to figures can not be translated. When
HTML is created you will see figure_heatmap_settings. When a PDF document is
created figure_heatmap_settings_ is replaced with a figure number.
reST 속성을 가진, 다음으로 번역할 항목은 다음과 같습니다.
**Input Point dialog**: Provides a selection of loaded point vector maps.
이 문장에서 별표를 제거하지 마십시오. 별표 사이에 담긴 텍스트는 볼드체로 표시될 것입니다. 텍스트 자체는 대화창에 포함된 텍스트일 경우가 많아, 응용 프로그램에서도 번역될 가능성이 큽니다.
다음은 :guilabel: reST 태그를 담고 있는 번역 항목입니다.
When the |checkbox| :guilabel:`Advanced` checkbox is checked it will
give access to additional advanced options.
:guilabel: 태그의 텍스트 Advanced 는 QGIS 응용 프로그램에서도 번역될 가능성이 크기 때문에 번역해야 할 필요가 있을 겁니다!
다음 번역 항목은 ``airports`` 를 포함하고 있습니다. 이 인용 부호는 텍스트에 또다른 텍스트 폰트 속성을 부여하는 데 쓰입니다. 이 경우 ``airports`` 는 글자 그대로의 값으로 번역할 필요가 없습니다.
For the following example, we will use the ``airports`` vector point
layer from the QGIS sample dataset (see :ref:`label_sampledata`).
Another excellent QGIS tutorial on making heatmaps can be found on
`https://www.qgistutorials.com
<https://www.qgistutorials.com/en/docs/creating_heatmaps.html>`_.
This item also includes a hyperlink with an url and an external presentation.
The url should of course be left intact, you are allowed to change the external
text https://www.qgistutorials.com which is visible by the reader. Never
remove the underscore at the end of the hyperlink which forms an essential
part of it!!
번역 규칙 요약
|bronze|,|checkbox|,|labels|,|selectString|,|addLayer|와 같이|문자 두 개 사이의 텍스트를 변경하지 마십시오. 이미지를 대체하기 위해 쓰이는 특수 태그입니다.:ref:또는:file:태그로 시작하는 참조를 변경하지 마십시오.figure_labels_1_처럼 언더바로 끝나는 참조를 변경하지 마십시오.하이퍼링크 내부에 있는 URL을 변경하지 마십시오. 그러나 외부 설명 텍스트는 변경해도 됩니다. 하이퍼링크 마지막에 있는 언더바를 공백을 추가하지 말고 (
>`_) 내버려두십시오.:index:,:sup:,:guilabel:그리고:menuselection:태그 뒤에 붙는 인용 부호 안의 텍스트를 번역하십시오. QGIS 응용 프로그램에서 해당 텍스트를 번역했는지, 했다면 어떻게 번역했는지 확인하십시오. 태그 자체는 변경하지 마십시오.이중 별표 그리고 이중 인용 부호 사이의 텍스트는 값 또는 파일명을 나타내는 경우가 많으며, 때로는 번역해야 하고 때로는 그대로 두어야 합니다.
`,``,*,**,::과 같은 특수 문자를 소스 텍스트와 정확히 동일한 개수로 작성하도록 유의해야 합니다. 이런 특수 문자는 제공하는 정보의 스타일에 기여합니다.특수 문자 또는 태그에 담긴 텍스트는 공백으로 시작해서도 끝나서도 안 됩니다.
변역된 문자열을 새 단락으로 끝내지 마십시오. 만약 그렇게 하면 HTML 생성 시 텍스트가 번역되지 않을 것입니다.
앞에서 정리한 규칙을 준수한다면 보기 좋은 번역 문서를 얻게 될 겁니다!
질문이 있다면, QGIS 커뮤니티 팀 또는 QGIS 번역 팀 으로 연락해주십시오.