Setările IDE pentru scrierea și depanarea de plugin-uri
Although each programmer has his prefered IDE/Text editor, here are some recommendations for setting up popular IDE’s for writing and debugging QGIS Python plugins.
O notă privind configurarea IDE-ului în Windows
În Linux nu este necesară nici o configurare suplimentară pentru dezvoltarea plug-in-urilor. Dar în Windows trebuie să vă asigurați că aveți aceleași setări de mediu și folosiți aceleași bibliotecile și interpretor ca și QGIS. Cel mai rapid mod de a face acest lucru, este de a modifica fișierul batch de pornire de a QGIS.
Dacă ați folosit programul de instalare OSGeo4W, îl puteți găsi în folderul bin al propriei instalări OSGeoW. Căutați ceva de genul C:\OSGeo4W\bin\qgis-unstable.bat.
For using Pyscripter IDE, here’s what ou have to do:
Faceți o copie a qgis-unstable.bat și redenumiți-o pyscripter.bat.
Open it in an editor. And remove the last line, the one that starts qgis.
Add a line that points to the your pyscripter executable and add the commandline argument that sets the version of python to be used (2.7 in the case of QGIs 2.0)
Also add the argument that points to the folder where pyscripter can find the python dll used by qgis, you can find this under the bin folder of your OSGeoW install:
@echo off
SET OSGEO4W_ROOT=C:\OSGeo4W
call "%OSGEO4W_ROOT%"\bin\o4w_env.bat
call "%OSGEO4W_ROOT%"\bin\gdal16.bat
@echo off
path %PATH%;%GISBASE%\bin
Start C:\pyscripter\pyscripter.exe --python25 --pythondllpath=C:\OSGeo4W\bin
Now when you double click this batch file it will start pyscripter, with the correct path.
More popular that Pyscripter, Eclipse is a common choice among developers. In the following sections, we will be explaining how to configure it for depelopping and testing plugins. To prepare your environment for using Eclipse in windows, you should also create a batch file and use it to start Eclipse.
Pentru a crea fișierul batch, urmați acești pași.
- Locate the folder where qgis_core.dll resides in. Normally this is C:\OSGeo4W\apps\qgis\bin , but if you compiled your own qgis application this is in your build folder in output/bin/RelWithDebInfo
- Locate your eclipse.exe executable.
- Create the following script and use this to start eclipse when developping QGIS plugins.
call "C:\OSGeo4W\bin\o4w_env.bat"
set PATH=%PATH%;C:\path\to\your\qgis_core.dll\parent\folder
C:\path\to\your\eclipse.exe
Depanare cu ajutorul Eclipse și PyDev
Instalare
Pentru a utiliza Eclipse, asigurați-vă că ați instalat următoarele
- Eclipse
Aptana Eclipse Plugin sau PyDev
- QGIS 2.0
Pregătirea QGIS
E necesară efectuarea anumitor acțiuni pregătitoare pentru însuși QGIS. Două plugin-uri sunt de interes: Remote Debug și Plugin Reloader.
- Go to Plugins/Fetch python plugins
- Search for Remote Debug ( at the moment it’s still experimental, so enable experimental plugins under the Options tab in case it does not show up ). Install it.
De asemenea, căutați Plugin Reloader și instalați-l. Acest lucru vă va permite să reîncărcați un plug-in, fără a fi necesare închiderea și repornirea QGIS.
Configurarea Eclipse
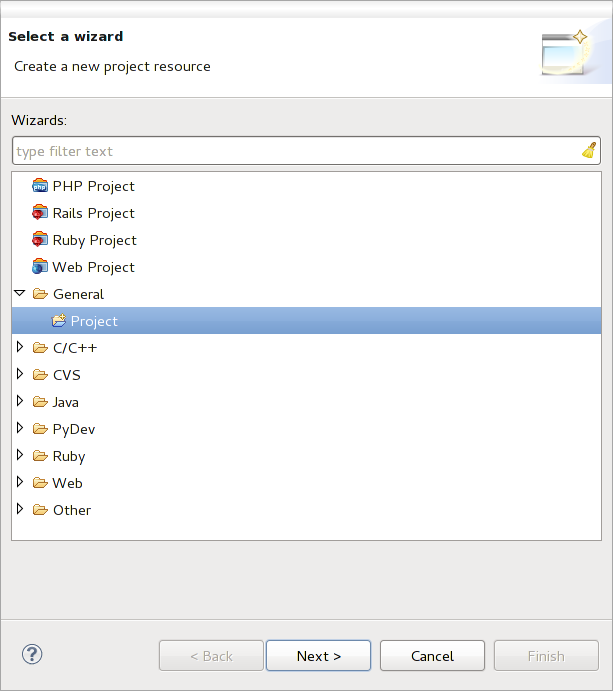
In Eclipse, create a new project. You can select General Project and link your real sources later on, so it does not really mather where you place this project.

Proiectul Eclipse
Now right click your new project and choose New => Folder.
Click Advanced and choose Link to alternate location (Linked Folder). In case you already have sources you want to debug, choose these, in case you don’t, create a folder as it was already explained
Now in the view Project Explorer, your source tree pops up and you can start working with the code. You already have syntax highlighting and all the other powerful IDE tools available.
Configurarea depanatorului
To get the debugger working, switch to the Debug perspective in eclipse (Window=>Open Perspective=>Other=>Debug).
Now start the PyDev debug server by choosing PyDev=>Start Debug Server.
Eclipse is now waiting for a connection from QGIS to its debug server and when QGIS connects to the debug server it will allow it to control the python scripts. That’s exactly what we installed the Remote Debug plugin for. So start QGIS in case you did not already and click the bug symbol .
Acum puteți seta un punct de întrerupere și de îndată ce codul îl va atinge, execuția se va opri, după care veți putea inspecta starea actuală a plug-in-ului. (Punctul de întrerupere este punctul verde din imaginea de mai jos, și se poate seta printr-un dublu clic în spațiul alb din stânga liniei în care doriți un punct de întrerupere)

Punct de întrerupere
Un aspect foarte interesant este faptul că puteți utiliza consola de depanare. Asigurați-vă că execuția este, în mod curent, stopată, înainte de a continua.
Open the Console view (Window => Show view). It will show the Debug Server console which is not very interesting. But there is a button Open Console which lets you change to a more interesting PyDev Debug Console. Click the arrow next to the Open Console button and choose PyDev Console. A window opens up to ask you which console you want to start. Choose PyDev Debug Console. In case its greyed out and tells you to Start the debugger and select the valid frame, make sure that you’ve got the remote debugger attached and are currently on a breakpoint.

Consola de depanare PyDev
Acum aveți o consolă interactivă care vă permite să testați orice comenzi din interior, în contextul actual. Puteți manipula variabile, să efectuați apeluri API sau orice altceva.
A little bit annoying is, that everytime you enter a command, the console switches back to the Debug Server. To stop this behavior, you can click the Pin Console button when on the Debug Server page and it should remember this decision at least for the current debug session.
Configurați Eclipse pentru a înțelege API-ul
O caracteristică facilă este de a pregăti Eclipse pentru API-ul QGIS. Aceasta va permite verificarea eventualelor greșeli de ortografie din cadrul codului. Dar nu doar atât, va permite ca Eclipse să autocompleteze din importurile către apelurile API.
Pentru a face acest lucru, Eclipse analizează fișierele bibliotecii QGIS și primește toate informațiile de acolo. Singurul lucru pe care trebuie să-l faceți este de a-i indica lui Eclipse unde să găsească bibliotecile.
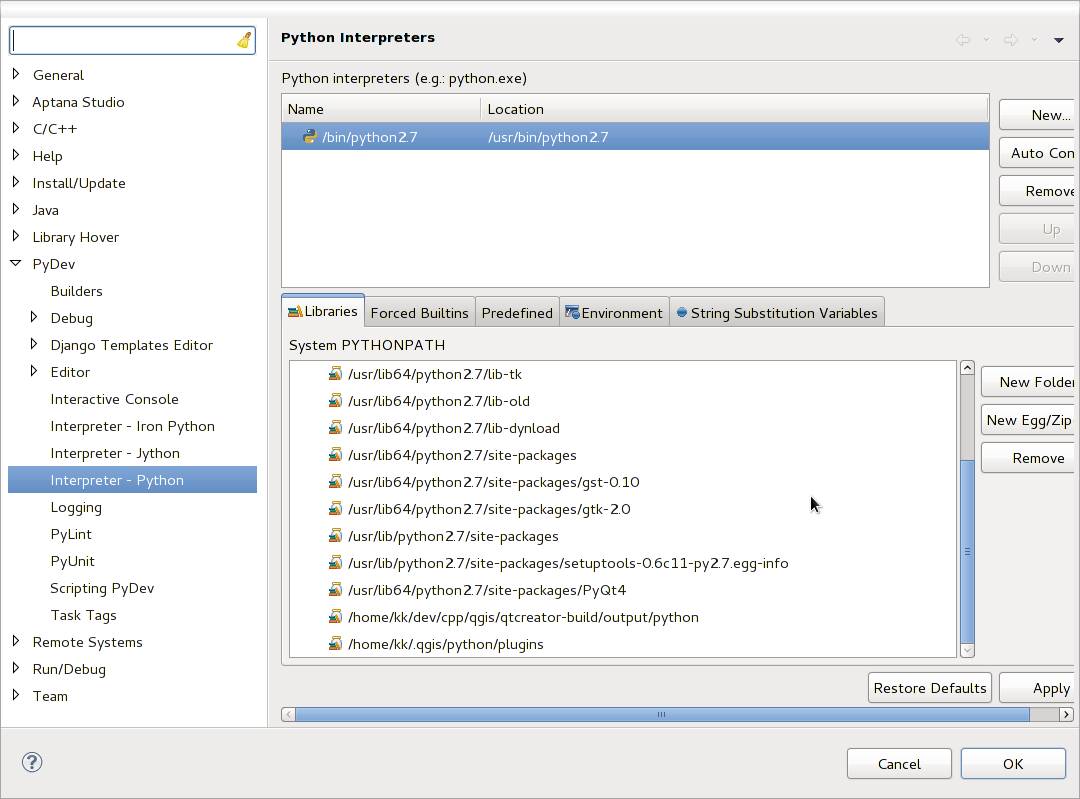
Click Window=>Preferences=>PyDev=>Interpreter - Python.
Veți vedea interpretorul de python (pe moment versiunea 2.7) configurat, în partea de sus a ferestrei și unele file în partea de jos. Filele interesante pentru noi sunt Libraries și Forced Builtins.

Consola de depanare PyDev
First open the Libraries tab. Add a New Folder and choose the python folder of your QGIS installation. If you do not know where this folder is (it’s not the plugins folder) open QGIS, start a python console and simply enter qgis and press enter. It will show you which qgis module it uses and its path. Strip the trailing /qgis/__init__.pyc from this path and you’ve got the path you are looking for.
You should also add your plugins folder here (on linux its ~/.qgis/python/plugins ).
Next jump to the Forced Builtins tab, click on New... and enter qgis. This will make eclipse parse the QGIS API. You probably also want eclipse to know about the PyQt4 API. Therefore also add PyQt4 as forced builtin. That should probably already be present in your libraries tab
Faceți clic pe OK și ați terminat.
Note: everytime the QGIS API changes (e.g. if you’re compiling QGIS master and the sip file changed), you should go back to this page and simply click Apply. This will let Eclipse parse all the libraries again.
Pentru o altă setare posibilă de Eclipse, pentru a lucra cu plugin-urile Python QGIS, verificați acest link
Depanarea cu ajutorul PDB
If you do not use an IDE such as Eclipse, you can debug using PDB, following this steps.
First add this code in the spot where you would like to debug:
# Use pdb for debugging
import pdb
# These lines allow you to set a breakpoint in the app
pyqtRemoveInputHook()
pdb.set_trace()
Apoi executați QGIS din linia de comandă.
În Linux rulați:
$ ./Qgis
În Mac OS X rulați:
$ /Applications/Qgis.app/Contents/MacOS/Qgis
Iar când aplicația atinge punctul de întrerupere aveți posibilitatea de a tasta în consolă!