QGIS Configuration
QGIS is highly configurable through the Settings menu. Choose between Project Properties, Options and Customization.
Note
QGIS follows desktop guidelines for the location of options and project properties item. Consequently related to the OS you are using, location of some of items described below could be in the Project or the Settings menu.
Proprietăţi Proiect
In the properties window for the project under  Settings ‣ Project Properties (kde) or
 Project ‣ Project Properties (Gnome, OS X or Windows), you
can set project-specific options.
Project ‣ Project Properties (Gnome, OS X or Windows), you
can set project-specific options.
In the General menu, the general settings let you:
- give a title to the project beside the project file path
- choose the color to use for features when they are selected
- choose the background color: the color to use for the map canvas
- set whether the path to layers in the project should be saved as absolute (full) or as relative to the project file location. You may prefer relative path when both layers and project files can be moved or shared or if the project is accessed from computers on different platforms.
- choose to avoid artifacts when project is rendered as map tiles. Note that checking this option can lead to performance degradation.
Calculating areas and distances is a common need in GIS. However, these values are really tied to the underlying projection settings. The Measurements frame lets you control these parameters. You can indeed choose:
- the ellipsoid to use: it can be an existing one, a custom one (you’ll need to set values of the semi-major and semi-minor axis) or None/Planimetric.
- the units for distance measurements for length and perimeter and
the units for area measurements. These settings, which default
to the units set in QGIS options but then overrides it for the current project,
are used in:
Bara de actualizare a câmpului din tabela de atribute
Operațiunile din calculatorul de câmpuri
- Identify tool derived length, perimeter and area values
Unitatea implicită se afișează în dialogul de măsurare
The Coordinate display allows you to choose and customize the format of units to use to display the mouse coordinate in the status bar and the derived coordinates shown via the identify tool.
Finally, you can define a project scale list, which overrides the global predefined scales.
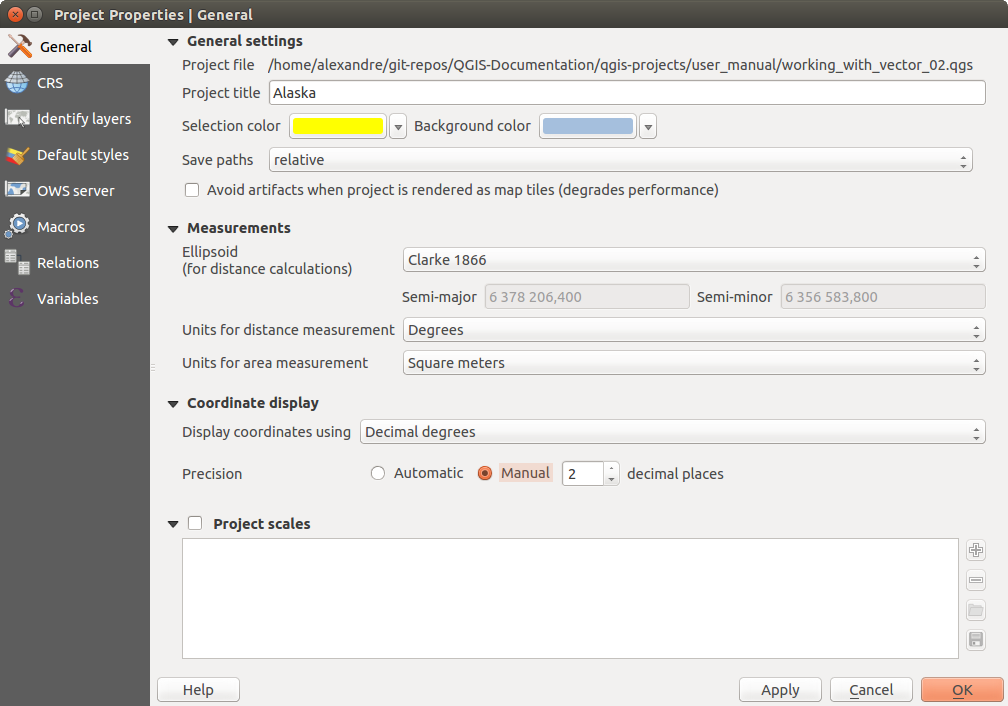
Fila Generalităților din fereastra cu Proprietățile Proiectului
- The CRS menu enables you to choose the Coordinate Reference System for this project, and to enable on-the-fly re-projection of raster and vector layers when displaying layers from a different CRS.
- With the Identify layers menu, you set (or disable) which layers will respond to the identify tool. By default, layers are set queryable.
- The Default Styles menu lets you control how new layers will be
drawn when they do not have an existing
.qmlstyle defined. You can also set the default transparency level for new layers and whether symbols should have random colors assigned to them. There is also an additional section where you can define specific colors for the running project. You can find the added colors in the drop down menu of the color dialog window present in each renderer. - The tab OWS Server allows you to define information about the QGIS Server WMS and WFS capabilities, extent and CRS restrictions.
- The Macros menu is used to edit Python macros for projects. Currently,
only three macros are available:
openProject(),saveProject()andcloseProject().
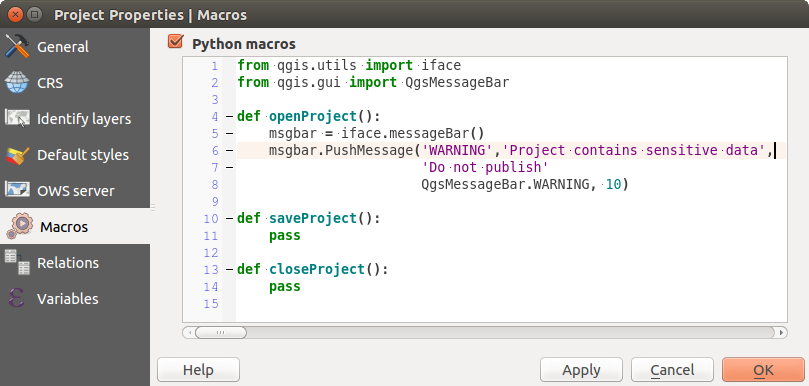
Setările macro din QGIS
Meniul Relațiilor este folosit pentru a defini relațiile 1:n. Relațiile sunt definite în fereastra proprietăților proiectului. O dată ce există relații pentru un strat, un nou element de interfață cu utilizatorul, de tip formular (de exemplu, atunci când se identifică o entitate și se deschide formularul acesteia) va lista entitățile aferente. Acest lucru oferă o modalitate puternică de a exprima, de exemplu, istoria inspecțiilor de-a lungul unei conducte sau a unui segment de drum. Puteți afla mai multe despre suportul pentru relațiile 1:n în Secțiunea Crearea relațiilor one to many.
Opţiuni
 Some basic options for QGIS can be selected using the
Options dialog. Select the menu option Settings ‣
Options. The tabs where you can customize your
options are described below.
Some basic options for QGIS can be selected using the
Options dialog. Select the menu option Settings ‣
Options. The tabs where you can customize your
options are described below.
Meniu General
Aplicație
- Select the Style (QGIS restart required)
 and choose
between ‘Oxygen’,’Windows’,’Motif’,’CDE’, ‘Plastique’ and ‘Cleanlooks’ ().
and choose
between ‘Oxygen’,’Windows’,’Motif’,’CDE’, ‘Plastique’ and ‘Cleanlooks’ (). Definește Tema pictogramei
. În prezent, este posibilă doar valoarea ‘default’.Definește Dimensiunea pictogramei
.- Define the Font. Choose between
 Qt default and a user-defined font.
 Schimbă Durata mesajelor temporizate sau a dialogurilor
. Ascundere fereastră de întâmpinare
- Afișează sfaturi la pornire
- Titluri îngroșate pentru casetele grupurilor
- Stilizare QGIS pentru casetele grupurilor
- Se folosește fereastra nativă de alegere a culorii
- Se folosește fereastra interactivă de alegere a culorii
- Custom side bar style
- Suport experimental de rotație a canevasului (este necesar restartul)
Fișierele proiectului
- Open project on launch (choose between ‘New’,
‘Most recent’ and ‘Specific’). When choosing ‘Specific’ use the
 to define a project.
 - Create new project from default project. You have the
possibility to press on Set current project as default or on
Reset default. You can browse through your files and define a
directory where you find your user-defined project templates. This will be
added to Project ‣ New From Template. If you first activate
Create new project from default project and then save
a project in the project templates folder.
- :guilabel:`Se solicită salvarea modifcărilor din proiect și din sursa de date, atunci când este necesar
- Se solicită confirmarea atunci când un strat va fi eliminat
- Avertizare la deschiderea unui fișier de proiect salvat cu o versiune de QGIS mai veche
- Enable macros . This option was created to handle
macros that are written to perform an action on project events. You can
choose between ‘Never’, ‘Ask’, ‘For this session only’ and
‘Always (not recommended)’.
Meniul Sistemului
Mediu
Variabilele de mediu ale sistemului pot fi acum vizualizate, iar multe dintre ele pot fi configurate în grupul Environment (v. figure_environment_variables). Acest lucru este util pentru platforme, cum ar fi Mac, unde interfața unei aplicații nu moștenește în mod obligatoriu variabilele de mediu ale utilizatorului. De asemenea, este util și la stabilirea/vizualizarea variabilelor de mediu pentru seturile de instrumente externe, controlate de instrumentele Processing (ex.: SAGA, GRASS), și pentru a depana ieșirile provenite din anumite secțiuni ale codului sursă.
- Use custom variables (restart required - include separators).
You can [Add] and [Remove] variables. Already-defined environment
variables are displayed in Current environment variables, and it’s
possible to filter them by activating
Show only QGIS-specific variables.
Figure System Environment:
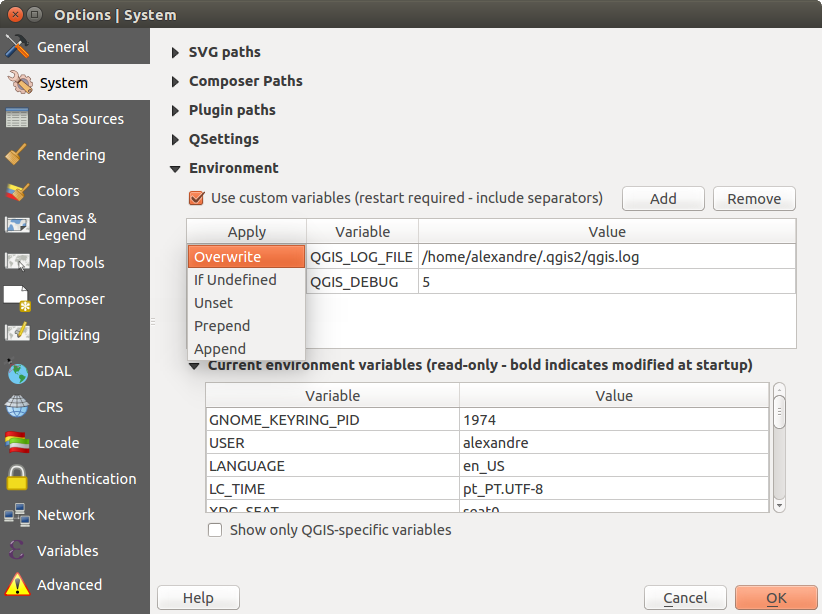
Variabilele de mediu ale sistemului din QGIS
Căile plugin-urilor
[Adăugați] sau [Eliminați] :Căil(e) către bibliotecile suplimentare cu plugin-uri C++`
Meniul Surselor de Date
Atributele şi tabela entității
- Deschidere tabelă de atribute într-o fereastră detașabilă (este necesară restartarea QGIS)
- Copy geometry in WKT representation from attribute
table. When using
 Copy selected rows to
clipboard from the Attribute table dialog, this has the
result that the coordinates of points or vertices are also copied to the
clipboard.
Copy selected rows to
clipboard from the Attribute table dialog, this has the
result that the coordinates of points or vertices are also copied to the
clipboard. - Attribute table behavior . There are three
possibilities: ‘Show all features’, ‘Show selected features’ and ‘Show
features visible on map’.
- Attribute table row cache
 . This row cache makes
it possible to save the last loaded N attribute rows so that working with the
attribute table will be quicker. The cache will be deleted when closing the
attribute table.
. This row cache makes
it possible to save the last loaded N attribute rows so that working with the
attribute table will be quicker. The cache will be deleted when closing the
attribute table. - Representation for NULL values. Here, you can define a value for data fields containing a NULL value.
Gestiunea surselor de date
Scanează elementele valide din navigator
. Se poate alege ‘Verificare extensie’ sau ‘Verificare conținut fișier’.Scanează conținutul fișierelor compresate (.zip) din fereastra navigatorului
. Sunt posibile ‘Nu’, ‘Scanare de bază’ și ‘Scanare completă’.- Prompt for raster sublayers when opening. Some rasters support
sublayers — they are called subdatasets in GDAL. An example is netCDF files
— if there are many netCDF variables, GDAL sees every variable as a
subdataset. The option allows you to control how to deal with sublayers when a file
with sublayers is opened. You have the following choices:
- ‘Always’: Always ask (if there are existing sublayers)
- ‘If needed’: Ask if layer has no bands, but has sublayers
- ‘Never’: Never prompt, will not load anything
- ‘Load all’: Never prompt, but load all sublayers
- Ignore shapefile encoding declaration. If a shapefile
has encoding information, this will be ignored by QGIS.
- Adăugare straturi PostGIS printr-un dublu clic și selectarea modului extins
- Adăugare straturi Oracle printr-un dublu clic și selectarea modului extins
- Execută expresiile pe server, dacă este posibil
- create transaction groups automatically whenever possible
(Experimental). When this mode is turned on, all
(postgres) layers from the same database are synchronised in their edit state,
i.e. when one layer is put into edit state, all are, when one layer is committed
or one layer is rolled back, so are the others. Also, instead of buffering edit
changes locally, they are directly sent to a transaction in the database which
gets committed when the user clicks save layer.
Calea Ascunsă față de Navigator
Acest control grafic listează toate folderul pe care ați decis să-l ascundeți de panoul Navigatorului. Eliminarea unui dosar din listă îl va face disponibil în panoul Navigatorului.
Meniul de Randare
Comportamentul randării
- În mod implicit, noile straturi adăugate hărții ar trebui să fie afișate
- Se folosește memoria tampon, acolo unde este posibil, pentru a se accelera redesenarea
- Straturile se randează în paralel, utilizând mai multe nuclee CPU
- Max nuclee de utilizat
Intervalul de reactualizare a hărții (implicit 250 ms)
- Activează simplificarea implicită a entităților, pentru straturile nou adăugate
Pragul de Simplificare
- Simplificarea are loc la furnizor, dacă este posibil
Scara maximă la care stratul ar trebui să fie simplificat
Calitatea randării
- Liniile vor apărea mai puțin zimțate, cu prețul unei pierderi de performanță la desenare
Rastere
- With RGB band selection, you can define the number for the Red, Green and Blue band.
Îmbunătăţirea contrastului
- Single band gray . A single band gray can have
‘No stretch’, ‘Stretch to MinMax’, ‘Stretch and Clip to MinMax’ and also
‘Clip to MinMax’.
- Multi band color (byte/band) . Options are ‘No stretch’,
‘Stretch to MinMax’, ‘Stretch and Clip to MinMax’ and ‘Clip to MinMax’.
- Multi band color (>byte/band) . Options are ‘No stretch’,
‘Stretch to MinMax’, ‘Stretch and Clip to MinMax’ and ‘Clip to MinMax’.
- Limits (minimum/maximum) . Options are
‘Cumulative pixel count cut’, ‘Minimum/Maximum’, ‘Mean +/- standard deviation’.
Limitele reducerii numărului cumulat de pixeli
Multiplicator pentru Abaterea Standard
Depanare
- Actualizează canevasul hărții
Meniul Canevasului și Legendei
Aspectul implicit al hărții (suprascris de proprietățile proiectului)
Definirea Selecției culorii și a Culorii Fundalului.
Legenda stratului
- Double click action in legend . You can either
‘Open layer properties’ or ‘Open attribute table’ with the double click.
Sunt posibile următoarele Stiluri pentru elementul de tip legendă:
- Capitalizarea Numelor Straturilor
- Nume de straturi îngroșate
- Nume de grupuri îngroșate
- Afișează numele atributului de clasificare
- Creează pictogramele rasterului (poate dura mult)
Meniul Instrumentelor pentru Hartă
Acest meniu oferă unele opțiuni referitoare la comportamentul Instrumentului de identificare.
- Search radius for identifying and displaying map tips is a tolerance factor expressed as a percentage of the map width. This means the identify tool will depict results as long as you click within this tolerance.
Evidențierea culorii permite alegerea culorii pe care ar trebui să o aibă o entitate atunci când este evidențiată.
- Buffer determines a buffer distance to be rendered from the outline of the identify highlight.
- Minimum width determines how thick should the outline of a highlighted object be.
Instrumentul de măsură
Definește Culoarea benzii elastice a instrumentelor de măsurare
Definire Număr de zecimale
- Keep base unit to not automatically convert large numbers
(e.g., meters to kilometers)
- Preferred distance units (‘Meters’, ‘Feet’,
‘Nautical Miles’, ‘Degrees’ or ‘Map Units’ )
- Preferred area units (‘Square meters’, ‘Square feet’,
‘Square yards’, ‘Hectares’, ‘Map Units’ ...)
- Preferred angle units (‘Degrees’, ‘Radians’, ‘Gon/gradians’,
‘Minutes of arc’ ...)
Deplasare și transfocare
- Define Mouse wheel action (‘Zoom’, ‘Zoom and recenter’,
‘Zoom to mouse cursor’, ‘Nothing’)
Definire Factor de mărire pentru rotița mouse-ului
Scări predefinite
Here, you find a list of predefined scales. With the  and
and  buttons you can add or remove your personal scales.
You can also import or export scales from/to a
buttons you can add or remove your personal scales.
You can also import or export scales from/to a .XML file. Note that you still have
the possibility to remove your changes and reset to the predefined list.
Meniul Compozitorului
Valori implicite pentru compoziție
You can define the Default font here.
Aspectul grilei
Definiți Stilul grilei
(‘Solid’, ‘Puncte’, ‘Cruciulițe’)Definiți Culoarea grilei
Grilă și de ghidaje implicite
Definiți Spațierea grilei
.Definiți Decalajul grilei
pentru x și yDefiniți Toleranța acroșării
.
Meniul de Digitizare
Creare entitate
- Suprimă ferestrele pop-up cu atribute, după fiecare caracteristică creată
- Se reutilizează ultimele valori introduse ale atributelor
- Validate geometries. Editing complex lines and polygons with many nodes can result in very slow rendering. This is because the default validation procedures in QGIS can take a lot of time. To speed up rendering, it is possible to select GEOS geometry validation (starting from GEOS 3.3) or to switch it off. GEOS geometry validation is much faster, but the disadvantage is that only the first geometry problem will be reported.
Bandă elastică
Definește Lățimea liniei și Culoarea liniei pentru Banda Elastică
Acroșare
- Deschidere opțiuni de acroșare într-o fereastră detașabilă (este necesară restartarea QGIS)
- Define Default snap mode (‘To vertex’, ‘To segment’,
‘To vertex and segment’, ‘Off’)
Definește Toleranța de acroșare implicită, în unități de hartă sau în pixeli
Definește Raza de căutare pentru editarea vertecșilor, în unități de hartă sau în pixeli
Simbolurile vertexului
- Arată simbolurile numai pentru entitățile selectate
- Define vertex Marker style (‘Cross’ (default), ‘Semi
transparent circle’ or ‘None’)
Definește Dimensiunea simbolului pentru vertex
Instrument pentru curba de decalare
The next 3 options refer to the  Offset Curve tool
in Digitizare avansată. Through the various settings, it is possible to
influence the shape of the line offset. These options are possible starting from GEOS 3.3.
Offset Curve tool
in Digitizare avansată. Through the various settings, it is possible to
influence the shape of the line offset. These options are possible starting from GEOS 3.3.
Îmbinare stiluri
Segmentele cvadrantului
- Miter limit
Meniul CRS-ului
CRS-ul implicit pentru noile proiecte
 Nu permite activarea ‘din zbor’ a reproiectării
- Activează reproiectarea automată ‘din zbor’, atunci când straturile au CRS-uri diferite.
- În mod implicit, activează reproiectarea ‘din zbor’
Select a CRS and Noile proiecte vor începe întotdeauna cu acest CRS
CRS-ul pentru noile straturi
This area allows you to define the action to take when a new layer is created, or when a layer without a CRS is loaded.
- Se cere CRS-ul
- Utilizează CRS-ul proiectului
- Utilizează CRS-ul implicit
Transformări de datum implicite
- Cerere de transformare a datum-ului, atunci când nu este definit unul implicit
- If you have worked with the ‘on-the-fly’ CRS transformation you can see the result of the transformation in the window below. You can find information about ‘Source CRS’ and ‘Destination CRS’ as well as ‘Source datum transform’ and ‘Destination datum transform’.
Meniul Limbii
- Suprascrie limba sistemului și Limba care se va folosi în locul acesteia
Informaţii despre limba sistemului activ
Autentificare
In the Authentication tab you can set authentication configurations and manage PKI certificates. See Sistem de Autentificare for more details.
Meniul Reţelei
Generalități
Definiți Adresa de căutare WMS ca fiind, în mod implicit,
http://geopole.org/wms/search?search=\%1\&type=rssDefinire Timpul de așteptare pentru cererile de rețea (ms) - implicit este 60000
Definire Perioada de expirare prestabilită pentru plăcuțele WMS-C/WMTS (ore) - implicit este 24
Define Maximum de încercări, în cazul erorilor de obținere a plăcuței
Definire User-Agent
Figure Network Tab:
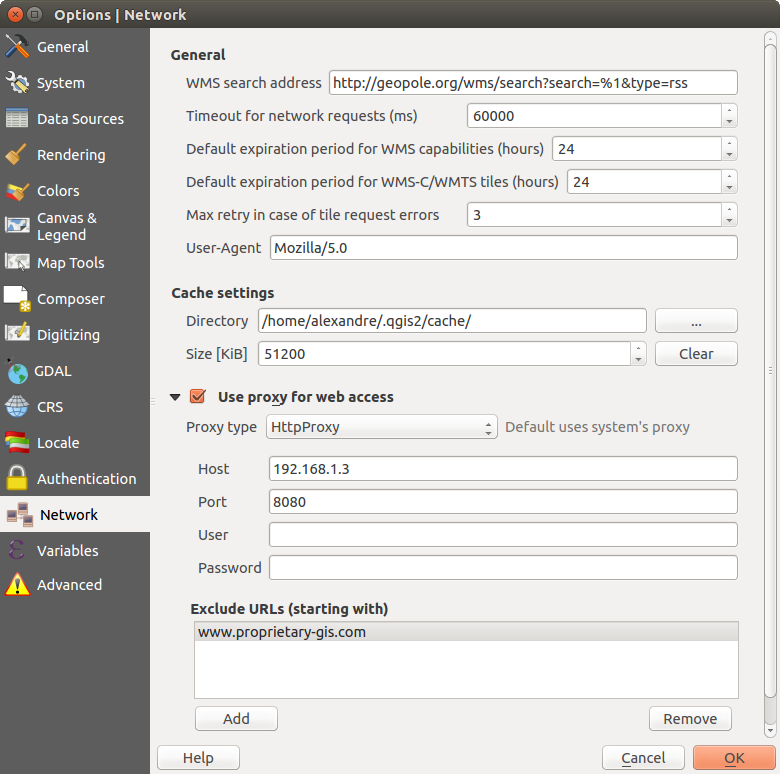
Setările proxy din QGIS
Setările memoriei tampon
Definirea Directorului și a unei Dimensiuni pentru memoria tampon.
- Se folosește proxy pentru accesul web și se definesc ‘Gazda’, ‘Portul’, ‘Utilizatorul’, and ‘Parola’.
- Set the Proxy type according to your needs.
- Default Proxy: Proxy is determined based on the application proxy set using
- Socks5Proxy: Generic proxy for any kind of connection. Supports TCP, UDP, binding to a port (incoming connections) and authentication.
- HttpProxy: Implemented using the “CONNECT” command, supports only outgoing TCP connections; supports authentication.
- HttpCachingProxy: Implemented using normal HTTP commands, it is useful only in the context of HTTP requests.
- FtpCachingProxy: Implemented using an FTP proxy, it is useful only in the context of FTP requests.
Excluding some URLs can be added to the text box below the proxy settings (see Figure_Network_Tab).
If you need more detailed information about the different proxy settings, please refer to the manual of the underlying QT library documentation at http://doc.trolltech.com/4.5/qnetworkproxy.html#ProxyType-enum.
Tip
Folosirea Proxi-urilor
Using proxies can sometimes be tricky. It is useful to proceed by ‘trial and error’ with the above proxy types, to check to see if they succeed in your case.
Puteți modifica opțiunile în funcție de necesități. Pentru a se activa, unele dintre schimbări pot necesita o repornire a QGIS.
- Setările sunt salvate într-un fișier text:
$HOME/.config/QGIS/QGIS2.conf - Puteți găsi setările în:
$HOME/Library/Preferences/org.qgis.qgis.plist - Setările sunt stocate în registru sub:
HKEY\CURRENT_USER\Software\QGIS\qgis
Personalizare
The customization dialog lets you (de)activate almost every element in the QGIS user interface. This can be very useful if you want to provide your end-users with a ‘light’ version of QGIS, containing only the icons, menus or panels they need.
Note
Pentru aplicarea modificărilor, trebuie să reporniți QGIS.
Figure Customization 1:

Dialogul de Personalizare
Ticking the Enable customization checkbox is the first step
on the way to QGIS customization. This enables the toolbar and the widget
panel from which you can uncheck and thus disable some GUI items.
Elementul configurabil poate fi:
- a Menu or some of its sub-menus from the Bara de Meniuri
un întreg Panou (see Panouri și Bare de Instrumente)
- the Status bar described in Bara de Stare or some of its items
- a Toolbar: the whole bar or some of its icons
- or any widget from any dialog in QGIS: label, button, combobox...
With  Switch to catching widgets in main application, you
can click on an item in QGIS interface that you want to be hidden and
QGIS automatically unchecks the corresponding entry in the Customization dialog.
Switch to catching widgets in main application, you
can click on an item in QGIS interface that you want to be hidden and
QGIS automatically unchecks the corresponding entry in the Customization dialog.
Once you setup your configuration, click [Apply] or [Ok] to validate your changes. This configuration becomes the one used by default by QGIS at the next startup.
The modifications can also be saved in a .ini file using  Save To File button. This is a handy way to share a common QGIS
interface among multiple users. Just click on
Save To File button. This is a handy way to share a common QGIS
interface among multiple users. Just click on  Load from File
from the destination computer in order to import the
Load from File
from the destination computer in order to import the .ini file.
You can also run command line tools and save various
setups for different use cases as well.
Tip
Restaurează cu ușurință setările QGIS predefinite
The initial QGIS GUI configuration can be restored by one of the methods below:
- unchecking Enable customization option in the
Customization dialog or click the
 Check All button
 - pressing the [Reset] button in the QSettings frame under Settings ‣ Options menu, System tab
- launching QGIS at a command prompt with the following command line
qgis --nocustomization - setting to
falsethe value of UI ‣ Customization ‣ Enabled variable under Settings ‣ Options menu, Advanced tab.
In most cases, you need to restart QGIS in order to have the change applied.