QGIS Configuration
QGIS is highly configurable through the Settings menu. Choose between Panels, Toolbars, Project properties, Options and Customization.
Panels and Toolbars
In the Panels‣ menu you can switch on and off QGIS widgets. The Toolbars‣ menu provides the possibility to switch on and off icon groups in the QGIS toolbar (see figure_panels_toolbars).
Figure Panels and Toolbars:
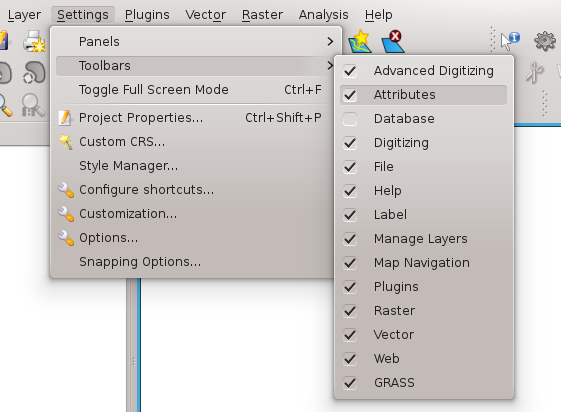
The Panels and Toolbars menu 
Tip
Activating the QGIS Overview
In QGIS you can use an overview panel that provides a full extent view of layers added to it. It can be selected under the menu Settings ‣ Panels. Within the view is a rectangle showing the current map extent. This allows you to quickly determine which area of the map you are currently viewing. Note that labels are not rendered to the map overview even if the layers in the map overview have been set up for labeling. If you click and drag the red rectangle in the overview that shows your current extent, the main map view will update accordingly.
Tip
Show Log Messages
Since QGIS 1.8 it’s possible to track the QGIS messages. You can activate
 Log Messages in the menu
Settings ‣ Panels and follow the messages
in the General and Plugin tab during loading and operation.
Log Messages in the menu
Settings ‣ Panels and follow the messages
in the General and Plugin tab during loading and operation.
Project Properties
In the properties window for the project under Settings ‣
Project Properties or  Settings ‣
Project Properties you set project specific options. These
include:
Settings ‣
Project Properties you set project specific options. These
include:
- In the General tab the project title, selection and background color, layer units, precision, and the option to save relative paths to layers can be defined. You can define the layer units (only used when CRS transformation is disabled) and the precision of decimal places to use.
- The CRS Coordinate Reference System tab enables you to choose the CRS for this project, and to enable on-the-fly re-projection of raster and vector layers when displaying layers from a different CRS.
- With the third Identifiable layers tab you set (or disable) which layers will respond to the identify tool. (See the Map tools paragraph from the Options section to enable identifying of multiple layers.)
- The tab OWS Server allows to define information about the QGIS
mapserver Service Capabilities, the Extent and the CRS Restrictions as well as
the WFS Capabilities. Activating the Add WKT geometry to feature info response
will allow to query the WMS layers.
Options
 Some basic options for QGIS can be selected using the
Options dialog. Select the menu option Settings ‣
Options. The tabs where you can optimize your
options are:
Some basic options for QGIS can be selected using the
Options dialog. Select the menu option Settings ‣
Options. The tabs where you can optimize your
options are:
General Tab
- Prompt to save project changes when required
- Warn when opening a project file saved with an older version of QGIS
- Change Selection and Background color
- Change the QGIS Style
- Change the icon theme (choose between ‘default’, ‘classic’ and ‘gis’)
- Change icon size between 16, 24 and 32 pixel.
- Change the menu size
- Define double click action in legend (choose between ‘open layer properties’ and ‘open ‘) attribute table.
- Capitalize layer names in legend
- Display classification attribute names in legend
- Create raster icons in legend
- Hide splash screen at startup
- Show tips at startup
- Open identify results in a dock window (QGIS restart
required)
- Open snapping options in a dock window (QGIS restart
required)
- Open attribute table in a dock window
- Add PostGIS layers with double click and select in extended mode
- Add new layers to selected or current group
- Copy geometry in WKT representation from attribute table
- Attribute table behavior (choose between ‘Show all features’ (default), ‘Show selected features’,’Show features in current canvas’)
- Attribute table row cache
- Define Representation for NULL values
- Prompt for raster sublayers
 . Some rasters support
sublayers - they are called subdatasets in GDAL. An example is netcdf files -
if there are many netcdf variables, GDAL sees every variable as a subdataset.
The option is to control how to deal with sublayers when a file with sublayers
is opened. You have the following choices:
. Some rasters support
sublayers - they are called subdatasets in GDAL. An example is netcdf files -
if there are many netcdf variables, GDAL sees every variable as a subdataset.
The option is to control how to deal with sublayers when a file with sublayers
is opened. You have the following choices:- ‘Always’: always ask (if there are existing sublayers)
- ‘If needed’: ask if layer has no bands, but has sublayers
- ‘Never’: never prompt, will not load anything
- ‘Load all’: never prompt, but load all sublayers
- Scan for valid items in the browser dock . The ‘Check
extension’ option was designed to speed up the loading of a directory, which
can be time-consuming when ‘Check file contents’ is activated and
there are many files (tens or hundreds).
- Scan for contents of compressed files (.zip) in browser dock
This option was also designed to speed up the loading of a directory. You have
the following choices:
- ‘Basic Scan’: checks that the extension is supported by one of the drivers
- ‘Full Scan’: opens every file to check it is valid
- ‘Passthru’: don’t use this option it will be removed in the next QGIS version
GDAL tab
GDAL is a data exchange library for raster files. In this tab you can define which GDAL driver to be used for a raster format as in some cases more than one GDAL driver is available.
Plugins tab
- Add Path(s) to search for additional C++ plugin libraries.
Rendering Tab
- By default new layers added to the map should be displayed
- Define Number of features to draw before updating the display.
- Use render caching where possible to speed up redraws
- Make lines appear less jagged at the expense of some drawing
performance
- Fix problems with incorrectly filled polygons
- Use new generation symbology for rendering
- Define the default Raster settings for visualisation: ‘RGB band selection’,
Use standard deviation and ‘Contrast Enhancement’
- Add/remove Path(s) to search for Scalable Vector Graphics (SVG) symbols
Additionally you can define whether to save the path for svg textures absolute or relative in the General tab of the Settings ‣ Project Properties menu.
Map tools Tab
- The Mode setting determines which layers will be shown by the Identify tool. By switching to ‘Top down’ or ‘Top down, stop at first’ instead of ‘Current layer’ attributes for all identifiable layers (see the Project properties section under: Projects to set which layers are identifiable) will be shown with the Identify tool.
- Open feature form, if a single feature is identified
- Define Search radius for identifying and displaying map tips as a percentage of the map width
- Define Ellipsoid for distance calculations
- Define Rubberband color for measure tools
- Define Decimal places
- Keep base unit
 Define preferred measurement units (‘meters’ or ‘feet’)
- Define preferred angle units (‘Degrees’, ‘Radians’
or ‘Gon’)
- Define Mouse wheel action (‘Zoom’, ‘Zoom and recenter’,
‘Zoom to mouse cursor’, ‘Nothing’)
- Define Zoom factor for wheel mouse
Overlays Tab
- Define Placement algorithm for labels, symboly and
diagrams (choose between ‘Central point’ (standard), ‘Chain’, ‘Popmusic tabu
chain’, ‘Popmusic tabu’ and ‘Popmusic chain’)
Digitizing Tab
- Define Rubberband Line color and Line width
- Define Default snap mode (‘To vertex’, ‘To segment’,
‘To vertex and segment’)
- Define Default snapping tolerance in map units or pixel
- Define search radius for vertex edits in ‘map units’ or ‘pixel’
- Show markers only for selected features
- Define vertex Marker style (‘Cross’ (default), ‘Semi
transparent circle’ or ‘None’) and vertex Marker size.
- Suppress attributes pop-up windows after each created feature
- Reuse last entered attribute values
- Validate geometries Editing complex lines/polygons with many nodes can end up with very slow rendering. This is because the default validation procedures in QGIS can use a lot of time. To speed up rendering it is possible to select GEOS geometry validation (starting from GEOS 3.3) or to switch it off. GEOS geometry validation is much faster, but the disadvantage is that only the first geometry problem will be reported.
The next 3 options refer to the  Offset Curve tool in Advanced digitizing.
Through the various settings, it is possible to influence the shape of the line offset. These options are
possible from GEOS 3.3 .
Offset Curve tool in Advanced digitizing.
Through the various settings, it is possible to influence the shape of the line offset. These options are
possible from GEOS 3.3 .
- Join style for curve offset
- Quadrantsegments for curve offset
- Miter limit for curve offset
CRS Tab
The CRS tab is divided in two areas. The first area allows to define the default CRS for new projects.
- Select a CRS and Always start new projects with this CRS.
- Enable on the fly re-projection by default
The second area allows to define the action, when a new layer is created, or when a layer without CRS is loaded.
 Prompt for Coordinate Reference System (CRS)
- Use project Coordinate Reference System (CRS)
- Use default Coordinate Reference System (CRS) displayed below
Locale Tab
- Overwrite system locale and Locale to use instead
- Information about active system locale
Network Tab
Figure Network Tab:
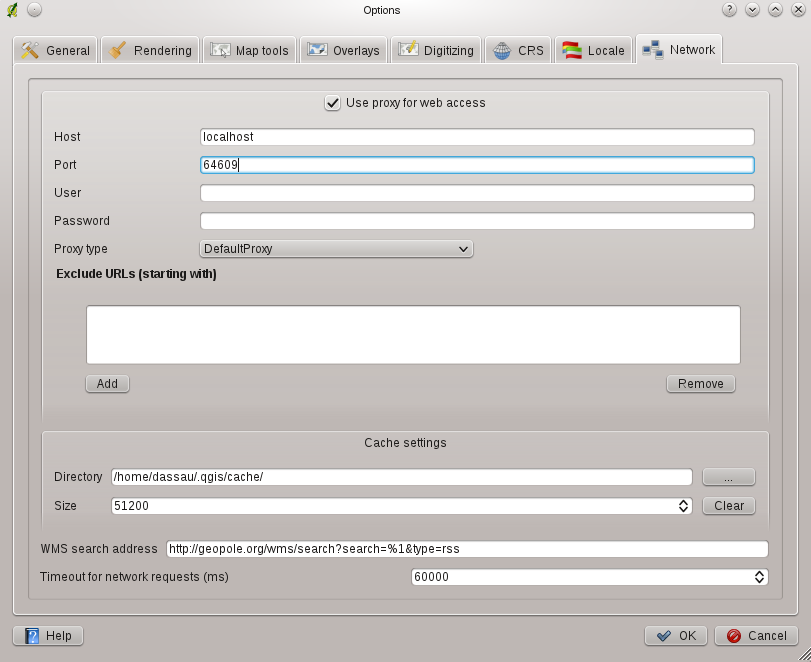
Proxy-settings in QGIS
- Use proxy for web access and define ‘Host’, ‘Port’, ‘User’,
and ‘Password’.
- Set the Proxy type according to your needs.
- Default Proxy: Proxy is determined based on the application proxy set using
- Socks5Proxy: Generic proxy for any kind of connection. Supports TCP, UDP, binding to a port (incoming connections) and authentication.
- HttpProxy: Implemented using the “CONNECT” command, supports only outgoing TCP connections; supports authentication.
- HttpCachingProxy: Implemented using normal HTTP commands, it is useful only in the context of HTTP requests
- FtpCachingProxy: Implemented using an FTP proxy, it is useful only in the context of FTP requests
- Define Cache settings (path and size)
- Define WMS search address, default is http://geopole.org/wms/search?search=\%1\&type=rss
- Define Timeout for network requests (ms) - deeingebundenfault is 60000
Excluding some URLs can be added to the text box below the proxy-settings (see Figure_Network_Tab) by pressing the [Add] button. After that double-click into the just created URL-field and enter the URL you would like to exclude from using the proxy. Obviously the button [Remove] removes the selected entry.
If you need more detailed information about the different proxy-settings, please refer to the manual of the underlying QT-library-documentation at http://doc.trolltech.com/4.5/qnetworkproxy.html#ProxyType-enum.
Tip
Using Proxies
Using proxies can sometimes be tricky. It is useful to ‘trial and error’ the above proxy types and check if they succeed in your case.
You can modify the options according to your needs. Some of the changes may require a restart of QGIS before they will be effective.
- settings are saved in a texfile: $HOME/.config/QuantumGIS/qgis.conf
 you can find your settings in:
$HOME/Library/Preferences/org.qgis.qgis.plist
you can find your settings in:
$HOME/Library/Preferences/org.qgis.qgis.plist- settings are stored in the registry under:
\HKEY\CURRENT_USER\Software\QuantumGIS\qgis
Customization
The customization tool is a new development in QGIS 1.8.. It lets you (de)activate almost every element in the QGIS user interface. This can get very useful if you have a lot of plug-ins installed that you never use and that are filling your screen.
Figure Customization 1:
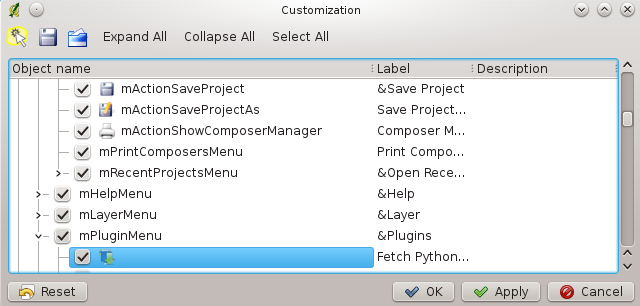
The Customization dialog
QGIS Customization is divided into five groups. In Docks you
find the dock windows. Dock windows are applications that can be started and used as
a floating, top-level window or embedded to the QGIS main window as a docked widget
(see also Panels and Toolbars). In Menus you
can hide entries in the Menu bar. In the Status Bar features
like the coordinate information can be daectivated. In Toolbars
you can (de)activate the toolbar icons of QGIS and in Widgets
you can (de)activate dialogs as well as their buttons.
With  Switch to catching widgets in main application
you can click on elements in QGIS you want to be hidden and find the corresponding entry
in Customization (see figure_customization). You can also save your various different
setups for different use cases as well. Before your changes are applied, you need to
restart QGIS.
Switch to catching widgets in main application
you can click on elements in QGIS you want to be hidden and find the corresponding entry
in Customization (see figure_customization). You can also save your various different
setups for different use cases as well. Before your changes are applied, you need to
restart QGIS.