.

QGIS Configuration

QGIS is highly configurable through the Settings menu. Choose between Panels, Toolbars, Project Properties, Options and Customization.

Note

QGIS follows desktop guidelines for the location of options and project properties item. Consequently related to the OS you are using, location of some of items described above could be located in the View menu (Panels and Toolbars) or in Project for Options.

Panels and Toolbars

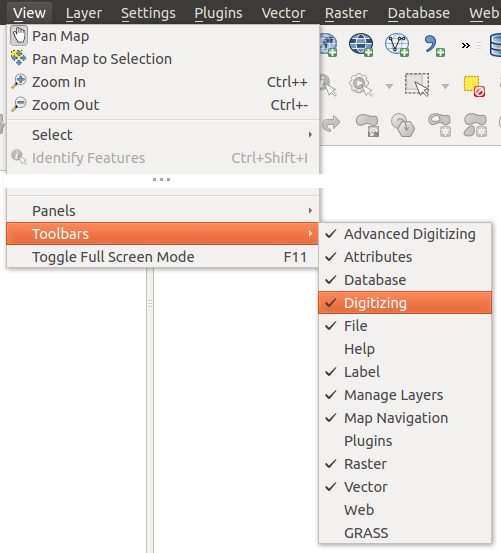
In the Panels‣ menu, you can switch on and off QGIS widgets. The Toolbars‣ menu provides the possibility to switch on and off icon groups in the QGIS toolbar (see figure_panels_toolbars).

Figure Panels and Toolbars:

../../../_images/panels_and_toolbars.png

The Panels and Toolbars menu nix

Tip

Activating the QGIS Overview

In QGIS, you can use an overview panel that provides a full extent view of layers added to it. It can be selected under the menu nix Settings ‣ Panels or win View ‣ Panels. Within the view is a rectangle showing the current map extent. This allows you to quickly determine which area of the map you are currently viewing. Note that labels are not rendered to the map overview even if the layers in the map overview have been set up for labeling. If you click and drag the red rectangle in the overview that shows your current extent, the main map view will update accordingly.

Tip

Show Log Messages

It’s possible to track the QGIS messages. You can activate checkbox Log Messages in the menu nix Settings ‣ Panels or win View ‣ Panels and follow the messages that appear in the different tabs during loading and operation.

Propriedades do Projecto

In the properties window for the project under nix Settings ‣ Project Properties (kde) or nix win Project ‣ Project Properties (Gnome), you can set project-specific options. These include:

  • In the General menu, the project title, selection and background color, layer units, precision, and the option to save relative paths to layers can be defined. If the CRS transformation is on, you can choose an ellipsoid for distance calculations. You can define the canvas units (only used when CRS transformation is disabled) and the precision of decimal places to use. You can also define a project scale list, which overrides the global predefined scales.
  • O menu SRC permite que escolha o Sistema de Coordenadas Referência para o projecto, e para activar a reprojecção on-the-fly das camadas matricias e vectoriais na exibição de camadas de diferentes SRC.

  • With the third Identify layers menu, you set (or disable) which layers will respond to the identify tool (see the “Map tools” paragraph from the Opções section to enable identifying of multiple layers).
  • The Default Styles menu lets you control how new layers will be drawn when they do not have an existing .qml style defined. You can also set the default transparency level for new layers and whether symbols should have random colours assigned to them. There is also an additional section where you can define specific colors for the running project. You can find the added colors in the drop down menu of the color dialog window present in each renderer.
  • The tab OWS Server allows you to define information about the QGIS Server WMS and WFS capabilities, extent and CRS restrictions.
  • O menu Macros é para editar macros Python para os projectos. Actualmente, apenas estão disponíveis três macros: openProject(), saveProject() e closeProject().

Figure Macro Menu:

../../../_images/macro.png

Macro settings in QGIS

  • O menu Relations é usado para definir relações 1:n. As relações são definidas no diálogo das propriedades do projecto. Quando existirem relações para uma camada, um novo elemento de interface do utilizador na vista de formulário (p. ex. quando identificar um elemento e abrir o seu formulário) irá listar os elementos relacionados. Isto fornece uma maneira poderosa para expressar p. ex. o histórico de inspecção ao longo de um segmento de tubagem ou estrada. Poderá encontrar mais informação sobre suporte de relações 1:n na Secção Creating one to many relations.

Opções

mActionOptions Some basic options for QGIS can be selected using the Options dialog. Select the menu option Settings ‣ mActionOptions Options. The tabs where you can customize your options are described below.

Menu Geral

Aplicação

  • Select the Style (QGIS restart required) selectstring and choose between ‘Oxygen’,’Windows’,’Motif’,’CDE’, ‘Plastique’ and ‘Cleanlooks’ (nix).
  • Define the Icon theme selectstring. Currently only ‘default’ is possible.
  • Define the Icon size selectstring.
  • Define the Font. Choose between radiobuttonon Qt default and a user-defined font.
  • Change the Timeout for timed messages or dialogs selectstring.
  • checkbox Esconder o ecrã inicial no arranque

  • checkbox Mostrar dicas ao iniciar

  • checkbox Títulos da caixa de grupos a negrito

  • checkbox :guilabel:` Caixas de grupo em estilo QGIS`

  • checkbox Use native color chooser dialogs
  • checkbox Use live-updating color chooser dialogs
  • checkbox Custom side bar style
  • checkbox Experimental canvas rotation support (restart required)

Ficheiros de projecto

  • Open project on launch selectstring (choose between ‘New’, ‘Most recent’ and ‘Specific’). When choosing ‘Specific’ use the browsebutton to define a project.
  • checkbox Create new project from default project. Tem a possibilidade de carregar em Set current project as default ou em Reset default. Pode navegar através dos seus ficheiros e definir uma directoria onde encontrar os modelos de projecto definidos pelo utilizador. Isto será adicionado a Project ‣ New From Template. Primeiro active checkbox Create new project from default project e a seguir salve o projecto dentro da pasta de modelos de projecto.

  • checkbox Avisar para salvar projecto e alterações de fontes de dados quando necessário

  • checkbox Prompt for confirmation when a layer is to be removed
  • checkbox Avisar quando abrir um projecto guardado com uma versão antiga do |qg|

  • Enable macros selectstring. This option was created to handle macros that are written to perform an action on project events. You can choose between ‘Never’, ‘Ask’, ‘For this session only’ and ‘Always (not recommended)’.

Menu Sistema

Ambiente

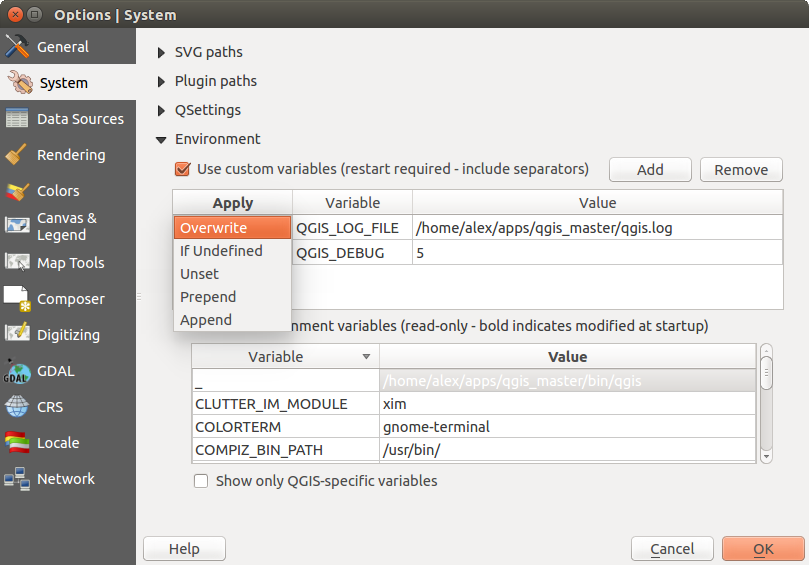
Variáveis de ambiente do sistema podem ser vistas agora, e muitas configuradas, no grupo Environment (ver figure_environment_variables). Isto é útil para plataformas, tais como Mac, onde um aplicativo GUI não herda necessariamente o ambiente do utilizador da linha de comandos. Também é útil para configuração e visualização de variáveis de ambiente para os conjuntos de ferramentas externas controlados pela caixa de ferramentas de Processamento (p. ex., SAGA, GRASS), e para activar a saída de depuração (“debugging”) para secções específicas do código-fonte.

  • checkbox Use custom variables (restart required - include separators). You can [Add] and [Remove] variables. Already-defined environment variables are displayed in Current environment variables, and it’s possible to filter them by activating checkbox Show only QGIS-specific variables.

Figure System Environment:

../../../_images/sys-env-options.png

System environment variables in QGIS

Directórios dos módulos

[Adicionar] ou [Remover] Caminho(s) para pesquisar bibliotecas de módulos C++ adicionais

Menu Fonte de Dados

Atributos dos elementos e tabela

  • checkbox Abre a tabela de atributos na janela principal (Necessário reiniciar o QGIS)

  • checkbox Copy geometry in WKT representation from attribute table. When using mActionCopySelected Copy selected rows to clipboard from the Attribute table dialog, this has the result that the coordinates of points or vertices are also copied to the clipboard.
  • Attribute table behaviour selectstring. There are three possibilities: ‘Show all features’, ‘Show selected features’ and ‘Show features visible on map’.
  • Attribute table row cache selectnumber. This row cache makes it possible to save the last loaded N attribute rows so that working with the attribute table will be quicker. The cache will be deleted when closing the attribute table.
  • Representação para valores NULL. Aqui, pode definir um valor para os campos de dados que contêm valores NULL.

Manipulação das fontes de dados

  • Scan for valid items in the browser dock selectstring. You can choose between ‘Check extension’ and ‘Check file contents’.
  • Scan for contents of compressed files (.zip) in browser dock selectstring. ‘No’, ‘Basic scan’ and ‘Full scan’ are possible.
  • Prompt for raster sublayers when opening. Some rasters support sublayers — they are called subdatasets in GDAL. An example is netCDF files — if there are many netCDF variables, GDAL sees every variable as a subdataset. The option allows you to control how to deal with sublayers when a file with sublayers is opened. You have the following choices:
    • ‘Sempre’: Perguntar sempre (se existem subcamadas)

    • ‘Se necessário’: Perguntar se a camada não tem bandas, mas tem subcamadas

    • ‘Nunca’: Nunca pede, não irá carregar nada

    • ‘Carregar tudo’: Nunca pede, mas carrega todas as subcamadas

  • checkbox Ignore shapefile encoding declaration. If a shapefile has encoding information, this will be ignored by QGIS.
  • checkbox Add PostGIS layers with double click and select in extended mode
  • checkbox Adicione camadas Oracle com duplo clique e seleccione em modo alargado

Menu de Renderização

Rendering behaviour

  • checkbox By default new layers added to the map should be displayed
  • checkbox Use render caching where possible to speed up redraws
  • checkbox Render layers in parallel using many CPU cores
  • checkbox Max cores to use
  • Map update interval (default to 250 ms)
  • checkbox Enable feature simplication by default for newly added layers
  • Simplification threshold
  • checkbox Simplify on provider side if possible
  • Maximum scale at which the layer should be simplified

Qualidade de renderização

  • checkbox Fazer com que as linhas apareçam menos irregulares, em detrimento de algum desempenho do desenho

Matriciais

  • Com a Selecção de banda RGB pode definir o número para a banda Vermelha, Verde e Azul.

Contrast enhancement

  • Single band gray selectstring. A single band gray can have ‘No stretch’, ‘Stretch to MinMax’, ‘Stretch and Clip to MinMax’ and also ‘Clip to MinMax’.
  • Multi band color (byte/band) selectstring. Options are ‘No stretch’, ‘Stretch to MinMax’, ‘Stretch and Clip to MinMax’ and ‘Clip to MinMax’.
  • Multi band color (>byte/band) selectstring. Options are ‘No stretch’, ‘Stretch to MinMax’, ‘Stretch and Clip to MinMax’ and ‘Clip to MinMax’.
  • Limits (minimum/maximum) selectstring. Options are ‘Cumulative pixel count cut’, ‘Minimum/Maximum’, ‘Mean +/- standard deviation’.
  • Limites de contagem cumulativa de pixeis de corte

  • Multiplicador do desvio-padrão

Corrigindo Erros

  • checkbox Map canvas refresh

Colors Menu

This menu allows you to add some custom color that you can find in each color dialog window of the renderers. You will see a set of predefined colors in the tab: you can delete or edit all of them. Moreover you can add the color you want and perform some copy and paste operations. Finally you can export the color set as a gpl file or import them.

Menu de Janela e Legenda

Aparência padrão do mapa (reescrita pelas propriedades do projecto)

  • Define a Cor da selecção e a Cor de fundo.

Legenda da camada

  • Double click action in legend selectstring. You can either ‘Open layer properties’ or ‘Open attribute table’ with the double click.
  • The following Legend item styles are possible:
    • checkbox Maiusculizar os nomes das camadas

    • checkbox Tornar negrito os nomes das camadas

    • checkbox Tornar negrito os nomes dos grupos

    • checkbox Mostrar nomes de atributos de classificação

    • checkbox Criar ícones matriciais (pode ser lento)

Menu Ferramentas de Mapa

This menu offers some options regarding the behaviour of the Identify tool.

  • Search radius for identifying and displaying map tips is a tolerance factor expressed as a percentage of the map width. This means the identify tool will depict results as long as you click within this tolerance.
  • Highlight color allows you to choose with which color should features being identified are to be highlighted.
  • Buffer expressed as a percentage of the map width, determines a buffer distance to be rendered from the outline of the identify highlight.
  • Minimum width expressed as a percentage of the map width, determines how thick should the outline of a highlighted object be.

Ferramenta de medida

  • Define Cor do elástico para as ferramentas de medida

  • Define Casas decimais

  • checkbox Keep base unit
  • Preferred measurements units radiobuttonon (‘Meters’, ‘Feet’, ‘Nautical Miles’ or ‘Degrees’)`
  • Preferred angle units radiobuttonon (‘Degrees’, ‘Radians’ or ‘Gon’)

Movendo e ampliando

  • Define Mouse wheel action selectstring (‘Zoom’, ‘Zoom and recenter’, ‘Zoom to mouse cursor’, ‘Nothing’)
  • Define o factor de aproximação/ afastamento para a roda do rato

Escalas pré-definidas

Here, you find a list of predefined scales. With the [+] and [-] buttons you can add or remove your individual scales.

Composer Menu

Composition defaults

You can define the Default font here.

Aparência da Grelha

  • Define the Grid style selectstring (‘Solid’, ‘Dots’, ‘Crosses’)
  • Define the Grid color

Grid and guide defaults

  • Define the Grid spacing selectnumber
  • Define the Grid offset selectnumber for x and y
  • Define the Snap tolerance selectnumber

Menu Digitalizar

Criação de elementos

  • checkbox Suprimir atributos de janelas pop-up depois de cada elemento criado

  • checkbox Reutilizar últimos valores de atributos inseridos

  • Validate geometries. Editing complex lines and polygons with many nodes can result in very slow rendering. This is because the default validation procedures in QGIS can take a lot of time. To speed up rendering, it is possible to select GEOS geometry validation (starting from GEOS 3.3) or to switch it off. GEOS geometry validation is much faster, but the disadvantage is that only the first geometry problem will be reported.

Elástico

  • Define a Borracha Espessura da linha e Cor da linha

Ajuste

  • checkbox Abrir opções de atracção na janela principal (necessário reiniciar o QGIS)

  • Define Default snap mode selectstring (‘To vertex’, ‘To segment’, ‘To vertex and segment’, ‘Off’)
  • Define Tolerância de atracção pré-definida em unidades de mapa ou pixeis

  • Define o Raio de pesquisa para editar vértices em unidades de mapa ou pixeis

Marcadores de Vértices

  • checkbox Mostrar marcadores apenas para elementos seleccionados

  • Define vertex Marker style selectstring (‘Cross’ (default), ‘Semi transparent circle’ or ‘None’)
  • Definir o vértice Tamanho do Marcador

Ferramenta de curva de afastamento

The next 3 options refer to the mActionOffsetCurve Offset Curve tool in Digitalização Avançada. Through the various settings, it is possible to influence the shape of the line offset. These options are possible starting from GEOS 3.3.

  • Join style
  • Quadrant segments
  • Miter limit

Menu GDAL

GDAL is a data exchange library for raster files. In this tab, you can Edit create options and Edit Pyramids Options of the raster formats. Define which GDAL driver is to be used for a raster format, as in some cases more than one GDAL driver is available.

Menu SRC

SRC padrão para novos projectos

  • radiobuttonoff Don’t enable ‘on the fly’ reprojection
  • radiobuttonon Automatically enable ‘on the fly’ reprojection if layers have different CRS
  • radiobuttonoff Enable ‘on the fly’ reprojection by default
  • Seleccione um SRC em Iniciar sempre um novo projecto com este SRC

SRC para novas camadas

This area allows you to define the action to take when a new layer is created, or when a layer without a CRS is loaded.

  • radiobuttonon Prompt for CRS
  • radiobuttonoff Use project CRS
  • radiobuttonoff Use default CRS

Default datum transformations

  • checkbox Ask for datum transformation when no default is defined
  • If you have worked with the ‘on-the-fly’ CRS transformation you can see the result of the transformation in the window below. You can find information about ‘Source CRS’ and ‘Destination CRS’ as well as ‘Source datum transform’ and ‘Destination datum transform’.

Locale Menu

  • checkbox Sobrepor idioma do sistema e Idioma a utilizar em alternativa

  • Informação sobre a região do sistema activo local

Network Menu

Geral

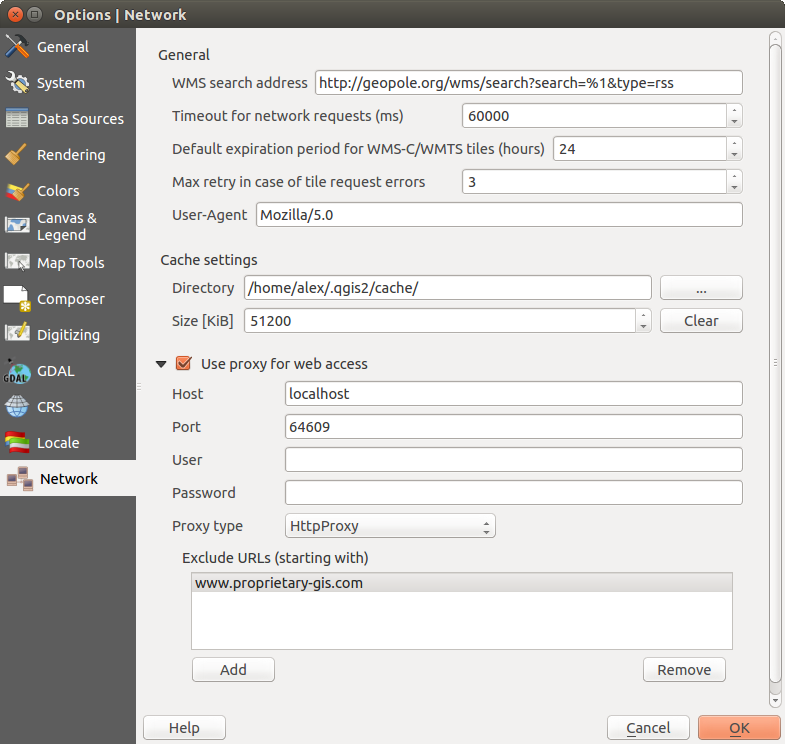
  • Define Pesquisa de endereço WMS, padrão como http://geopole.org/wms/search?search=\%1\&type=rss

  • Define Tempo esgotado para pedidos de rede (ms) - o padrão é 60000

  • Define Período de validade por defeito para tiles WMSC/WMTS (horas) - por defeito é 24

  • Define Max retry in case of tile request errors
  • Define User-Agent

Figure Network Tab:

../../../_images/proxy-settings.png

Proxy-settings in QGIS

Configurações de cache

Define a Pasta e Tamanho para o cache.

  • checkbox Usar proxy para aceder à web e define ‘Máquina’, ‘Porta’, ‘Utilizador’, e ‘Palavra-chave’.

  • Set the Proxy type selectstring according to your needs.
    • Default Proxy: Proxy é determinado baseando-se na definição do proxy da aplicação em uso

    • Socks5Proxy: Proxy genérico para qualquer tipo de ligação. Suporta TCP, UDP, unindo a uma porta (ligações de entrada) e autenticação.

    • HttpProxy: Implementado usando o comando “LIGAR” , apenas suporta ligações TCP de saída; suporta autenticação.

    • HttpCachingProxy: Implementado usando comandos HTTP normais, é útil apenas no contexto de pedidos HTTP.

    • FtpCachingProxy: Implementado usando um proxy FTP, é útil no contexto de pedidos FTP.

Alguns URLs excluídos podem ser adicionados na caixa de texto debaixo das configurações de proxy (veja Figure_Network_Tab).

If you need more detailed information about the different proxy settings, please refer to the manual of the underlying QT library documentation at http://doc.trolltech.com/4.5/qnetworkproxy.html#ProxyType-enum.

Tip

Usando Proxies

Using proxies can sometimes be tricky. It is useful to proceed by ‘trial and error’ with the above proxy types, to check to see if they succeed in your case.

You can modify the options according to your needs. Some of the changes may require a restart of QGIS before they will be effective.

  • nix Settings are saved in a text file: $HOME/.config/QGIS/QGIS2.conf
  • osx pode encontrar as configurações em: $HOME/Library/Preferences/org.qgis.qgis.plist

  • As configurações win são armazenadas no registo em: HKEY\CURRENT_USER\Software\QGIS\qgis

Personalização

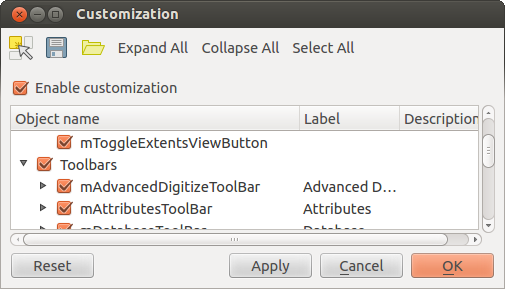
The customization tool lets you (de)activate almost every element in the QGIS user interface. This can be very useful if you have a lot of plugins installed that you never use and that are filling your screen.

Figure Customization 1:

../../../_images/customization.png

The Customization dialog nix

QGIS Customization is divided into five groups. In checkbox Menus, you can hide entries in the Menu bar. In checkbox Panels, you find the panel windows. Panel windows are applications that can be started and used as a floating, top-level window or embedded to the QGIS main window as a docked widget (see also Panels and Toolbars). In the checkbox Status Bar, features like the coordinate information can be deactivated. In checkbox Toolbars, you can (de)activate the toolbar icons of QGIS, and in checkbox Widgets, you can (de)activate dialogs as well as their buttons.

With mActionSelect Switch to catching widgets in main application, you can click on elements in QGIS that you want to be hidden and find the corresponding entry in Customization (see figure_customization). You can also save your various setups for different use cases as well. Before your changes are applied, you need to restart QGIS.