.
OpenStreetMap
In recente jaren heeft het project OpenStreetMap enorm aan populariteit gewonnen omdat in vele landen geen gratis geo-gegevens zoals digitale wegenkaarten beschikbaar zijn. Het doel van het project OSM is om een gratis bewerkbare kaart van de wereld te maken vanuit GPS-gegevens, lucht-/satellietfotografie of lokale kennis. QGIS verschaft een plug-in die gebruikers in staat stelt te werken met gegevens van OSM om dat doel te ondersteunen.
De plug-in OpenStreetMap, een bronplug-in van QGIS, verschaft de basisfunctionaliteiten voor het bewerken van gegevens van OSM; dit omvat het laden van gegevens,, importeren, opslaan, downloaden, verwerken, terug uploaden van gegevens baar de server van OpenStreetMap. Bij het implementeren van de plug-in van OSM werd inspiratie gezocht bij de bestaande bewerkingsprogramma’s voor de gegevens van OSM. Het doel was hun functionaliteiten te combineren om de best mogelijke resultaten te behalen.
Het volgende gedeelte geeft een korte introductie voor de principes van het project OSM.
Delen van de volgende alinea’s werden gekopieerd vanaf de website van OpenStreetMap op http://www.openstreetmap.org.
Het project OpenStreetMap
OpenStreetMap is een project om een vrij bewerkbare kaart van de wereld te maken. De kaarten worden gemaakt met behulp van gegevens uit draagbare GPS-apparaten, luchtfotografie, andere vrije bronnen of eenvoudigweg uit lokale kennis. Het project werd begonnen omdat op het gebruik van de meeste kaarten wettelijke of technische beperkingen rusten, die mensen beperken om ze te gebruiken in creatieve, productieve, of op onverwachte manieren. Zowel gerenderde afbeeldingen als de vector gegevensset van OSM zijn voor downloaden beschikbaar onder de licentie Creative Commons Attribution ShareAlike 2.0.
Figure OpenStreetMap 1:
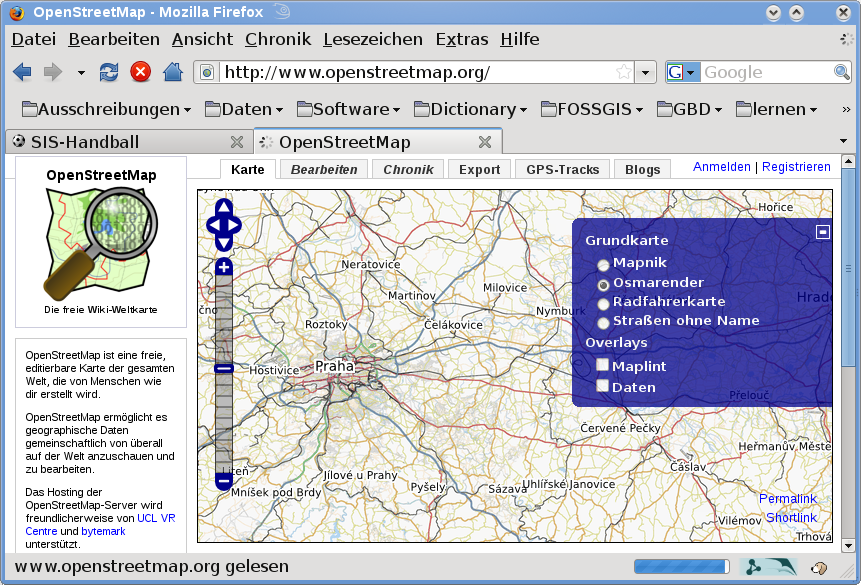
Gegevens van OpenStreetMap op het web
OpenStreetMap werd geïnspireerd door sites zoals Wikipedia - de kaartweergave (zie Figure_OpenStreetMap_1 ) bevat een prominente tab Bewerken en een volledige historie voor de revisies wordt onderhouden. Geregistreerde gebruikers kunnen logs voor GPS-sporen uploaden en de vectorgegevens bewerken met behulp van bepaalde programma’s voor bewerking.
Het gegevensprimitief van OSM is een objectklasse die via de API kan worden opgeslagen op de server. De drie ondersteunde typen gegevens zijn: Knoop, Weg en Relatie.
Een knoop is één paar coördinaten van breedte-/lengtegraad. Het wordt gebruikt als bouwsteen voor andere objecten en als een object op zichzelf (Points Of Interest), als zij als zodanig zijn getagd.
Een weg is een lijst van ten minste twee knopen die een lineair object beschrijven, zoals een straat of iets dergelijks. Knopen kunnen leden zijn van meerdere wegen.
Een relatie is een groep van nul of meer primitieven met geassocieerde rollen. Het wordt gebruikt om relaties tussen objecten te specificeren, en kunnen ook een abstract object weergeven.
Verscheidene logische objecten in een algemene kaart (‘Point Of Interest’, ‘straat’, ‘tramlijn’, ‘bushalte’ etc.) worden door deze primitieven gedefinieerd. kaartobjecten zijn welbekend in de gemeenschap van OSM en worden als tags opgeslagen, gebaseerd op een sleutel en een waarde. OSM wordt gewoonlijk gedistribueerd in de indeling XML. XML wordt ook gebruikt voor de communicatie met de server van OSM.
Verbinding QGIS - OSM
Het eerste deel van dit gedeelte beschrijft hoe gegevensprimitieven van OSM worden weergegeven in vectorlagen van QGIS. Zoals eerder vermeld bestaan gegevens van OSM uit Knopen, Wegen en Relaties. In QGIS worden zij weergegeven in drie verschillende typen van lagen: Puntenlaag, Lijnlaag en Polygoonlaag. Het is niet mogelijk om één van deze lagen te verwijderen en met de andere twee te werken.
Een puntenlaag geeft alle objecten weer van het type Knoop die op zichzelf staan. Dat alleen knopen die niet zijn opgenomen in een weg behoren tot de puntenlaag.
Een Lijnlaag geeft die objecten van OSM weer die van het type Weg zijn en niet zijn gesloten. Dat betekent dat geen van deze wegen begint en eindigt met dezelfde Knoop.
Een polygoonlaag geeft alle wegen weer die niet zijn opgenomen in de lijnlaag.
OpenStreetMap heeft nog één extra gegevensprimitief in aanvulling op drie hiervoor vermelde. Deze wordt relatie genoemd. Er is met opzet geen vectorlaag om Relatie weer te geven. Een relatie definieert een verbinding tussen een aantal gegevensprimitieven. Nadat een punt, lijn of polygoon is geïdentificeerd op een kaart, geeft de plug-in een lijst alle relaties weer waar het geïdentificeerde object deel van uitmaakt.
Het was een uitdaging om de verbinding te ontwerpen tussen de gegevens van OSM en de standaard bewerkingsgereedschappen voor QGIS. Deze gereedschappen zijn gemaakt om één enkele vectorlaag tegelijk te bewerken, ongeacht welk type object het weergeeft. Dit betekent dat als gegevens van OSM worden geladen in QGIS via de plug-in, u zou (theoretisch) de puntlaag, lijnlaag of polygoonlaag afzonderlijk kunnen bewerken met deze standaard gereedschappen.
Een lijnlaag bestaat uit twee verschillende typen objecten van OSM, Wegen en Knopen. In de indeling van OSM bestaat een Weg uit Knopen. Als u begint met bewerken van een lijnlaag en u wijzigt de vorm van een lijn, beïnvloedt uw actie niet alleen de weg van OSM, maar ook de knopen van OSM die daar deel van uitmaken.
QGIS standaard bewerkingsgereedschappen kunnen de provider van OSM niet vertellen welke leden van welke lijnen zijn gewijzigd en hoe. Het kan alleen de nieuwe geometrie van de lijn vertellen, en dat is niet genoeg om de wijzigingen correct door te voeren op de database van OSM database. De lijnlaag kent ook de identificaties van de leden van de lijn niet. Hetzelfde probleem treedt op wanneer u probeert de polygoonlaag te bewerken.
De plug-in OSM dient daarom zijn eigen gereedschap te gebruiken voor het bewerken van gegevens van OSM. De lagen van OSM kunnen correct worden gewijzigd omdat zij worden gebruikt. De plug-in Bewerkingsgereedschap bestaat uit gereedschappen voor punt, lijn, polygoon en het maken, verwijderen en verplaatsen van relaties.
Notitie
Wijzigingen in de broncode van QuantumGIS zouden nodig zijn om een verbinding te maken tussen de plug-in van OSM en standaard bewerkingsgereedschappen.
Installatie
De plug-in OpenStreetMap is een bron-plug-in binnen QGIS. De plug-in ‘OpenStreetMap’ kan worden geselecteerd in beheer en installeer plug-ins... zoals beschreven in het gedeelte load_core_plugin.
Basis gebruikers-interface
De eerste keer dat de plug-in OSM wordt gestart (en nadat de eerste gegevens zijn geladen), verschijnen verscheidene nieuwe pictogrammen voor de plug-in OSM in het menu Werkbalken van QGIS, tezamen met nieuwe vast te zetten vensters zoals weergegeven in figure_OpenStreetMap_2.
Figure OpenStreetMap 2:
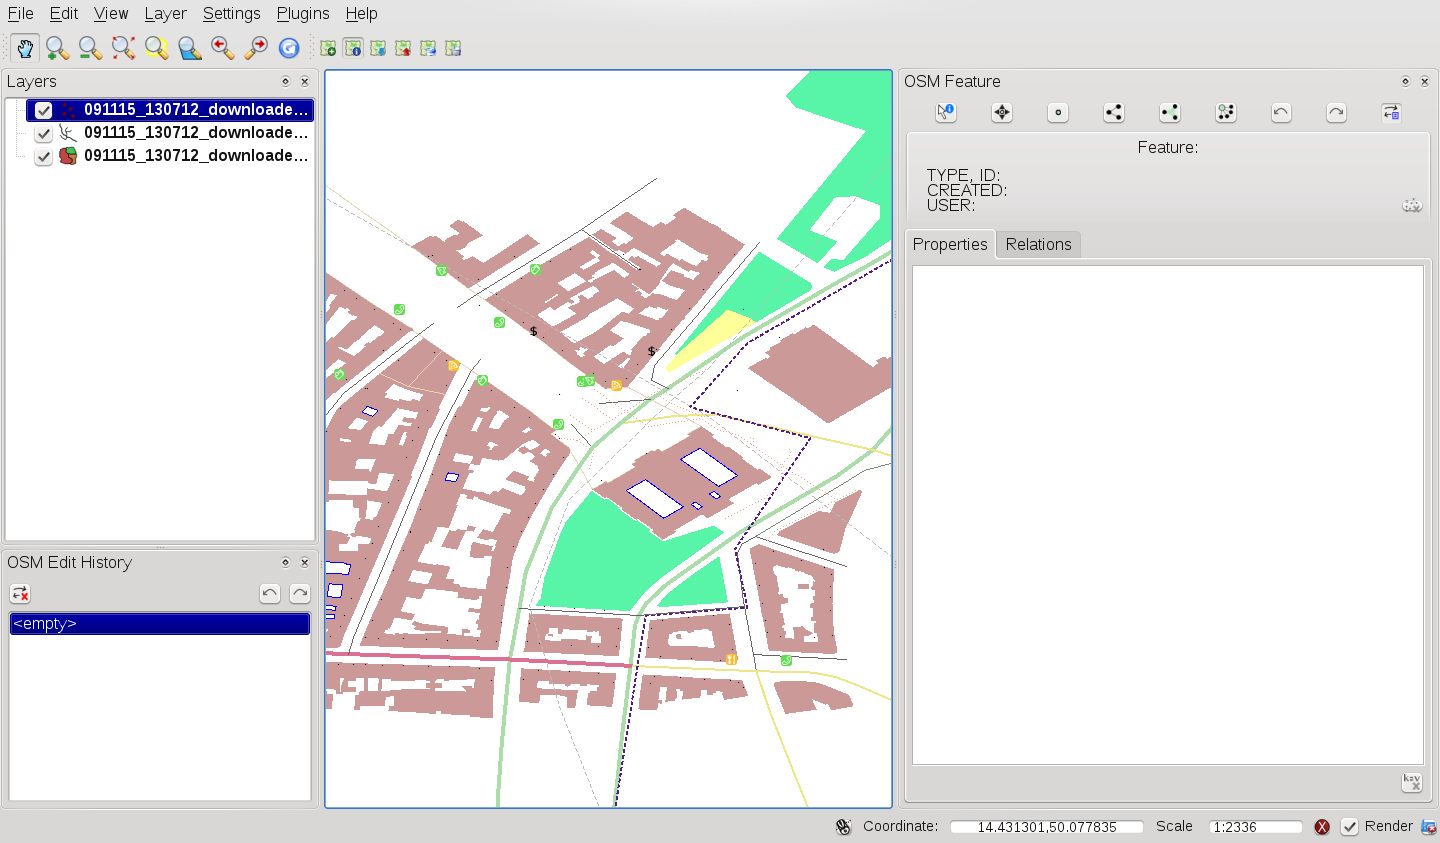
Gebruikers-interface plug-in OSM
Widget OSM-objecten
De widget OSM-objecten helpt om objecten van OSM te identificeren. Het toont basisinformatie over het type object en de identificatie en ook informatie over wie een object heeft gewijzigd en wanneer. De widget OSM-objecten verschaft ook alle bewerkingsgereedschappen in (in het bovenste deel er van). Meer informatie over deze gereedschappen kunnen worden gevonden in de gedeelten hieronder. De widget is initieel uitgeschakeld. Het activeert zichzelf na het met succes laden van enige gegevens van OSM.
Widget OSM Ongedaan maken/Opnieuw
Deze widget Ongedaan maken/Opnieuw wordt gebruikt om bewerkingsacties ongedaan te maken of opnieuw uit te voeren. Het bestaat niet alleen uit een klassieke knop Ongedaan maken en Opnieuw, maar geeft ook een lijst weer met een korte omschrijving van de bewerkingsacties die werden uitgevoerd. De widget OSM Ongedaan maken/Opnieuw is initieel uitgeschakeld. U kunt hem weergeven met behulp van een knop op de widget OSM-objecten.
Pictogrammen voor menu Werkbalken
 OSM laden uit bestand wordt gebruikt om gegevens uit een speciaal XML-bestand van OpenStreetMap te laden.
 Tonen/Verbergen beheren OSM-objecten wordt gebruikt om de widget OSM-objecten te tonen of te verbergen. De widget OSM-objecten is een paneel dat helpt bij het identificeren van OSM-objecten en het bewerken van gegevens van OSM.
 Downloaden gegevens van OSM wordt gebruikt om gegevens te downloaden van de server van OpenStreetMap.
 Uploaden gegevens van OSM wordt gebruikt voor het uploaden van wijzigingen (in huidige gegevens).
 Importeren gegevens vanaf een laag wordt gebruikt om gegevens vanuit een vectorlaag te importeren. Ten minste één vectorlaag moet zijn geladen en huidge gegevens van OSM moeten zijn geladen.
 OSM opslaan naar bestand wordt gebruikt om gegevens van OSM terug op te slaan in een XML-bestand.
Meer gedetailleerde informatie over alle widgets, knoppen en dialoogvensters kan worden gevonden in de toepasselijke gedeelten van dit gedeelte over de plug-in, overeenkomstig hun functionaliteit (bewerken, identificatie, etc.).
Laden van gegevens van OSM
De eerste actie die zou moeten worden uitgevoerd na het starten van de plug-in OSM is het openen van gegevens uit een bestand van OSM. Gegevens van OSM kunnen als shapefile worden geïmporteerd of direct worden gedownload vanaf de server van OpenStreetMap. Hier focussen we op de eerste vermelde methode.
Gebruik het pictogram OSM laden vanuit bestand om gegevens uit een bestand te laden. Als dergelijke knoppen er niet zijn, heeft iemand misschien uw werkbalk voor OpenStreetMap in uw installatie van QGIS uitgeschakeld. U kunt hem weer opnieuw inschakelen door opnieuw te selecteren Beeld‣ Werkbalken‣ OpenStreetMap.
Figure OpenStreetMap 3:
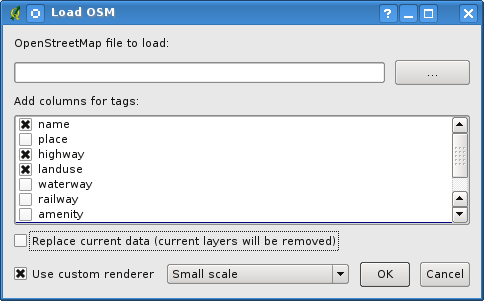
Dialoogvenster Laden van gegevens van OSM
Het doel van de elementen ervan wordt hieronder uitgelegd.
OpenStreetMap gegevens laden: Klik op de knop  om het file:.osm-betand te selecteren waaruit u de gegevens wilt laden.
Add columns for tags: This option determines a connection between OSM and QGIS data. Each feature of OSM data has some tags (pairs of key and value), that define the feature properties. Each feature of a QGIS vector layer also has its attributes (key and value). With this option you can define which properties of OSM objects should be visible when displaying detailed information about QGIS features.
Replace current data: Checking this option means that new data should replace current data the user is working with. Layers of current data will be removed and new ones will be loaded. When loading OSM data for the first time, this option is not active, because there is nothing to replace.
Use custom renderer: This option determines how many details of the map will be used. There are three pre-defined OSM styles for map displaying. Use ‘Small scale’ if you want to view OSM data at low level, to see all details and to edit something. If not you can use ‘Medium scale’ or ‘Large scale’. QGIS 2.2 doesn’t support changing the renderer style dynamically.
Click [OK] to load your data. If this is the first time the OSM file is loaded, the plugin must first parse the database. This may take few seconds or minutes - it depends on the amount of loaded data.
Viewing OSM data
After the OSM data are loaded, you can identify map features using the appropriate
tool. Use the  Identify feature button on the top-left of the
OSM Feature widget. Using this tool you can easily explore all map objects. When
the mouse cursor is placed over an object, you can see all information on it
directly in the OSM Feature widget. There is also a dynamic rubberband displayed
on the map so that the user is able to determine which feature is currently
identified.
Identify feature button on the top-left of the
OSM Feature widget. Using this tool you can easily explore all map objects. When
the mouse cursor is placed over an object, you can see all information on it
directly in the OSM Feature widget. There is also a dynamic rubberband displayed
on the map so that the user is able to determine which feature is currently
identified.
The Properties tab of the widget contains of all feature tags. Clicking on the Relation tab shows you a list of all relations connected with identified feature.
If you want to hold a feature for a while to be able to read its properties and relations, move the mouse cursor at the same time, try left-clicking while you are over the feature. Identification process will stop until next left-clicking.
Sometimes there is more than one feature at a point where left-clicking was performed. This happens especially when clicking on cross-roads or if you did not zoom enough into the map. In this situation only one of such features is identified (and marked with the rubberband) but the plugin remembers all of them. Then (still in the pause mode) you can cycle through the identified features by right-clicking.
Editing basic OSM data
‘Basic data’ in this context means non-relational OSM features - nodes and ways. If you prefer to examine how to perform relational editing, skip this section and move on to the next one.
Basic data editing is a key part of the OSM Plugin. You can change the property, position or shape of any existing basic feature. You can remove features or add new ones. All changes on nodes and ways are remembered by Undo/Redo all changes can be easily uploaded to the OpenStreetMap server.
Changing feature tags
Changing the property/tag of an OSM feature can be done directly in the table of feature tags. The Tags table of basic features can be found on the OSM Feature widget. Don’t forget to identify feature first.
Figure OpenStreetMap 4:

Changing an OSM feature tag
If you want to change a tag value, just double-click in the appropriate row of
column ‘Value’ and type, or select a new value. If you want to remove a tag,
click in the relevant row, then use the button  Remove
selected tags on the right bottom under the table.
Remove
selected tags on the right bottom under the table.
To add new tags just type the key and value into the last row of the table where ‘<next tag value>’ is written. Notice that you cannot change the key of an existing tag pair. Conveniently, there are some combo boxes of all existing tag keys and their typical values.
Point creation
For point creation there is a  Create point button on the
OSM Feature widget. To create some points, just click on the button and start
clicking on the map. If your cursor is over some map feature, the feature is
marked/identified immediately. If you click on the map when a line or polygon is
marked, a new point is created directly on such line or polygon as its new member.
If your cursor is over an existing point, a new point cannot be created. In such
case the OSM plugin will show following message:
Create point button on the
OSM Feature widget. To create some points, just click on the button and start
clicking on the map. If your cursor is over some map feature, the feature is
marked/identified immediately. If you click on the map when a line or polygon is
marked, a new point is created directly on such line or polygon as its new member.
If your cursor is over an existing point, a new point cannot be created. In such
case the OSM plugin will show following message:
Figure OpenStreetMap 5:
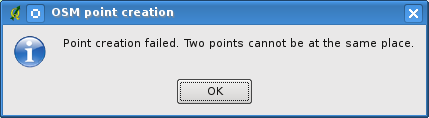
OSM point creation message
The mechanism of helping a user to hit the line or polygon is called snapping and is enabled by default. If you want to create a point very close to some line (but not on it) you must disable snapping by holding the Ctrl key first.
Line creation
For line creation, there is a  Create Line button on the
OSM Feature widget. To create a line just click the button and start left-clicking
on the map. Each of your left-clicks is remembered as a vertex of the new line.
Line creation ends when the first right-click is performed. The new line will
immediately appear on the map.
Create Line button on the
OSM Feature widget. To create a line just click the button and start left-clicking
on the map. Each of your left-clicks is remembered as a vertex of the new line.
Line creation ends when the first right-click is performed. The new line will
immediately appear on the map.
Notitie
A Line with less than two members cannot be created. In such case the operation is ignored.
Snapping is performed to all map vertices - points from the Point vector layer and all Line and Polygon members. Snapping can be disabled by holding the Ctrl key.
Polygon creation
For polygon creation there is a  Create polygon button
on the OSM Feature widget. To create a polygon just click the button and start
left-clicking on the map. Each of your left-clicks is remembered as a member
vertex of the new polygon. The Polygon creation ends when first right-click is
performed. The new polygon will immediately appear on the map. Polygon with less
than three members cannot be created. In such case operation is ignored. Snapping
is performed to all map vertexes - points (from Point vector layer) and all Line
and Polygon members. Snapping can be disabled by holding the Ctrl key.
Create polygon button
on the OSM Feature widget. To create a polygon just click the button and start
left-clicking on the map. Each of your left-clicks is remembered as a member
vertex of the new polygon. The Polygon creation ends when first right-click is
performed. The new polygon will immediately appear on the map. Polygon with less
than three members cannot be created. In such case operation is ignored. Snapping
is performed to all map vertexes - points (from Point vector layer) and all Line
and Polygon members. Snapping can be disabled by holding the Ctrl key.
Map feature moving
If you want to move a feature (no matter what type) please use the  Move feature button from the OSM Feature widget menu. Then you can browse
the map (features are identified dynamically when you go over them) and click on
the feature you want to move. If a wrong feature is selected after your click,
don’t move it from the place. Repeat right-clicking until the correct feature is
identified. When selection is done and you move the cursor, you are no more able
to change your decision what to move. To confirm the move, click on the left mouse
button. To cancel a move, click another mouse button.
Move feature button from the OSM Feature widget menu. Then you can browse
the map (features are identified dynamically when you go over them) and click on
the feature you want to move. If a wrong feature is selected after your click,
don’t move it from the place. Repeat right-clicking until the correct feature is
identified. When selection is done and you move the cursor, you are no more able
to change your decision what to move. To confirm the move, click on the left mouse
button. To cancel a move, click another mouse button.
If you are moving a feature that is connected to another features, these connections won’t be damaged. Other features will just adapt themselves to a new position of a moved feature.
Snapping is also supported in this operation, this means:
- When moving a standalone (not part of any line/polygon) point,snapping to all map segments and vertices is performed.
- When moving a point that is a member of some lines/polygons,snapping to all map segments and vertices is performed, except for vertices of point parents.
- When moving a line/polygon, snapping to all map vertices is performed. Note that the OSM Plugin tries to snap only to the 3 closest-to-cursor vertices of a moved line/polygon, otherwise the operation would by very slow. Snapping can be disabled by holding Ctrl key during the operation.
Map feature removing
If you want to remove a feature, you must identify it first. To remove an
identified feature, use the  Remove this feature button
on the OSM Feature widget. When removing a line/polygon, the line/polygon itself
is deleted, so are all its member points that doesn’t belong to any other
line/polygon.
Remove this feature button
on the OSM Feature widget. When removing a line/polygon, the line/polygon itself
is deleted, so are all its member points that doesn’t belong to any other
line/polygon.
When removing a point that is member of some lines/polygons, the point is deleted and the geometries of parent lines/polygons are changed. The new parent geometry has less vertices than the old one.
If the parent feature was a polygon with three vertexes, its new geometry has only two vertexes. And because there cannot exist polygon with only two vertices, as described above, the feature type is automatically changed to Line.
If the parent feature was a line with two vertexes, its new geometry has only one vertex. And because there cannot exist a line with only one vertex, the feature type is automatically changed to Point.
Editing relations
Thanks to existence of OSM relations we can join OSM features into groups and give them common properties - in such way we can model any possible map object: borders of a region (as group of ways and points), routes of a bus, etc. Each member of a relation has its specific role. There is a pretty good support for OSM Relations in our plugin. Let’s see how to examine, create, update or remove them.
Examining relation
If you want to see relation properties, first identify one of its members. After that open the Relations tab on the OSM Feature widget. At the top of the tab you can see a list of all relations the identified feature is part of. Please choose the one you want to examine and look at its information below. In the first table called ‘Relation tags’ you find the properties of the selected relation. In the table called ‘Relation members’ you see brief information on the relation members. If you click on a member, the plugin will make a rubberband on it in the map.
Relation creation
Er zijn 2 manieren om een relatie te maken:
- You can use the
 Create relation button on OSM
Feature widget.
Create relation button on OSM
Feature widget. - You can create it from the Relation tab of OSM Feature widget
using the
 Add relation button.
In both cases a dialog will appear. For the second case, the feature that is currently identified is automatically considered to be the first relation member, so the dialog is prefilled a little. When creating a relation, please select its type first. You can select one of predefined relation types or write your own type. After that fill the relation tags and choose its members.
If you have already selected a relation type, try using the  Generate tags button. It will generate typical tags to your relation type.
Then you are expected to enter values to the keys. Choosing relation members can
be done either by writing member identifiers, types and roles or using the
Identify tool and clicking on map.
Generate tags button. It will generate typical tags to your relation type.
Then you are expected to enter values to the keys. Choosing relation members can
be done either by writing member identifiers, types and roles or using the
Identify tool and clicking on map.
Finally when type, tags and members are chosen, the dialog can be submitted. In such case the plugin creates a new relation for you.
Changing relation
If you want to change an existing relation, identify it first (follow steps
written above in Section Examining relation). After that click on the
 Edit relation button. You will find it on the OSM
Feature widget. A new dialog appears, nearly the same as for the ‘create relation’
action. The dialog is pre-filled with information on given relations. You can
change relation tags, members or even its type. After submitting the dialog your
changes will be committed.
Edit relation button. You will find it on the OSM
Feature widget. A new dialog appears, nearly the same as for the ‘create relation’
action. The dialog is pre-filled with information on given relations. You can
change relation tags, members or even its type. After submitting the dialog your
changes will be committed.
Downloading OSM data
To download data from OpenStreetMap server click on the
Download OSM data button. If there is no such button, the OSM toolbar may
be disabled in your QGIS instalation. You can enable it again at
Settings ‣ Toolbars ‣ OpenStreetMap . After clicking the
button a dialog appears and provides following functionalities:
Figure OpenStreetMap 6:
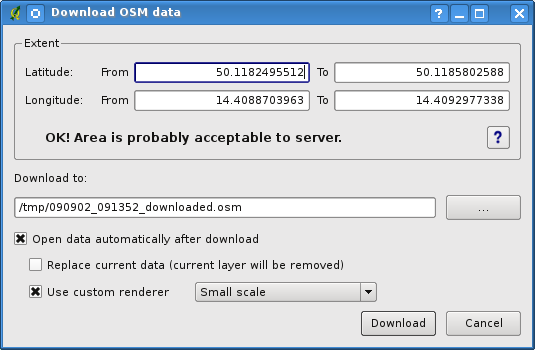
OSM download dialog
Extent: Specifies an area to download data from intervals of latitude and
longitude degrees. Because there is some restriction of OpenStreetMap server on
how much data can be downloaded, the intervals must not be too wide. More detailed
info on extent specification can is shown after clicking the  Help button on the right.
Download to: Here you are expected to write a path to the file where data
will be stored. If you can’t remember the structure of your disk, don’t panic.
The browse button will help you.
Open data automatically after download: Determines, if the download process
should be followed by loading the data process or not. If you prefer not to load
data now, you can do it later by using the Load OSM from file
button.
Replace current data: This option is active only if  Open data automatically after download is checked. Checking this
option means that downloaded data should replace current data we are working with
now. Layers of the current data will be removed and new ones will be loaded. When
starting QGIS and downloading OSM data for the first time, this option is
initially inactive, because there is nothing to replace.
Open data automatically after download is checked. Checking this
option means that downloaded data should replace current data we are working with
now. Layers of the current data will be removed and new ones will be loaded. When
starting QGIS and downloading OSM data for the first time, this option is
initially inactive, because there is nothing to replace.
Use custom renderer: This option is active only if the
Open data automatically after download checkbox is checked. It
determines how many details will be in the map. There are three predefined OSM
styles for map displaying. Use ‘Small scale’ if you want to view OSM data at low
level, to see all details and to edit something. If not you can use ‘Medium scale’
or ‘Large scale’. QGIS 2.2 does not support changing the renderer style
dynamically.
Click the [Download] button to start the download process.
A progress dialog will continuously inform you about how much of data is already downloaded. When an error occurs during the download process, a dialog tells you why. When action finishes successfully both the progress dialog and download dialog will close themselves.
Uploading OSM data
Note that the upload is always done on current OSM data. Before opening the OSM Upload dialog, please be sure that you really have the right active layer with OSM data.
To upload current data to the OSM server click on the
Upload OSM data button. If there is no such button, OSM toolbar in your
QGIS installation is disabled. You can enable it again in
Settings ‣ Toolbars ‣ OpenStreetMap . After clicking the
[Upload] button a new dialog will appear.
Figure OpenStreetMap 7:
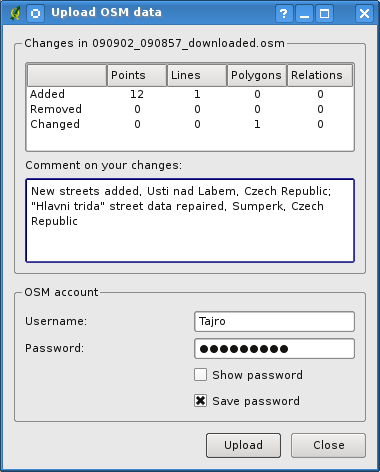
OSM upload dialog
At the top of the dialog you can check, if you are uploading the correct data. There is a short name of a current database. In the table you find information on how many changes will be uploaded. Statistics are displayed separately for each feature type.
In the Comment on your changes box you can write brief information on meaning of your upload operation. Just write in brief what data changes you’ve done or let the box empty. Fill ‘OSM account’ arrays so that the server could authenticate you. If you don’t have an account on the OSM server, it’s the best time to create one at http://www.openstreetmap.org. Finally use [Upload] to start an upload operation.
Saving OSM data
To save data from a current map extent to an XML file click on the
Save OSM to file button. If there is no such button, the OSM toolbar in
your QuantumGIS installation is probably disabled. You can enable it again in
Settings ‣ Toolbars ‣ OpenStreetMap. After clicking on the
button a new dialog appears.
Figure OpenStreetMap 8:

OSM saving dialog
Select features you want to save into XML file and the file itself. Use the [OK] button to start the operation. The process will create an XML file, in which OSM data from your current map extent are represented. The OSM version of the output file is 0.6. Elements of OSM data (<node>, <way>, <relation>) do not contain information on their changesets and uids. This information are not compulsory yet, see DTD for OSM XML version 0.6. In the output file OSM elements are not ordered.
Notice that not only data from the current extent are saved. Into the output file the whole polygons and lines are saved even if only a small part of them is visible in the current extent. For each saved line/polygon all its member nodes are saved too.
Import OSM data
To import OSM data from an opened non-OSM vector layer follow this instructions.
Choose current OSM data by clicking on one of their layers. Click on the
Import data from a layer button. If there is no such button,
someone has probably disabled the OpenStreetMap toolbar in your QGIS installation.
You can enable it again in Settings ‣ Toolbars ‣ OpenStreetMap.
After clicking on the button following message may show up:
Figure OpenStreetMap 9:
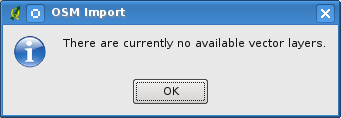
OSM import message dialog
In such case there is no vector layer currently loaded. The import must be done from a loaded layer - please load a vector layer from which you want to import data. After a layer is opened, your second try should give you a better result (don’t forget to mark the current OSM layer again):
Figure OpenStreetMap 10:
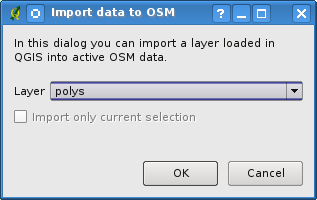
Import data to OSM dialog
Use the submit dialog to start the process of OSM data importing. Reject it if you are not sure you want to import something.