OpenStreetMap
In recent years, the OpenStreetMap project has gained popularity because in many countries no free geodata such as digital roadmaps are available. The objective of the OSM project is to create a free editable map of the world from GPS data, aerial photography or from local knowledge. To support this objective, QGIS provides a plugin that enables its users to work with OSM data.
The OpenStreetMap plugin, a core QGIS plugin, provides the basic functionalities for OSM data manipulation; this includes data loading, importing, saving, downloading, editing and uploading data back to the OpenStreetMap server. While implementing the OSM plugin an inspiration was taken from existing OSM data editors. The purpose was to combine their functionalities to get the best possible result.
The following section gives a brief introduction to principles of the OSM project.
Parts of the following paragraphs are copied from the OpenStreetMap web site at http://www.openstreetmap.org.
The OpenStreetMap project
OpenStreetMap is a project to create a free editable map of the world. The maps are created using data from portable GPS devices, aerial photography, other free sources or simply from local knowledge. The project was started because most maps have legal or technical restrictions on their use, restricting people from using them in creative, productive, or unexpected ways. Both rendered images and the vector dataset of OSM are available for download under a Creative Commons Attribution ShareAlike 2.0 license.
Figure OpenStreetMap 1:
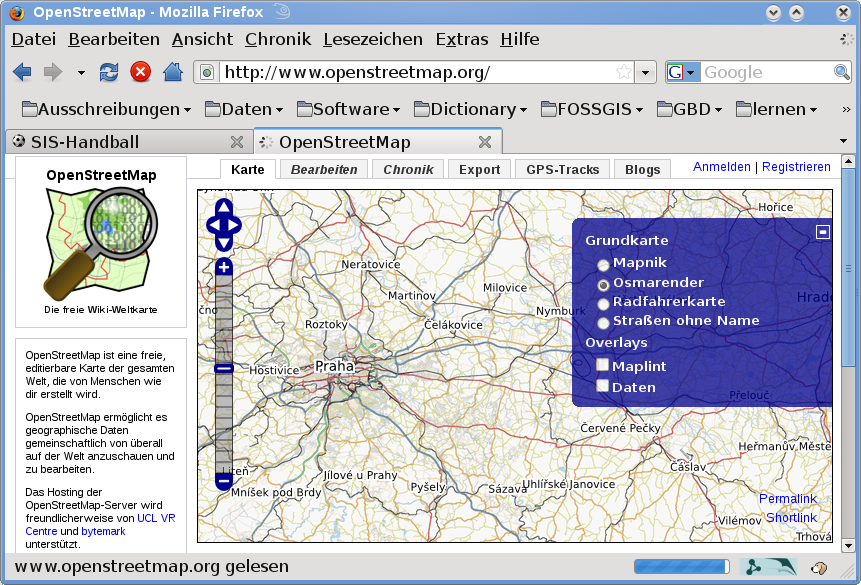
OpenStreetMap data in the web
OpenStreetMap was inspired by sites such as Wikipedia - the map display (see Figure_OpenStreetMap_1 ) features a prominent Edit tab and a full revision history is maintained. Registered users can upload GPS track logs and edit the vector data using the given editing tools.
OSM data primitive is an object class that can be stored via the API in the server. The three supported types of data are: Node, Way and Relation.
- A node is a latitude/longitude pair of coordinates. It is used as building a block for other features and as a feature itself (Points Of Interest), if they are tagged as required.
- A way is a list of at least two nodes that describe a linear feature such as a street, or similar. Nodes can be members of multiple ways.
- A relation is a group of zero or more primitives with associated roles. It is used to specify relationships between objects, and may also model an abstract object.
Several different logical features in a common map ‘Point Of Interest’, ‘Street’, ‘Tram Line’, ‘Bus Stop’ etc.) are defined by these primitives. Map features are well-known in the OSM community and are stored as tags, based on a key and a value. OSM is usually distributed in XML format. XML payload is used for the communication with the OSM server as well.
QGIS - OSM Connection
The first part of this section describes how OSM data primitives are displayed in QGIS vector layers. As previously mentioned, OSM data consists of Nodes, Ways and Relations. In QGIS, they are displayed in three different layer types: Point layer, Line layer and Polygon layer. It is not possible to remove any of these layers and work with the other ones.
- A Point layer displays all features of type Node that stands alone. That means that only Nodes that are not included in any Way belongs to the Point layer.
- A Line layer displays those OSM features of type Way that are not closed. That means, none of these Ways starts and ends with the same Node.
- A Polygon layer displays all Ways that are not included in Line layer.
OpenStreetMap has one more data primitive in addition to the three mentioned above. This is called Relation. There is purposely no vector layer to display Relations. A Relation defines a connection between any number of data primitives. After a Point, Line or Polygon is identified on a map, the plugin shows a list of all relations which the identified feature is part of.
It was challenging to design the connection between OSM data and the standard QGIS editing tools. These tools are made to edit a single vector layer at a time, no matter of what feature types it displays. This means that if OSM data are loaded to QGIS through the plugin, you could (theoretically) edit the Point layer, Line layer or Polygon layer with these standard tools separately.
A Line layer consists of two different types of OSM features, Ways and Nodes. In OSM format, a Way is composed of Nodes. If you start editing a Line layer and change the shape of some line, your action affects not only the OSM Way, but also the OSM Nodes that are part of it.
QGIS standard editing tools cannot tell the OSM provider, which members of which line has changed and how. It can tell only what’s the new geometry of which line, and that’s not enough to propagate changes to the OSM database correctly. The Line layer does also not know the identifiers of the line members. The same problem occurs when you try to edit the Polygon layer.
For this reason, the OSM plugin need its own tools for editing OSM data. While they are used, the OSM layers can be changed correctly. The Plugin editing tools consists of tools for Point, Line, Polygon and Relation creation, deletion and moving.
Note
To create a connection between the OSM plugin and standard editing tools, changes in QuantumGIS core code would be necessary.
Installation
The OpenStreetMap plugin is a core plugin inside QGIS. The ‘OpenStreetMap’ plugin can be selected in the Plugin Manager as described in section Carregando um Módulo do QGIS Core.
Basic user interface
The first time the OSM plugin is started (and after the first data are loaded), several new OSM plugin icons appear in the QGIS toolbar menu together with new dock windows as shown in figure_OpenStreetMap_2.
Figure OpenStreetMap 2:
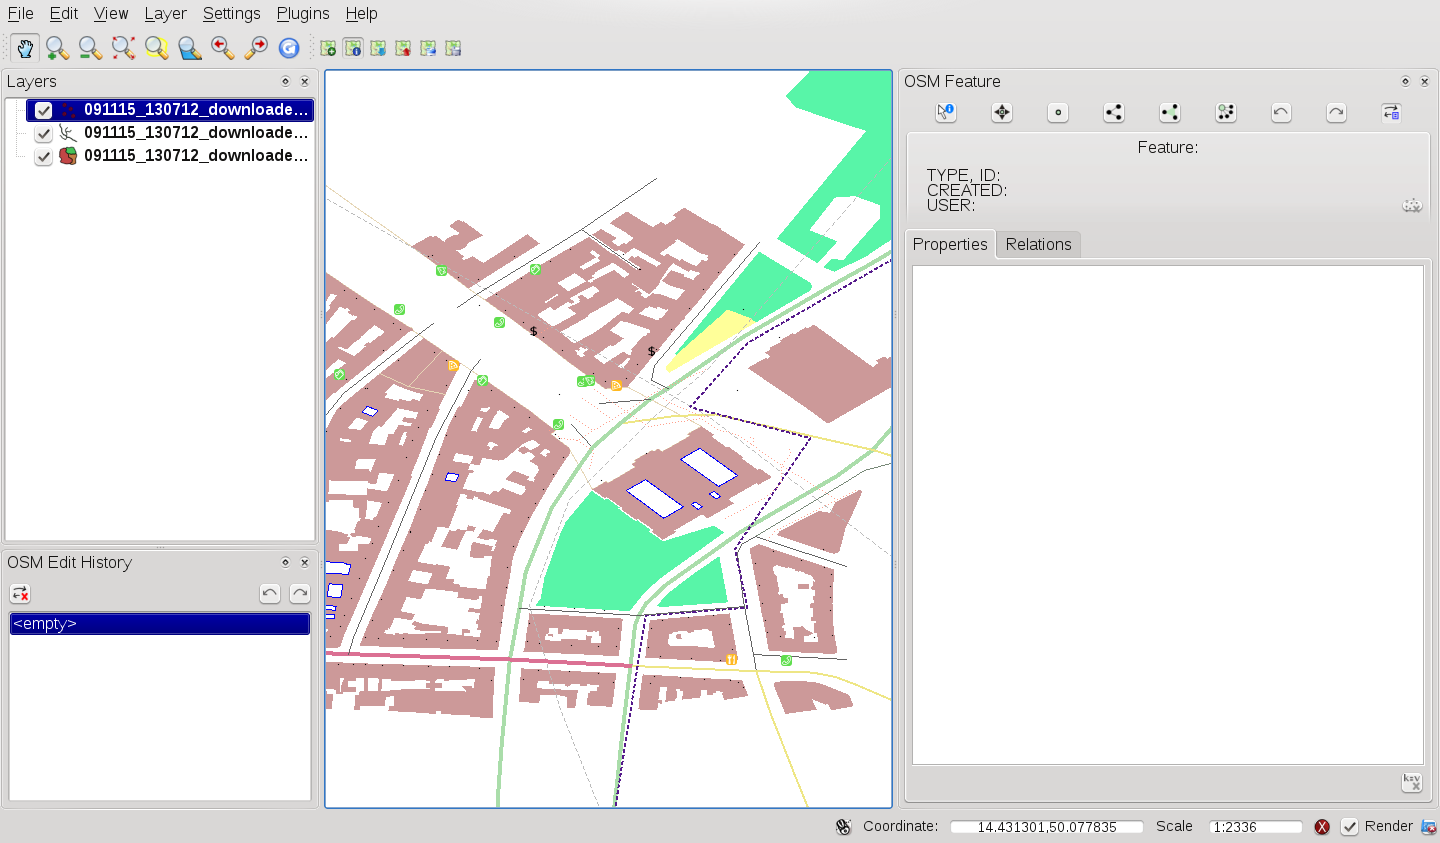
OSM plugin user interface
OSM Features widget
The OSM Feature widget helps to identify OSM features. It shows basic information on the feature type and identifier as well as information on who has changed a feature, and when. The OSM Feature widget also provides all editing tools (in the top part of it). More information on those tools can be found in the sections below. The widget is initially disabled. It activates itself after successful loading some OSM data.
OSM Undo/Redo widget
This Undo/Redo widget is used to undo and redo edit actions. It consists not only a classic Undo and Redo button, but also shows a list with a brief description of the edit actions that were done. The OSM Undo/Redo widget is initially closed. You can show it using a button on the OSM Feature widget.
Toolbar menu icons
 Load OSM from file is used to load data from a special
OpenStreetMap XML file.
Load OSM from file is used to load data from a special
OpenStreetMap XML file.
 Show/Hide OSM Feature Manager is used to show or hide
the OSM Feature widget. The OSM Feature widget is a panel that helps with OSM
feature identification and with OSM data editing.
Show/Hide OSM Feature Manager is used to show or hide
the OSM Feature widget. The OSM Feature widget is a panel that helps with OSM
feature identification and with OSM data editing.
 Download OSM data is used to download data from the
OpenStreetMap server.
Download OSM data is used to download data from the
OpenStreetMap server.
 Upload OSM data is used to upload changes (on current data).
 Import data from a layer is used to import data from a vector
layer. At least one vector layer must be loaded and current OSM data must be selected.
Import data from a layer is used to import data from a vector
layer. At least one vector layer must be loaded and current OSM data must be selected.
 Save OSM to file is used to save OSM data back to an XML file.
More detailed information on all the widgets, buttons and dialogs can be found in appropriate sections of this plugin section according to their functionality (editing, identification, etc.).
Loading OSM data
The first action that should be done after starting the OSM Plugin is opening data from an OSM file. OSM data can be import as shapefile or downloaded directly from the OpenStreetMap server. Here we are focusing on the first mentioned method.
To load data from a file use the Load OSM from file icon. If
there is no such button, maybe someone disabled OpenStreetMap toolbar in your
QGIS installation. You can enable it again selecting Settings ‣
Toolbars ‣ OpenStreetMap.
Figure OpenStreetMap 3:
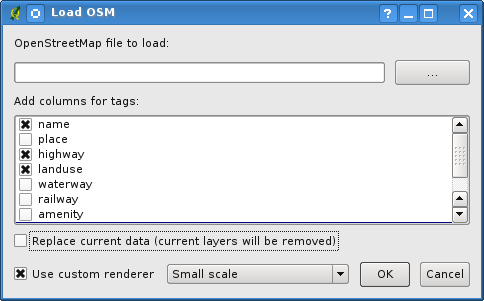
Load OSM data dialog
The purpose of its elements is explained below.
OpenStreetMap file to load: Click on the  button to select the
file:.osm file you want to load data from.
button to select the
file:.osm file you want to load data from.
Add columns for tags: This option determines a connection between OSM and QGIS data. Each feature of OSM data has some tags (pairs of key and value), that define the feature properties. Each feature of a QGIS vector layer also has its attributes (key and value). With this option you can define which properties of OSM objects should be visible when displaying detailed information about QGIS features.
Replace current data: Checking this option means that new data should replace current data the user is working with. Layers of current data will be removed and new ones will be loaded. When loading OSM data for the first time, this option is not active, because there is nothing to replace.
Use custom renderer: This option determines how many details of the map will be used. There are three pre-defined OSM styles for map displaying. Use ‘Small scale’ if you want to view OSM data at low level, to see all details and to edit something. If not you can use ‘Medium scale’ or ‘Large scale’. QGIS 2.0 doesn’t support changing the renderer style dynamically.
Click [OK] to load your data. If this is the first time the OSM file is loaded, the plugin must first parse the database. This may take few seconds or minutes - it depends on the amount of loaded data.
Viewing OSM data
After the OSM data are loaded, you can identify map features using the appropriate
tool. Use the  Identify feature button on the top-left of the
OSM Feature widget. Using this tool you can easily explore all map objects. When
the mouse cursor is placed over an object, you can see all information on it
directly in the OSM Feature widget. There is also a dynamic rubberband displayed
on the map so that the user is able to determine which feature is currently
identified.
Identify feature button on the top-left of the
OSM Feature widget. Using this tool you can easily explore all map objects. When
the mouse cursor is placed over an object, you can see all information on it
directly in the OSM Feature widget. There is also a dynamic rubberband displayed
on the map so that the user is able to determine which feature is currently
identified.
The Properties tab of the widget contains of all feature tags. Clicking on the Relation tab shows you a list of all relations connected with identified feature.
If you want to hold a feature for a while to be able to read its properties and relations, move the mouse cursor at the same time, try left-clicking while you are over the feature. Identification process will stop until next left-clicking.
Sometimes there is more than one feature at a point where left-clicking was performed. This happens especially when clicking on cross-roads or if you did not zoom enough into the map. In this situation only one of such features is identified (and marked with the rubberband) but the plugin remembers all of them. Then (still in the pause mode) you can cycle through the identified features by right-clicking.
Editing basic OSM data
‘Basic data’ in this context means non-relational OSM features - nodes and ways. If you prefer to examine how to perform relational editing, skip this section and move on to the next one.
Basic data editing is a key part of the OSM Plugin. You can change the property, position or shape of any existing basic feature. You can remove features or add new ones. All changes on nodes and ways are remembered by Undo/Redo all changes can be easily uploaded to the OpenStreetMap server.
Changing feature tags
Changing the property/tag of an OSM feature can be done directly in the table of feature tags. The Tags table of basic features can be found on the OSM Feature widget. Don’t forget to identify feature first.
Figure OpenStreetMap 4:

Changing an OSM feature tag
If you want to change a tag value, just double-click in the appropriate row of
column ‘Value’ and type, or select a new value. If you want to remove a tag,
click in the relevant row, then use the button  Remove
selected tags on the right bottom under the table.
Remove
selected tags on the right bottom under the table.
To add new tags just type the key and value into the last row of the table where ‘<next tag value>’ is written. Notice that you cannot change the key of an existing tag pair. Conveniently, there are some combo boxes of all existing tag keys and their typical values.
Point creation
For point creation there is a  Create point button on the
OSM Feature widget. To create some points, just click on the button and start
clicking on the map. If your cursor is over some map feature, the feature is
marked/identified immediately. If you click on the map when a line or polygon is
marked, a new point is created directly on such line or polygon as its new member.
If your cursor is over an existing point, a new point cannot be created. In such
case the OSM plugin will show following message:
Create point button on the
OSM Feature widget. To create some points, just click on the button and start
clicking on the map. If your cursor is over some map feature, the feature is
marked/identified immediately. If you click on the map when a line or polygon is
marked, a new point is created directly on such line or polygon as its new member.
If your cursor is over an existing point, a new point cannot be created. In such
case the OSM plugin will show following message:
Figure OpenStreetMap 5:
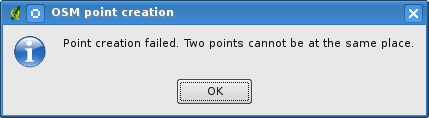
OSM point creation message
The mechanism of helping a user to hit the line or polygon is called snapping and is enabled by default. If you want to create a point very close to some line (but not on it) you must disable snapping by holding the Ctrl key first.
Line creation
For line creation, there is a  Create Line button on the
OSM Feature widget. To create a line just click the button and start left-clicking
on the map. Each of your left-clicks is remembered as a vertex of the new line.
Line creation ends when the first right-click is performed. The new line will
immediately appear on the map.
Create Line button on the
OSM Feature widget. To create a line just click the button and start left-clicking
on the map. Each of your left-clicks is remembered as a vertex of the new line.
Line creation ends when the first right-click is performed. The new line will
immediately appear on the map.
Note
A Line with less than two members cannot be created. In such case the operation is ignored.
Snapping is performed to all map vertices - points from the Point vector layer and all Line and Polygon members. Snapping can be disabled by holding the Ctrl key.
Polygon creation
For polygon creation there is a  Create polygon button
on the OSM Feature widget. To create a polygon just click the button and start
left-clicking on the map. Each of your left-clicks is remembered as a member
vertex of the new polygon. The Polygon creation ends when first right-click is
performed. The new polygon will immediately appear on the map. Polygon with less
than three members cannot be created. In such case operation is ignored. Snapping
is performed to all map vertexes - points (from Point vector layer) and all Line
and Polygon members. Snapping can be disabled by holding the Ctrl key.
Create polygon button
on the OSM Feature widget. To create a polygon just click the button and start
left-clicking on the map. Each of your left-clicks is remembered as a member
vertex of the new polygon. The Polygon creation ends when first right-click is
performed. The new polygon will immediately appear on the map. Polygon with less
than three members cannot be created. In such case operation is ignored. Snapping
is performed to all map vertexes - points (from Point vector layer) and all Line
and Polygon members. Snapping can be disabled by holding the Ctrl key.
Map feature moving
If you want to move a feature (no matter what type) please use the  Move feature button from the OSM Feature widget menu. Then you can browse
the map (features are identified dynamically when you go over them) and click on
the feature you want to move. If a wrong feature is selected after your click,
don’t move it from the place. Repeat right-clicking until the correct feature is
identified. When selection is done and you move the cursor, you are no more able
to change your decision what to move. To confirm the move, click on the left mouse
button. To cancel a move, click another mouse button.
Move feature button from the OSM Feature widget menu. Then you can browse
the map (features are identified dynamically when you go over them) and click on
the feature you want to move. If a wrong feature is selected after your click,
don’t move it from the place. Repeat right-clicking until the correct feature is
identified. When selection is done and you move the cursor, you are no more able
to change your decision what to move. To confirm the move, click on the left mouse
button. To cancel a move, click another mouse button.
If you are moving a feature that is connected to another features, these connections won’t be damaged. Other features will just adapt themselves to a new position of a moved feature.
Snapping is also supported in this operation, this means:
- When moving a standalone (not part of any line/polygon) point,snapping to all map segments and vertices is performed.
- When moving a point that is a member of some lines/polygons,snapping to all map segments and vertices is performed, except for vertices of point parents.
- When moving a line/polygon, snapping to all map vertices is performed. Note that the OSM Plugin tries to snap only to the 3 closest-to-cursor vertices of a moved line/polygon, otherwise the operation would by very slow. Snapping can be disabled by holding Ctrl key during the operation.
Map feature removing
If you want to remove a feature, you must identify it first. To remove an
identified feature, use the  Remove this feature button
on the OSM Feature widget. When removing a line/polygon, the line/polygon itself
is deleted, so are all its member points that doesn’t belong to any other
line/polygon.
Remove this feature button
on the OSM Feature widget. When removing a line/polygon, the line/polygon itself
is deleted, so are all its member points that doesn’t belong to any other
line/polygon.
When removing a point that is member of some lines/polygons, the point is deleted and the geometries of parent lines/polygons are changed. The new parent geometry has less vertices than the old one.
If the parent feature was a polygon with three vertexes, its new geometry has only two vertexes. And because there cannot exist polygon with only two vertices, as described above, the feature type is automatically changed to Line.
If the parent feature was a line with two vertexes, its new geometry has only one vertex. And because there cannot exist a line with only one vertex, the feature type is automatically changed to Point.
Editing relations
Thanks to existence of OSM relations we can join OSM features into groups and give them common properties - in such way we can model any possible map object: borders of a region (as group of ways and points), routes of a bus, etc. Each member of a relation has its specific role. There is a pretty good support for OSM Relations in our plugin. Let’s see how to examine, create, update or remove them.
Examining relation
If you want to see relation properties, first identify one of its members. After that open the Relations tab on the OSM Feature widget. At the top of the tab you can see a list of all relations the identified feature is part of. Please choose the one you want to examine and look at its information below. In the first table called ‘Relation tags’ you find the properties of the selected relation. In the table called ‘Relation members’ you see brief information on the relation members. If you click on a member, the plugin will make a rubberband on it in the map.
Relation creation
There are 2 ways to create a relation:
- You can use the
 Create relation button on OSM
Feature widget.
Create relation button on OSM
Feature widget. - You can create it from the Relation tab of OSM Feature widget
using the
 Add relation button.
In both cases a dialog will appear. For the second case, the feature that is currently identified is automatically considered to be the first relation member, so the dialog is prefilled a little. When creating a relation, please select its type first. You can select one of predefined relation types or write your own type. After that fill the relation tags and choose its members.
If you have already selected a relation type, try using the  Generate tags button. It will generate typical tags to your relation type.
Then you are expected to enter values to the keys. Choosing relation members can
be done either by writing member identifiers, types and roles or using the
Identify tool and clicking on map.
Generate tags button. It will generate typical tags to your relation type.
Then you are expected to enter values to the keys. Choosing relation members can
be done either by writing member identifiers, types and roles or using the
Identify tool and clicking on map.
Finally when type, tags and members are chosen, the dialog can be submitted. In such case the plugin creates a new relation for you.
Changing relation
If you want to change an existing relation, identify it first (follow steps
written above in Section Examining relation). After that click on the
 Edit relation button. You will find it on the OSM
Feature widget. A new dialog appears, nearly the same as for the ‘create relation’
action. The dialog is pre-filled with information on given relations. You can
change relation tags, members or even its type. After submitting the dialog your
changes will be committed.
Edit relation button. You will find it on the OSM
Feature widget. A new dialog appears, nearly the same as for the ‘create relation’
action. The dialog is pre-filled with information on given relations. You can
change relation tags, members or even its type. After submitting the dialog your
changes will be committed.
Downloading OSM data
To download data from OpenStreetMap server click on the
Download OSM data button. If there is no such button, the OSM toolbar may
be disabled in your QGIS instalation. You can enable it again at
Settings ‣ Toolbars ‣ OpenStreetMap . After clicking the
button a dialog appears and provides following functionalities:
Figure OpenStreetMap 6:
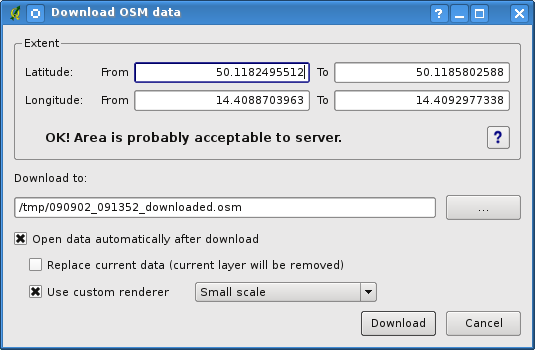
OSM download dialog
Extent: Specifies an area to download data from intervals of latitude and
longitude degrees. Because there is some restriction of OpenStreetMap server on
how much data can be downloaded, the intervals must not be too wide. More detailed
info on extent specification can is shown after clicking the  Help button on the right.
Download to: Here you are expected to write a path to the file where data
will be stored. If you can’t remember the structure of your disk, don’t panic.
The browse button will help you.
Open data automatically after download: Determines, if the download process
should be followed by loading the data process or not. If you prefer not to load
data now, you can do it later by using the Load OSM from file
button.
Replace current data: This option is active only if  Open data automatically after download is checked. Checking this
option means that downloaded data should replace current data we are working with
now. Layers of the current data will be removed and new ones will be loaded. When
starting QGIS and downloading OSM data for the first time, this option is
initially inactive, because there is nothing to replace.
Open data automatically after download is checked. Checking this
option means that downloaded data should replace current data we are working with
now. Layers of the current data will be removed and new ones will be loaded. When
starting QGIS and downloading OSM data for the first time, this option is
initially inactive, because there is nothing to replace.
Use custom renderer: This option is active only if the
Open data automatically after download checkbox is checked. It
determines how many details will be in the map. There are three predefined OSM
styles for map displaying. Use ‘Small scale’ if you want to view OSM data at low
level, to see all details and to edit something. If not you can use ‘Medium scale’
or ‘Large scale’. QGIS 2.0 does not support changing the renderer style
dynamically.
Click the [Download] button to start the download process.
A progress dialog will continuously inform you about how much of data is already downloaded. When an error occurs during the download process, a dialog tells you why. When action finishes successfully both the progress dialog and download dialog will close themselves.
Uploading OSM data
Note that the upload is always done on current OSM data. Before opening the OSM Upload dialog, please be sure that you really have the right active layer with OSM data.
To upload current data to the OSM server click on the
Upload OSM data button. If there is no such button, OSM toolbar in your
QGIS installation is disabled. You can enable it again in
Settings ‣ Toolbars ‣ OpenStreetMap . After clicking the
[Upload] button a new dialog will appear.
Figure OpenStreetMap 7:
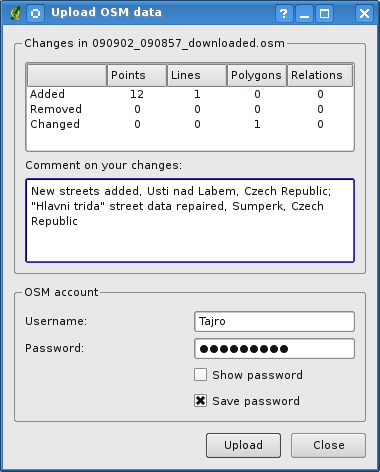
OSM upload dialog
At the top of the dialog you can check, if you are uploading the correct data. There is a short name of a current database. In the table you find information on how many changes will be uploaded. Statistics are displayed separately for each feature type.
In the Comment on your changes box you can write brief information on meaning of your upload operation. Just write in brief what data changes you’ve done or let the box empty. Fill ‘OSM account’ arrays so that the server could authenticate you. If you don’t have an account on the OSM server, it’s the best time to create one at http://www.openstreetmap.org. Finally use [Upload] to start an upload operation.
Saving OSM data
To save data from a current map extent to an XML file click on the
Save OSM to file button. If there is no such button, the OSM toolbar in
your QuantumGIS installation is probably disabled. You can enable it again in
Settings ‣ Toolbars ‣ OpenStreetMap. After clicking on the
button a new dialog appears.
Figure OpenStreetMap 8:
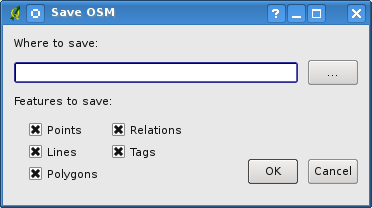
OSM saving dialog
Select features you want to save into XML file and the file itself. Use the [OK] button to start the operation. The process will create an XML file, in which OSM data from your current map extent are represented. The OSM version of the output file is 0.6. Elements of OSM data (<node>, <way>, <relation>) do not contain information on their changesets and uids. This information are not compulsory yet, see DTD for OSM XML version 0.6. In the output file OSM elements are not ordered.
Notice that not only data from the current extent are saved. Into the output file the whole polygons and lines are saved even if only a small part of them is visible in the current extent. For each saved line/polygon all its member nodes are saved too.
Import OSM data
To import OSM data from an opened non-OSM vector layer follow this instructions.
Choose current OSM data by clicking on one of their layers. Click on the
Import data from a layer button. If there is no such button,
someone has probably disabled the OpenStreetMap toolbar in your QGIS installation.
You can enable it again in Settings ‣ Toolbars ‣ OpenStreetMap.
After clicking on the button following message may show up:
Figure OpenStreetMap 9:
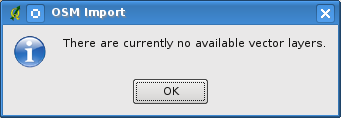
OSM import message dialog
In such case there is no vector layer currently loaded. The import must be done from a loaded layer - please load a vector layer from which you want to import data. After a layer is opened, your second try should give you a better result (don’t forget to mark the current OSM layer again):
Figure OpenStreetMap 10:
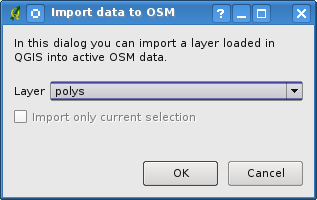
Import data to OSM dialog
Use the submit dialog to start the process of OSM data importing. Reject it if you are not sure you want to import something.