QGIS Configuration
QGIS is highly configurable through the Settings menu. Choose between Panels, Toolbars, Project properties, Options and Customization.
Bedienfelder und Werkzeugkästen
In the Panels‣ menu you can switch on and off QGIS widgets. The Toolbars‣ menu provides the possibility to switch on and off icon groups in the QGIS toolbar (see figure_panels_toolbars).
Figure Panels and Toolbars:
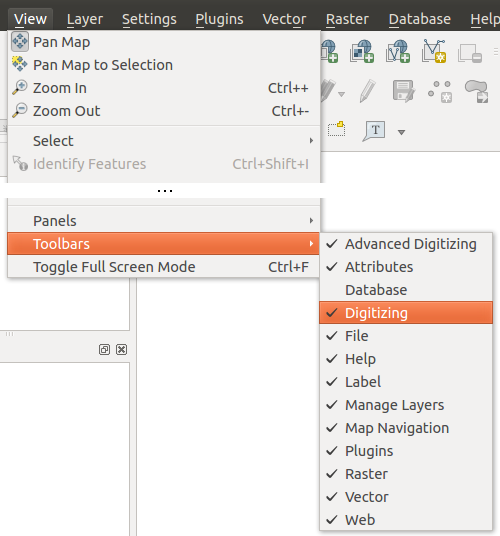
The Panels and Toolbars menu 
Tipp
Die QGIS-Übersicht aktivieren
In QGIS you can use an overview panel that provides a full extent view of layers added to it. It can be selected under the menu View ‣ Panels. Within the view is a rectangle showing the current map extent. This allows you to quickly determine which area of the map you are currently viewing. Note that labels are not rendered to the map overview even if the layers in the map overview have been set up for labeling. If you click and drag the red rectangle in the overview that shows your current extent, the main map view will update accordingly.
Tipp
Protokoll anzeigen lassen
It’s possible to track the QGIS messages. You can activate
 Log Messages in the menu
Settings ‣ Panels and follow the messages
in the General and Plugin tab during loading and operation.
Log Messages in the menu
Settings ‣ Panels and follow the messages
in the General and Plugin tab during loading and operation.
Projekteigenschaften
In the properties window for the project under
Project ‣ Project Properties or  Project ‣ Project Properties you set project specific
options.
These include:
Project ‣ Project Properties you set project specific
options.
These include:
- In the General menu the project title, selection and background color, layer units, precision, and the option to save relative paths to layers can be defined. If the CRS transformation is on you can choose an ellipsoid for distance calculations. You can define the canvas units (only used when CRS transformation is disabled) and the precision of decimal places to use. You also can define a project scale list, that overrides the global predefined scales.
- The CRS menu enables you to choose the Coordinate Reference System for this project, and to enable on-the-fly re-projection of raster and vector layers when displaying layers from a different CRS.
- With the third Identify layers menu you set (or disable) which layers will respond to the identify tool. (See the Map tools paragraph from the Optionen section to enable identifying of multiple layers.)
- The menu Default Styles lets you control how new layers will be drawn when they do not have an existing .qml style defined. You can also set the default transparency level for new layers and whether symbols should have random colours assigned to them.
- The tab OWS Server allows to define information about the QGIS Server WMS and WFS Capabilities, the Extent and the CRS Restrictions.
- The menu Macros is to create a Python module, saved into a project.qgs file to be loaded and have specific functions run on the following project events: openProject(), saveProject() and closeProject().
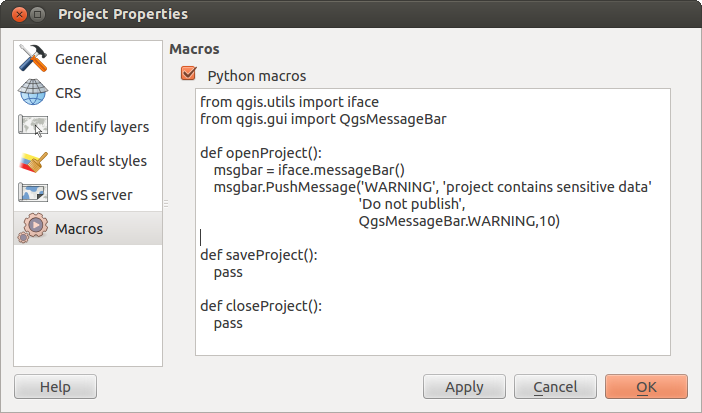
Macro settings in QGIS
Optionen
 Some basic options for QGIS can be selected using the
Options dialog. Select the menu option Settings ‣
Options. The menus where you can optimize your
options are:
Some basic options for QGIS can be selected using the
Options dialog. Select the menu option Settings ‣
Options. The menus where you can optimize your
options are:
General Menu
Application
- Select the Style (QGIS restart required)
 and choose between ‘Oxygen’,’Windows’,’Motif’,’CDE’, ‘Plastique’ and ‘Cleanlux’ ().
 - Define the Icon theme . Currently only ‘default’ is possible.
- Define the Icon size .
- Define the Font. Choose between
 QT default and a user-defined font.
 - Change the Timeout for timed messages or dialogs .
- Splashscreen beim Start nicht anzeigen
- Tipps beim Starten anzeigen
- Bold group box titles
- QGIS-styled group boxes
- Use live-updating color chooser dialog
Project files
- Open project on launch (choose between ‘New’. ‘Most recent’ and ‘Specific’. When choosing ‘Specific’ use the
 to define a project)
 - Create new project from default project. You have the possibility to press on Set current project as default or on Reset default. You can browse through your files and define a directory where you find your user-defined project templates. There will be an entry in Project ‣ New From Template if you first activate Create new project from default project and then save a project in the project templates folder.
- Prompt to save project and data source changes when required
- Warn when opening a project file saved with an older version of |qg|
- Enable macros . This option was created to handle macros which are written to perform an action
on project events. You can chosse between ‘Never’, ‘Ask’, ‘For this session only’ and ‘Always (not recommended)’.
System Menu
Environment
System environment variables can now be viewed and many configured in the Environment menu (see figure_environment_variables). This is useful for platforms, such as Mac, where a GUI application does not necessarily inherit the user’s shell environment. It’s also useful for setting/viewing environment variables for the external tool sets controlled by the processing toolbox, e.g. SAGA, GRASS; and, for turning on debugging output for specific sections of the source code.
- Use custom variables (restart required - include separators).
You can Add and Remove variables.
Current environment variables ‣ are displayed below and it’s possible
to Show only QGIS-specific variables.
Figure System Environment:
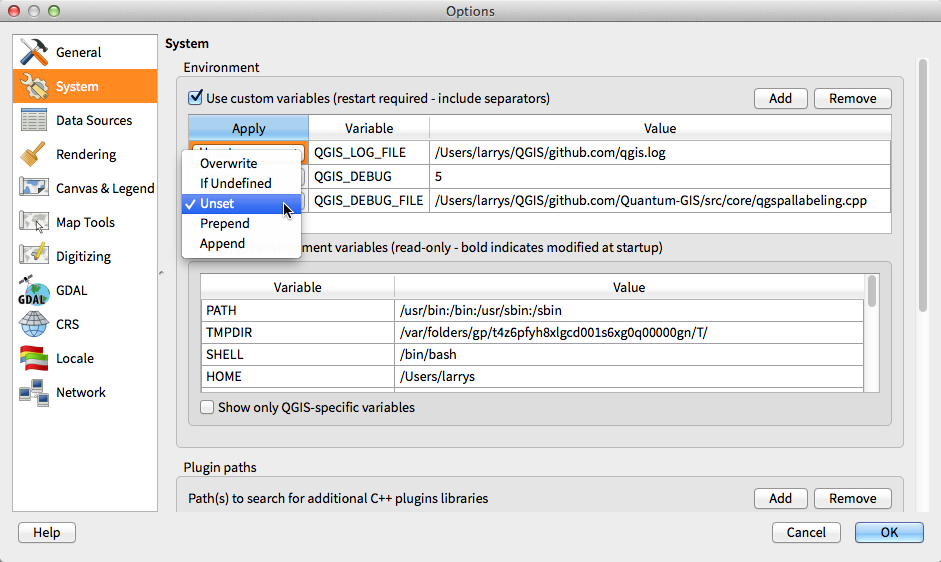
System environment variables in QGIS
Plugin paths
- Add or Remove Path(s) to search for additional C++ plugin libraries
Data Sources Menu
Feature attributes and table
- Open attribute table in a dock window (QGIS restart required)
- Copy geometry in WKT representation from attribute table. When using
 Copy selected rows to clipboard from the Attribute table menu
then this has the result that also the coordinates of points or vertices are copied to the clipboard.
Copy selected rows to clipboard from the Attribute table menu
then this has the result that also the coordinates of points or vertices are copied to the clipboard. - Attribute table behaviour . There are three possibilities: ‘Show all features’,
‘Show selected features’ and ‘Show features visible on map’
- Attribute table row cache . This row cache makes it possible to save the last
loaded x attribute rows so that working with the attribute table will be quicker. The cache will be deleted when closing the attribute table.
- Representation for NULL values Here you can define a value for data fields containing a NULL value.
Data source handling
- Scan for valid items in the browser dock . You can choose between ‘Check extension’ and ‘Check file contents’.
- Scan for contents of compresses files (.zip) in browser dock . ‘No’, ‘Basic scan’ and ‘Full scan’ are possible.
- Prompt for raster sublayers when opening. Some rasters support sublayers - they are called subdatasets in GDAL. An example is netcdf files - if there are many netcdf variables, GDAL sees every variable as a subdataset. The option is to control how to deal with sublayers when a file with sublayers is opened. You have the following choices:
- ‘Always’: always ask (if there are existing sublayers)
- ‘If needed’: ask if layer has no bands, but has sublayers
- ‘Never’: never prompt, will not load anything
- ‘Load all’: never prompt, but load all sublayers
- Ignore shapefile encoding declaration. If a shapefile has encoding information this will be ignored by QGIS.
- Add PostGIS layer with double click and select in extended mode
- Add Oracle layers with double click and select in extended mode
Rendering Menu
Rendering quality
- Linie auf Kosten der Zeichengeschwindigkeit weniger gezackt zeichnen
- Problem mit falsch gefüllten Polygonen beheben
Rasters
- with RGB band selection you can define the number for the Red, Green and Blue band.
Contrast enhancement
- Single band gray . A single band gray can have ‘No stretch’, ‘Stretch to MinMax’, ‘Stretch and Clip to MinMax’ and also ‘Clip to MinMax’
- Multi band color (byte/band) . ‘No stretch’, ‘Stretch to MinMax’, ‘Stretch and Clip to MinMax’ and ‘Clip to MinMax’.
- Multi band color (>byte/band) . ‘No stretch’, ‘Stretch to MinMax’, ‘Stretch and Clip to MinMax’ and ‘Clip to MinMax’.
- Limits (minimum/maximum) . ‘Cumulative pixel count cut’, ‘Minimum/Maximum’, ‘Mean +/- standard deviation’
- Cumulative pixel count cut limits
- Standard deviation multiplier
Debugging
- Show these events in the Log Message panel (under rendering tab): Map canvas refresh
Canvas and Legend Menu
Default map appearance (overridden by project properties)
- Define a Selection color and a Background color.
Layer legend
- Double click action in legend . You can either
‘Open layer properties’ or ‘Open attribute table’ with the double click.
- the following Legend item styles are possible
- Capitalise layer names
- Bold layer names
- Bold group names
- Display classification attribute names
- Create raster icons (may be slow)
- Neue Layer zur gewählten oder aktuellen Gruppe hinzufügen
Map tools Menu
Identify
- Abfrageergebnisse in einem Dock-Fenster (QGIS-Neustart erforderlich)
Die Modus-Einstellung legt fest welche Layer von dem Objekte abfragen-Werkzeug gezeigt werden. In dem Sie auf ‘Von oben nach unten’ oder ‘Von oben nach unten, beim ersten halten’ statt auf ‘Aktueller Layer’ wechseln werden Attribute für alle abfragbaren Layer (siehe Abschnitt Projekteigenschaften unter QGIS Projekte um festzulegen welche Layer abfragbar sind) mit dem Objekte abfragen-Werkzeug angezeigt.
- Objektformular öffnen, wenn ein einzelnes Objekte abgefragt wird
Suchradius für die Objektidentifikation und zur Maptippanzeige einstellen
Measure tool
Definieren Sie Gummibandfarbe für das Meßwerkzeug
Definieren Sie Dezimalstellen
- Basiseinheit beibehalten
- Preferred measurements units (‘meters’ or ‘feet’)`
- Preferred angle units (‘Angle’, ‘Radians’ or ‘Gon’)
Panning and zooming
Definieren Sie Mausradaktion (‘Zoom’, `Zoomen und mittig zentrieren, Zur Mausposition zoomen, Nichts)
Definieren Sie Zoomfaktor für das Mausrad
Predefined scales
Here you find a list of predefined scales. With the ‘+’ and ‘-‘ buttons you can add or remove your individual scales.
Digitizing Menu
Feature creation
- Eingabe der Attributwerte bei der Erstellung neuer Objekte unterdrücken
- Letzte Attributwerteingaben wiederverwenden
- Validate geometries. Editing complex lines/polygons with many nodes can end up with very slow rendering. This is because the default validation procedures in QGIS can use a lot of time. To speed up rendering it is possible to select GEOS geometry validation (starting from GEOS 3.3) or to switch it off. GEOS geometry validation is much faster, but the disadvantage is that only the first geometry problem will be reported.
Rubberband
- Define Rubberband Line width and Line color
Snapping
- Fangoptionsdialog in einem Dockfenster anzeigen (QGIS-Neustart erforderlich)
- Define Default snap mode (‘To vertex’, ‘To segment’,
‘To vertex and segment’, ‘Off’)
- Define Default snapping tolerance in map units or pixels
- Define the Search radius for vertex edits in map units or pixels
Vertex markers
- Markierungen nur für gewählte Objekte anzeigen
- Define vertex Marker style (‘Cross’ (default), ‘Semi
transparent circle’ or ‘None’)
- Define vertex Marker size
Curve offset tool
Die nächsten 3 Optionen beziehen sich auf das  Linie versetzen Werkzeug in Erweiterte Digitalisierung. Durch die verschiedenen Einstellungen ist es möglich die Form des Linienversatzes zu beeinflussen.
Verbindungsstil für Linienversatz
- Quadrant segments for curve offset
Eckengrenze für Linienversatz
CRS Menu
Default CRS for new projects
- Automatically enable ‘on the fly’ reprojection if layers have different CRS
- ‘On-The-Fly’-Reprojektion voreinstellen
- Select a CRS and Always start new projects with this CRS
CRS for new layers
This area allows to define the action, when a new layer is created, or when a layer without CRS is loaded.
- Prompt for CRS
 Use project CRS
- Use default CRS displayed below
Sprache
- System-Locale überschreiben und Stattdessen folgende Spracheinstellungen benutzen
Informationen über die aktive System-Locale
Netzwerk
General
WMS Suchadresse - Standard ist http://geopole.org/wms/search?search=%1&type=rss
- Define Timeout for network requests (ms) - default is 60000
- Define Default expiration period for WMSC/WMTS tiles (hours) - default is 24
Figure Network Tab:
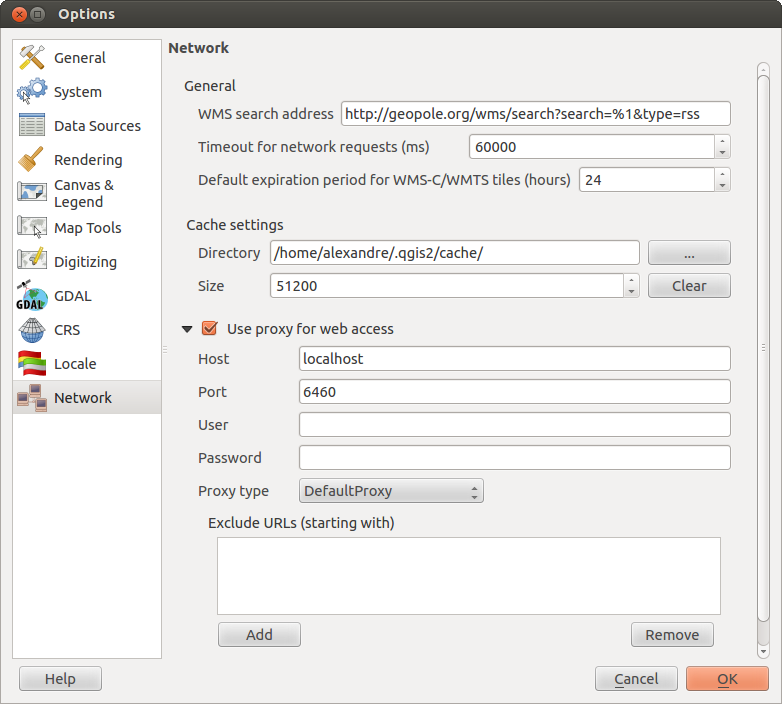
Proxy-settings in QGIS
Cache settings
Define the Directory and a Size for the cache.
- Proxy für Web-Zugriff benutzen und entsprechend ‘Host’, ‘Port’, ‘Benutzer’ und ‘Passwort’ definieren.
Definieren Sie den Proxytyp ‣ entsprechend ihrer Bedürfnisse.
DefaultProxy ‣: Proxy wird auf Grundlage des Proxy der Anwendung festgelegt
Socks5Proxy ‣: Proxy für jede Art von Verbindung. Unterstützt TCP, UDP, Bindung an einen Port (eingehende Verbindungen) und Authentifizierung.
HttpProxy ‣: Umgesetzt mit dem “CONNECT”-Befehl, unterstützt nur ausgehende TCP-Verbindungen und Authentifizierung.
HttpCachingProxy ‣:Umgesetzt mit normalen HTTP-Befehlen, ist nur im Rahmen von HTTP-Anfragen sinnvoll
FtpCachingProxy ‣: Umgesetzt mit FTP-Proxy, ist nur im Rahmen von HTTP-Anfragen sinnvoll
Excluding some URLs can be added to the text box below the proxy-settings (see Figure_Network_Tab).
Wenn Sie weitere Informationen über die verschiedenen Proxyeinstellungen benötigen, schauen Sie bitte im Handbuch der QT-Bibliothek nach unter der http://doc.trolltech.com/4.5/qnetworkproxy.html#ProxyType-enum.
Tipp
Proxy richtig anwenden
Das Verwenden von Proxys kann manchmal schwierig sein. Es ist sinnvoll die oben angesprochenen Proxytypen auszuprobieren, um zu sehen, welcher in dem jeweiligen Fall am besten funktioniert.
You can modify the options according to your needs. Some of the changes may require a restart of QGIS before they will be effective.
- settings are saved in a text file: $HOME/.config/QGIS/qgis.conf
 you can find your settings in: $HOME/Library/Preferences/org.qgis.qgis.plist
- settings are stored in the registry under: HKEY\CURRENT_USER\Software\QGIS\qgis
Anpassung
The customization tool lets you (de)activate almost every element in the QGIS user interface. This can get very useful if you have a lot of plug-ins installed that you never use and that are filling your screen.
Figure Customization 1:
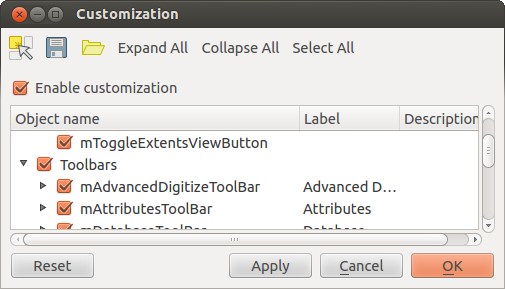
The Customization dialog
QGIS Customization is divided into five groups. In Menus you
can hide entries in the Menu bar. In Panel you
find the panel windows. Panel windows are applications that can be started and used as
a floating, top-level window or embedded to the QGIS main window as a docked widget
(see also Bedienfelder und Werkzeugkästen). In the Status Bar features
like the coordinate information can be deactivated. In Toolbars
you can (de)activate the toolbar icons of QGIS and in Widgets
you can (de)activate dialogs as well as their buttons.
With  Switch to catching widgets in main application
you can click on elements in QGIS you want to be hidden and find the corresponding entry
in Customization (see figure_customization). You can also save your various different
setups for different use cases as well. Before your changes are applied, you need to
restart QGIS.
Switch to catching widgets in main application
you can click on elements in QGIS you want to be hidden and find the corresponding entry
in Customization (see figure_customization). You can also save your various different
setups for different use cases as well. Before your changes are applied, you need to
restart QGIS.