플러그인 작성 및 디버그 작업을 위한 IDE 설정
각각의 프로그래머가 선호하는 통합개발환경(Integrated Development Environment, IDE) 또는 텍스트 편집기는 저마다 다르긴 하지만, QGIS 파이썬 플러그인 작성 및 디버그 작업을 위해 인기 있는 IDE를 설정하는 방법을 몇 가지 추천해보겠습니다.
윈도우 환경의 IDE 설정에 대한 지침
On Linux there is no additional configuration needed to develop plug-ins. But on Windows you need to make sure you that you have the same environment settings and use the same libraries and interpreter as QGIS. The fastest way to do this, is to modify the startup batch file of QGIS.
If you used the OSGeo4W Installer, you can find this under the bin folder
of your OSGoeW install. Look for something like
C:\OSGeo4W\bin\qgis-unstable.bat.
Pyscripter IDE 를 사용하려면, 다음과 같은 작업을 해야 합니다.
Make a copy of qgis-unstable.bat and rename it pyscripter.bat.
편집기에서 해당 파일을 연 다음, QGIS를 시작 시키는 마지막 줄을 삭제하십시오.
Add a line that points to the your Pyscripter executable and add the commandline argument that sets the version of Python to be used (2.7 in the case of QGIS 2.0)
또 Pyscripter가 QGIS에서 사용하는 Python dll 파일을 찾을 수 있는 폴더를 가리키는 인자를 추가하십시오. 이 파일은 OSGeo4W 설치 경로의
bin폴더에 있습니다.@echo off SET OSGEO4W_ROOT=C:\OSGeo4W call "%OSGEO4W_ROOT%"\bin\o4w_env.bat call "%OSGEO4W_ROOT%"\bin\gdal16.bat @echo off path %PATH%;%GISBASE%\bin Start C:\pyscripter\pyscripter.exe --python25 --pythondllpath=C:\OSGeo4W\bin
이제 이 배치 파일을 더블클릭하면 정확한 경로와 함께 Pyscripter를 실행할 것입니다.
More popular that Pyscripter, Eclipse is a common choice among developers. In the following sections, we will be explaining how to configure it for developing and testing plugins. To prepare your environment for using Eclipse in Windows, you should also create a batch file and use it to start Eclipse.
To create that batch file, follow these steps.
- Locate the folder where file:qgis_core.dll resides in. Normally this is
C:OSGeo4Wappsqgisbin, but if you compiled your own QGIS application this is in your build folder inoutput/bin/RelWithDebInfo eclipse.exe실행 파일의 위치를 찾으십시오.다음과 같은 스크립트를 생성한 다음 QGIS 플러그인 개발 시 이 배치 파일을 써서 Eclipse를 실행하십시오.
call "C:\OSGeo4W\bin\o4w_env.bat"
set PATH=%PATH%;C:\path\to\your\qgis_core.dll\parent\folder
C:\path\to\your\eclipse.exe
Eclipse 및 PyDev를 이용한 디버깅
QGIS 준비하기
There is some preparation to be done on QGIS itself. Two plugins are of interest: Remote Debug and Plugin reloader.
- Go to Plugins ‣ Fetch python plugins
- Search for Remote Debug ( at the moment it’s still experimental, so enable experimental plugins under the Options tab in case it does not show up ). Install it.
Plugin reloader 도 검색해서 설치하십시오. 이 플러그인은 QGIS를 종료하고 다시 실행할 필요 없이 플러그인을 다시 불러올 수 있도록 해줍니다.
Eclipse 설정하기
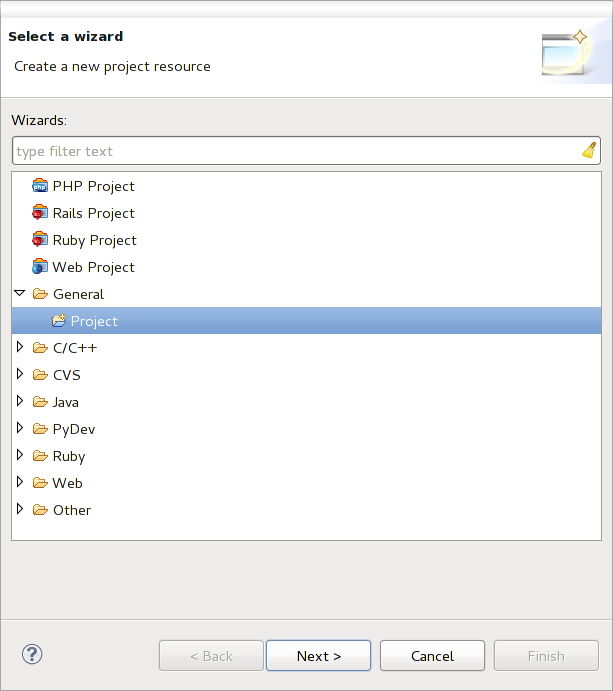
Eclipse에서 새 프로젝트를 생성하십시오. General Project 를 선택한 다음 나중에 여러분의 실제 리소스를 링크할 수 있기 때문에 이 프로젝트를 어디에 저장하든 크게 상관없습니다.

Eclipse 프로젝트
Now right click your new project and choose New ‣ Folder.
Click [Advanced] and choose Link to alternate location (Linked Folder). In case you already have sources you want to debug, choose these, in case you don’t, create a folder as it was already explained
이제 Project Explorer 뷰에 소스 트리가 표출되어 코드 작업을 시작할 수 있습니다. 이미 구문 강조가 되어 있으며 다른 모든 강력한 IDE 도구도 사용할 수 있습니다.
디버거 설정하기
디버거를 실행시키려면 Eclipse를 디버그 퍼스펙티브로 전환하십시오. (Window ‣ Open Perspective ‣ Other ‣ Debug 메뉴)
이제 메뉴에서 PyDev ‣ Start Debug Server 를 선택해서 PyDev 디버그 서버를 실행합니다.
Eclipse is now waiting for a connection from QGIS to its debug server and when QGIS connects to the debug server it will allow it to control the python scripts. That’s exactly what we installed the Remote Debug plugin for. So start QGIS in case you did not already and click the bug symbol .
Now you can set a breakpoint and as soon as the code hits it, execution will stop and you can inspect the current state of your plugin. (The breakpoint is the green dot in the image below, set one by double clicking in the white space left to the line you want the breakpoint to be set)

중단점(breakpoint)
이제 굉장히 흥미로운 디버그 콘솔을 활용할 수 있게 됐습니다. 다음으로 진행하기 전에 플러그인 실행이 중단점에서 멈춰 있는지 확인하세요.
콘솔 뷰(Window ‣ Show view 메뉴)를 여십시오. 그러면 Debug Server 콘솔이 나타나는데 그렇게 흥미로운 녀석은 아닙니다. 다만 여기에 있는 [Open Console] 버튼을 통해 훨씬 흥미로운 PyDev 디버그 콘솔로 변경할 수 있습니다. [Open Console] 옆에 있는 화살표를 클릭한 다음 PyDev Console 을 선택하십시오. 어떤 콘솔을 실행할지 묻는 창이 뜰 겁니다. PyDev Debug Console 을 선택하세요. 해당 항목이 회색으로 꺼져 있고 “Start the debugger and select the valid frame” 이라는 메시지를 표출할 경우, Remote Debugger 를 제대로 설치/실행했는지 그리고 플러그인이 현재 중단점에서 멈춰 있는지 확인하십시오.

PyDev 디버그 콘솔
이제 현재 컨텍스트 안에서 어떤 명령어라도 테스트해볼 수 있는 상호작용 콘솔을 사용할 수 있게 됐습니다. 변수를 조정하거나 API 호출을 만들어보거나 무엇이든 할 수 있습니다.
약간 짜증나는 점이라면 명령어를 입력할 때마다 콘솔이 디버그 서버로 전환된다는 점입니다. 이런 동작을 멈추려면 디버그 서버 페이지에서 Pin Console 버튼을 클릭해서 적어도 현재 디버그 세션 동안은 이 결정을 기억하도록 하면 됩니다.
Eclipse에게 API를 이해시키기
Eclipse가 실제로 QGIS API에 대해 알도록 하는 매우 유용한 기능이 있습니다. 이 기능을 활성화하면 여러분의 코드에 오타가 있는지 확인해볼 수 있습니다. 뿐만 아니라, Eclipse의 도움을 받아 임포트에서 API 호출에 걸쳐 자동완성 기능을 활성화할 수도 있습니다.
이를 위해 Eclipse는 QGIS 라이브러리 파일을 파싱해서 필요한 모든 정보를 얻어옵니다. 여러분이 직접 해야 할 작업은 Eclipse에게 어디서 라이브러리 파일들을 찾을 수 있는지 알려주는 것뿐입니다.
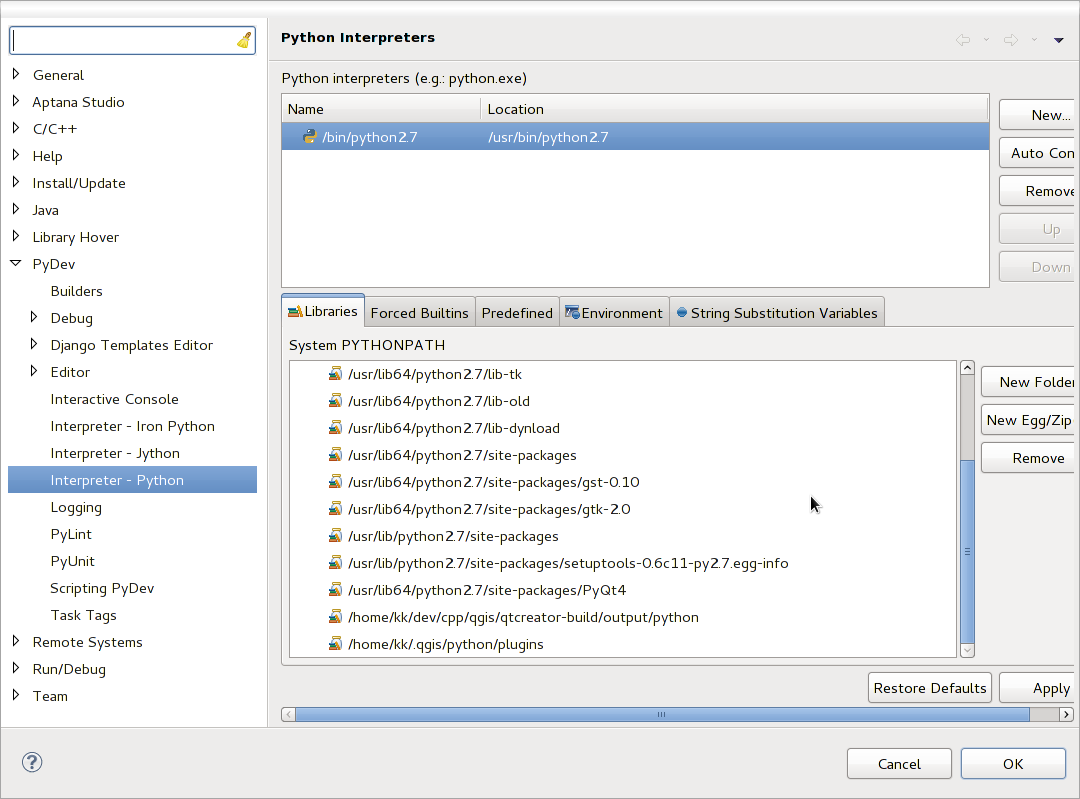
메뉴에서 Window ‣ Preferences ‣ PyDev ‣ Interpreter ‣ Python 을 클릭하십시오.
창의 상단에서 여러분이 설정한 파이썬 인터프리터(현재 QGIS 용 파이썬 2.7 버전)를, 하단에서 탭 몇 개를 볼 수 있습니다. 우리가 주목해야 할 탭은 Libraries 와 Forced Builtins 입니다.

PyDev 디버그 콘솔
먼저 라이브러리 탭을 여십시오. New Folder 버튼을 클릭한 다음 QGIS 설치 경로의 파이썬 폴더를 선택해서 추가하십시오. 이 폴더가 어디에 있는지 모른다면 (플러그인 폴더는 아닙니다) QGIS로 돌아가 파이썬 콘솔을 실행 후, qgis 라고만 입력한 후 엔터를 치십시오. 어떤 QGIS 모듈이 사용되는 지가 그 경로와 함께 표시될 것입니다. 경로의 마지막 부분에서 /qgis/__init__.pyc 스트링을 제거하면 여러분이 찾고 있는 경로가 됩니다.
You should also add your plugins folder here (on Linux it is
~/.qgis/python/plugins).
Next jump to the Forced Builtins tab, click on New... and enter qgis.
This will make Eclipse parse the QGIS API. You probably also want eclipse to
know about the PyQt4 API. Therefore also add PyQt4 as forced builtin. That
should probably already be present in your libraries tab.
OK 를 클릭하면 끝입니다.
Note: every time the QGIS API changes (e.g. if you’re compiling QGIS master and the SIP file changed), you should go back to this page and simply click Apply. This will let Eclipse parse all the libraries again.
Eclipse를 QGIS 플러그인과 같이 동작하게 하는 다른 설정 방법도 있습니다. 이 링크 를 확인해보세요.
PDB를 이용한 디버깅
Eclipse 같은 IDE를 사용하지 않을 경우, 다음과 같은 과정을 거쳐 PDB를 이용해 디버그할 수 있습니다.
먼저 디버그하고자 하는 부분에 다음 코드를 추가하십시오.
# Use pdb for debugging
import pdb
# These lines allow you to set a breakpoint in the app
pyqtRemoveInputHook()
pdb.set_trace()
그 다음 명령어를 통해 QGIS를 실행하십시오.
On Linux do:
$ ./Qgis
On Mac OS X do:
$ /Applications/Qgis.app/Contents/MacOS/Qgis
그러면 응용 프로그램이 여러분이 지정한 중단점에서 멈췄을 때 콘솔에 입력할 수 있습니다!
- TODO:
테스트 작업 정보 추가